
We all have a secret desire to be an artist, sculptor, or woodcarver in some form or another. When we watch movies with incredible sculpting creations, a subconscious ambition to be a sculptor emerges. Many of us have seen the incredible woodcarvers in movies. Many of us, on the other hand, have no idea how they do it.
Carving a face in wood is one of the most visible aspects of sculpting or woodcarving, which is also a challenging and rewarding art form. There are so many different ways to approach carving a face in wood, and we want to explain how to carve a face in wood in a way that is enjoyable and easy to understand. Let’s join with us.
What Is A Face Carving Or Spirit Carving?
Face carving is one of the oldest types of art forms seen in all cultures around the world, dating back to the stone age or earlier. Around 7500 BCE, researchers discovered the Shigir Idol, the first type of wood carving masterpiece in Urals Mountain of Russia, near Yekaterinburg. Though there is debate about the age of this sculpture, it is the oldest wood carving piece in the world.
Sculpting a human or animal face on a block of wood or log is known as face carving. Face carving and spirit carving are the two main styles of wood carving. You can either whittle or use power tools to create such stunning wood carving masterpieces.
In addition, there are various methods and styles of wood carving, including chip carving, relief carving, Scandinavian flat-plane carving, and that’s just the beginning.
The essential methods for cutting the nose, eyes, and mouth, in any case, are something similar for all faces, regardless of whether it’s a part of your carving or whole. You can utilize both soft and hard lumber for sculpting or carving appearances in wood.
Because this is delicate woodwork and fine art, patience is required while carving and learning all of the numerous characteristics and intricacies on your face, particularly when whittling.
Preparing The Wood For Face Carving
The first step of a face carving project is to select the appropriate wood. There are many different types of wood, and it’s crucial to understand each one since the texture and quality of the wood determine how it will respond to wood carving.
Your choice of wood is also determined by your level of experience. If you’re just getting warmed up, go for soft, less expensive woods with a less dense grain.
If you are an experienced woodcarver, on the other hand, it is always best to use harder, sturdier, and more colorful wood for your artwork’s added longevity.
In a later section of this essay, we will go into more depth on the best wood for carving. Now we’ll go over some fundamentals of how to prepare wood for carving.
After you’ve chosen the right kind of wood, follow the steps below:
- If you’re working on a large piece of wood, use a clamp or vice to keep it in a flat position so it doesn’t slide about while you’re working.
- If it’s a small piece of wood, use the clamp to keep it in place while you smooth it. Then, holding it in your hand, carve on it.
- If the wood piece that you will cut is in crude/raw condition, you need to eliminate the bark from it. You can utilize a drawknife to do as such.
- After you’ve peeled the bark, look beneath it for a light white or tan shading layer called as sapwood. Cut the sapwood with an ax as well to expose the main part of the tree for wood carving. (Some wood has an extremely thin sapwood layer. You should be cautious when removing it.)
- Finally, inspect the wood for faults such as lumps, holes, or knots. Your face carving craftsmanship may be marred by holes produced by creepy crawlies or discolored wood. As a result, carefully examine any abnormalities or knocks in a block of wood and organize your work accordingly.
Creating The Layout
Presumably, the most precarious and fundamental piece of face carving is drawing a design. You can do it in numerous ways, by utilizing a PC or drawing your plan utilizing paper and pencil. Whatever the strategy you’re utilizing, draw it definitively to get the exact end-product. Along these lines, it will be simpler if you follow some grid points. Allow me to clarify it exhaustively beneath.
While drawing the human face, artists for the most part follow a proportion of 8×5. That implies you need to take eight units the longitudinal way and five units the horizontal way to draw an ideal face. Be that as it may, this estimation might differ dependent on very long or limited faces.
Now take a piece of paper. Draw an eight inch by five inch rectangular shape. Divide the rectangle into little squares grids every one of one inch. We need to consider every little square of this rectangle is equivalent to the width of an eye to getting an almost live size graph.
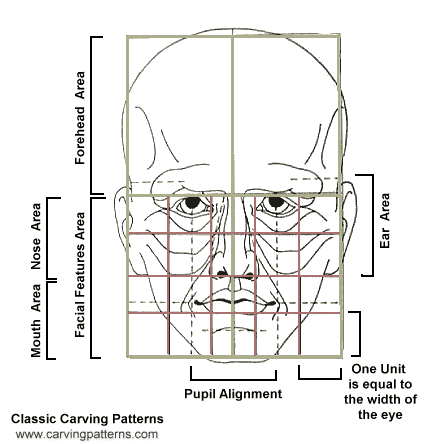
Take a look at the illustration above. Draw a vertical centerline like that, and you’ll have two sections of the face: left and right. Once more divide the rectangle into two equal parts horizontally. For clarity, the upper region is now referred to as the forehead section, while the bottom part is referred to as the facial feature area.
The brow ridge, forehead, and skull of the face will be found in the upper part of the rectangle. The brow ridge area will begin at the bottom of the grid and extend up to one-half of it. The skull area is a large chunk and can be utilized to carve hair or other ornamental works, such as a crown or hat.
The eyes, nose, mouth, and chin, as well as the majority of the ears, will be in the lower section of the rectangle, which is the facial features area.
The nose will be in the center top two units, spread one unit horizontally and two units vertically, according to the diagram. The eyes will be one unit wide and one half unit thick, with a unit serving as a snout between them. The pupils of each eye grid will be situated at the middle point.
With a half-unit gap, the mouth will begin just beneath the nose. It will cover up to two units and will be situated precisely beneath the pupil center lines. The lower lip should be a little thicker than the upper lip, and the corners of the mouth should be curled towards a point two-thirds of the way along with this unit.
Once you get the nose, eyes, and mouth in place, the chin and jaw will fall into place on their own. If you have a beard on your face, you should place them directly beneath the nose. You can simply draw any face this way.
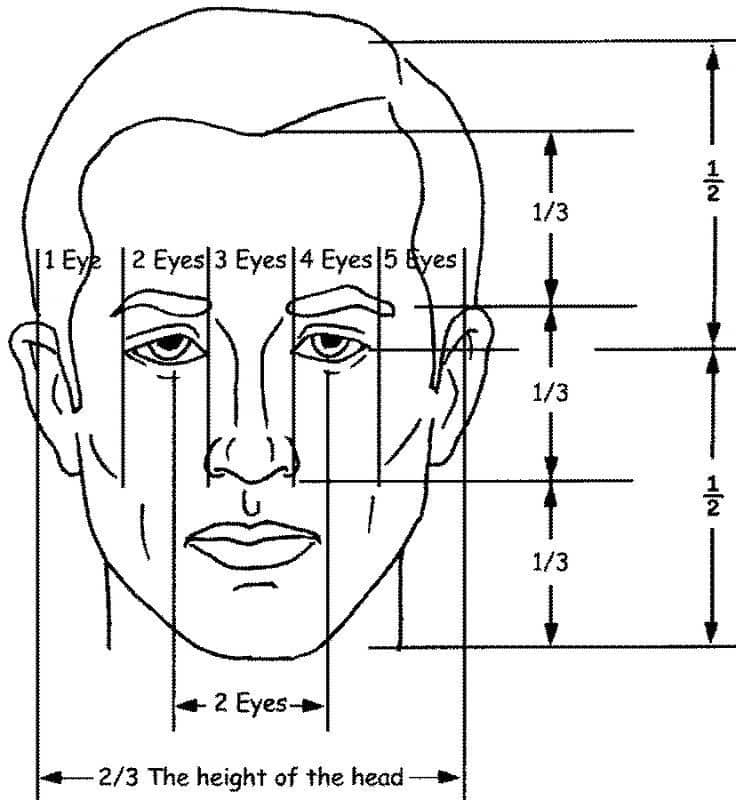
If the process of drawing a layout described above seems onerous, you can use the rule of thirds. According to the rule of thirds, the face is split into three equal portions from the hairline to the chin.
You must first determine the length of your nose. It would start at the tip of the nose and work its way up to the brow. Then you’ll need to take measurements of the bottom of the chin and the hairline.
This method is very similar to the method described above in terms of how a face is measured. The breadth of one eye must be considered as a unit. The breadth of the face must be calculated by adding five units from left to right. The mouth will be two units broad and will be positioned in the lower third of the body.
See the diagram below to get more ideas on this method.
We know how to draw an outline to carve a face in wood. Now, let’s take a look at how to cut those lines to acquire the finished outcome.
Steps Of Carving A Face In Wood
After you’ve completed the drawing on paper, it’s time to turn it into a final product.
To begin, you must first draw the contours on the wooden block or log that you will carve. You can create the outline on your wooden block or log using a marker pen or pencil first. Then start carving with tools like a chisel or knife.
Before starting carving with a knife, you must first determine the center point of the wooden piece and draw a line from the hairline to the chin. Make a few dotted lines over the nose, brow, and hairline from side to side as per the measurement of your paper sketch. This method is also used by many expert carvers. After you’ve drawn all of the lines, you’ll need to draw the face’s details, such as the eyes, brows, nose, mouth, and rest.
Now let’s begin carving out the face of the wood with your carving tools following the steps below:
● At the very begging, make liter v-shaped cuts with a knife to identify the face planes, the nasal bridge, the bottom of the nose, the mouth, and the chin.
[Note: Always begin with a modest v-cut and expand as needed by repeating the process. Also, carve the wood top to bottom or eyebrows to chin. You can use a hammer and chisel instead of a knife if the wooden item is larger.]
● Now begin carving the nose area in detail. For that, make some small diagonal cuts around the nose from the end of the nose bottom notch to up.
● Extend these cuts to about halfway between the centerline and where you intend to start the side of the face. Then, back up to the brow notch, cut diagonally back towards the center of the nose.
● Remove the wood between the nose and the side to detail out the cheek of the face.
[Note: To cut diagonal shapes around the nose, use a carving knife or a v-gauge. To avoid additional cuts, always double-check your initial plan or drawing when carving. You can’t go back to your old position once you’ve chopped deeply. Then, in order to cover the mistakes, further deep cutting will be required, which is always not achievable.]
● After you’ve finished detailing the nose, use a v-gauge to form the mouth and lips. The mouth should be cut along the lines you drew before. It’s worth remembering that the mouth should be one-third of the way between the nose bottom and the chin.
● To make the mouth and lips stand out more, use a carving knife to remove the superfluous wood surrounding them.
[Note: You may even apply a mustache on your face to make it look more creative. To do so, begin cutting from beneath the nose, curve down to the top of the chin, and then return up to meet above the top lip.]
● Smooth out the eye sockets and draw a line around the eyes. Because they are a bit hyper-realistic, it is one of the most difficult parts of the face to carve. In the wood, you won’t find the same round form of eyes and triangular nose as in our original faces.
● Before cutting eye sockets, flatten the area around the nose and brow with a knife if necessary. Then, just below the bridge of the nose, cut the eyes. Make two circles to represent the pupils after carving out the almond-shaped eye.
● It’s time to cut the rest of the features when you’ve finished with the nose, mouth, and eyes. Make sure you’re carving the forehead in such a way that the area sinks back into the wood. You can cut away the surplus wood around the nose using a v-gouge. The cheeks should be lowered back into the eye area.
● Let’s focus on the finer aspects of the face, as per the layout we drew previously. A bench knife or a detail knife can be used for this. Keep in mind that your brow and cheek lines will be inward bending, and your upper eyelids have a gentler slope.
● To make the shape of the head, round off the top edges. Make a gouge in the hair area to help it flow more naturally. You can either make two notches for the ear or may cover it with long hair as per your design.
● Finish with wrinkles, furrows in the brow, and sparrow’s feet as finishing touches. You might draw some little marks around the eyes and meandering lines on the forehead to signify age.
● You don’t need to use sandpaper if you want to retain the wood’s rough appearance, which many artists prefer. Otherwise, smooth off the rough surfaces and remove splinters using 220-grit paper to make it more natural as well as protect your fingers from injury.
When working on the smaller aspects, remember to be extra meticulous. It will be more difficult for you to fix errors than to remove excess wood.
Let’s look at the video below to get a more clear idea.
Best Wood For Carving Spirits And Faces
Wood comes in a variety of species, each with its own set of features, texture, and wood properties. The qualities of the wood play a big role in how it responds to carving.
Face carving, on the other hand, can be done in any sort of wood. As a result, face carving does not necessitate the use of a certain wood.
Let’s look at some specific wood species that are ideal for carving in order to create more sophisticated face wood carving.
Basswood (Tilia americana)
Basswood is also known as American Lime is the most popular wood for face carving especially for beginners. It is a creamy white wood with a soft texture and fine even grain is easy to work. Basswood is also easily available and inexpensive making it ideal for start learning wood carving. It is usually used for carving, turning, low-cost musical instruments, and toy making.
Butternut (Juglans cinerea)
Butternut is also called White Walnut is another good species for wood carving. It is a bit darker than the basswood or aspen, but lighter than the walnut. It has a nice golden brown to radish brown tone, straight grain suitable for an oil finish. It is also lightweight and soft makes it easy to carve for beginners. Butternut is an excellent choice for furniture, high relief carving, and veneering.
Black Walnut (Juglans nigra)
Black walnut is also a popular option for wood carving. It has a nice dark color and straight but medium coarse grain. It’s extremely durable and costly than the basswood, aspen, or butternut. You will need a mallet and chisel to work with it. It will be an excellent choice for relief carving and for furniture carving, turning, and gunstocks.
Aspen (Populus)
Aspen is close to basswood in terms of wood quality and cost. It is a white color wood, lightweight, and readily available. It is hardwood but soft and fun to carve. You can use Dremel, knife, and wood burn to make face or spirit carving in it. It is easy to sand also. You can use 220 for coarse and 400 for fine sanding it.
Birch (Betula)
Birch is a common natural tree found primarily in North America. There are several types of birch, but yellow and white birch are the most used in woodworking.
Birch is a fine-grained, even-textured wood with a pleasant scent and the requisite hardness while remaining soft, making it perfect for wood carving. It is a common choice among woodcarvers since it is inexpensive and frequently available. It’s also a popular choice for furniture, shelving, and crates.
For face carving, you can use Cedar, Apple, or Pine in addition to the above-mentioned wood species. The list isn’t complete yet. You can also use Mahogany, Jelutong, Obeche (also known as Wawa), Sassafras, and other woods. You can also go to this page to learn more about them or see the below video.
Required Tools To Do Face Carving
If you’re a complete newbie, you might not need a lot of tools to get started carving in wood. A carving knife or craft knife will come in helpful if you want to learn how to carve wood or construct some amusing figurines.
If you want to do some expert face or spirit carving, however, you should invest in some basic woodcutting or woodcarving tools. For your convenience, we’ve included a list of basic stuff below.
- Drawknife for raw wood
- Ax for raw wood
- Pencil and A piece of paper
- V-gouge
- U-gouge
- Carving knife
- Hammer and Chisel
- Clamp
- 220-grit sandpaper
- Wood stain or lacquer
- Safety Equipment
Drawknife And An Ax
If you want to start your work with an unfinished wood log, you probably need a drawknife and an ax to separate the sapwood from the main grain. However, if you decide to work with finished or pre-cut wooden pieces, you may avoid buying such tools.
We found Timber Tuff TMB-08DS drawknife is an excellent choice to shave sapwood from raw logs. It comes with a 5mm thick and 8inch long long-lasting straight steel blade. The blade is attached with a wood grip handle at a 30-degree angle for a fast and accurate cut.

If you need to quickly remove wood, scale bark, shape, and trim lumber, an Axe with a claw hammer is a good option. The FITOOL woodcarving Axe, which features a high-strength heat-treated and tempered beveled edge blade connected to a hard wooden handle, is our recommended.

Carving Knife
A carving knife is an essential tool for wood carving, and it should be of the highest quality. For this, we propose the BeaverCraft Cutting Knife, which allows for very smooth carving, whittling, and detailing of any features for face carving.

Gouge
Gouge comes very handy when you want to add extra details to your face carving. It’s preferable to have a set of high-quality gouges rather than just one, which is why we recommend the Schaaf 12 pcs full-size gouges and chisel with a canvas case.

Clamp
Clamps allow you to securely keep the wood piece you’re carving in place. It also helps to protect your hand from injury. As a result, you can add a variety of clamps to your collection. You can use the IRWIN QUICK-GRIP 8 pcs clamps set for this, which is designed to give up to 150psi clamping pressure with a quick-release trigger for easy and quick setup.

Strop And Polishing Thing
You’ll need something to polish sharp objects like a knife, gouge, or drawknife to keep them usable. A leather strop will maintain your cutting objects razor-sharp and make your carving process easier. BeaverCraft offers a beginner-friendly double-sided leather strop with a polishing compound.

Cut Resistance Gloves
Because of the highly sharp edge of carving knives, you may cut your finger while doing face carving, even if you are conscious. Consequently, whether you are a novice or an experienced carver, it is always preferable to use cut resistance gloves to avoid such accidents. You can choose from NoCry cut resistant kitchen and work safety gloves with reinforced fingers, which provide 5 levels of protection, are ambidextrous, food-safe, and machine washable.

Readymade Wooden Block For Practice
What would you think if you had some pre-finished woodblocks delivered to your door? Ha! Amazing! BeaverCraft provides a 10-piece carving block set for your convenience. This collection is available for purchase through Amazon.

Takeaways On How to Carve A Face in Wood
In the preceding article, we attempted to cover some basic steps for carving a face in wood. It won’t turn you become an experienced woodcarver, but we hope it will inspire you to start a small company and bring out your creative side.
Face carving can be a source of income once you get the hang of it. Many individuals nowadays enjoy preserving their favorite memories in a wooden frame, as well as decorating their houses with face-carved woodblocks. Making such sculptures or spirits out of wood is a simple way to make money.
So, let’s enjoy and profit from your innovation.
Tools Mirror is reader-supported. When you shop through retailer links on our site, we may earn an affiliate commission at no cost to you.
Recent Posts
Woodworking is one of the most rewarding hobbies and professions, but it also comes with serious risks if proper precautions are not taken. Whether you're working with a table saw, planer, or simple...
What to Use If You Don't Have a Brad Nailer: Handy Alternatives
You can use a hammer and finishing nails paring with nail set or wood glue if you don't have a Brad Nailer. These tools effectively secure trim and small woodworking projects. So, if you’re in...