To cut a 4×4 with a circular saw, clamp the board tightly and make sure the saw blade is adjusted to the correct depth. Cutting a 4×4 with a circular saw can seem daunting, but with the proper technique and equipment, it can be accomplished quickly and easily.
Using a circular saw is the perfect choice when you need to make accurate, straight cuts in wood. However, it is important to ensure that you have the right blade, the correct depth, and a secure clamping system in place before cutting.
In this article, we will cover the steps required to successfully cut a 4×4 with a circular saw. By following these simple steps, you’ll be able to create precise and clean cuts that will help you complete your woodworking and DIY projects with ease.

Preparing Your Workspace
Safety First!
Before we start having fun, we need to put on our safety gear! That means wearing goggles to protect our eyes and gloves to keep our hands safe.
Gathering Tools And Materials
Let’s gather the necessary tools and materials, like the wood we want to cut, our circular saw, and a sturdy table to work on.
Find the list of tools and materials you will need to cut a 4×4 below:
- Circular saw: Choose the right kind of circular saw according to your cutting needs.
- Clamps: Clamps are needed to secure the 4×4 and prevent it from moving during the cutting process. This ensures precision and safety.
- Safety gear: It’s essential to wear safety gear such as goggles, ear protection, and gloves when operating a circular saw.
- Measuring tape: A measuring tape ensures accuracy when measuring the length of the 4×4 and the size of the cut.
- Pencil: Using a pencil to mark the line of the cut ensures precision and accuracy.
When cutting a 4×4 with a circular saw, it’s important to have the necessary tools and materials for safety and accuracy. Select the right type of circular saw based on your needs, choose the best blade for the job, and have the essential tools and safety gear on hand.
Safety first, remember?
Setting Up Your Circular Saw
Before you start cutting a 4×4 with your circular saw, there are a few key steps to take in order to properly set it up. Here are the important things to consider:
Adjusting Depth
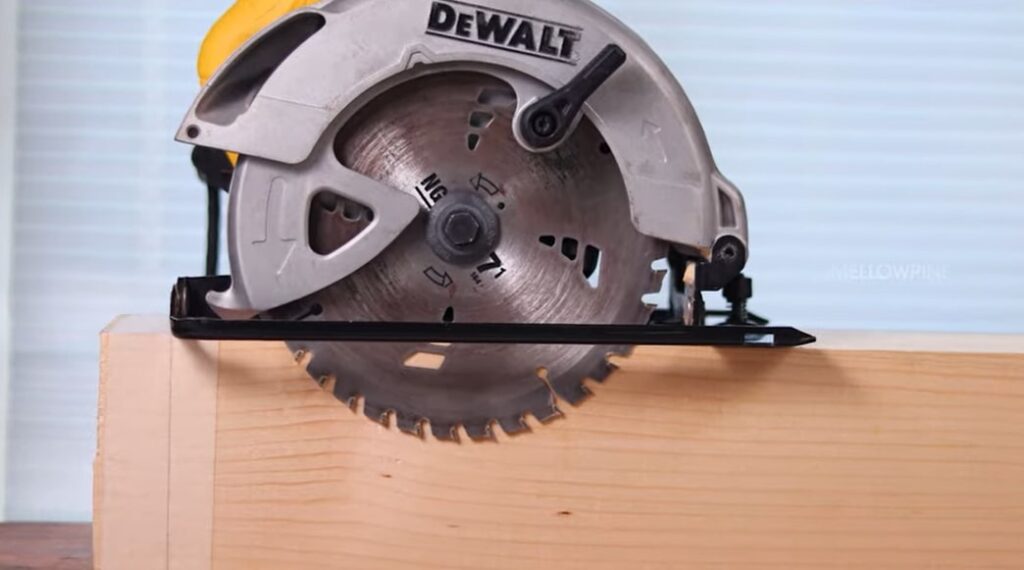
We need to make sure our circular saw is set to the right depth. It’s like setting the right level for a roller coaster ride!
Check the thickness of the board you want to cut, and adjust the depth of the blade accordingly. The blade should be only as deep as it needs to be to cut through the board.

Setting Angle (If Needed)
Another important detail is the angle of the blade. Ensure that it’s set to 90 degrees so that it’s perpendicular to the board. This will ensure a straight and accurate cut.
Sometimes we might need to cut our wood at an angle to make cool shapes. If we want to do that, we have to adjust the circular saw to the angle we like.
Aligning the Saw
When making your cuts, it’s essential to align the saw with the cut-marked area. Here are a few tips for doing this:
- Use a straight edge. Position it against the board in the exact place where you want to make your cut.
- Take the circular saw and place it against the edge of the board, with the saw blade running parallel to the straight edge.
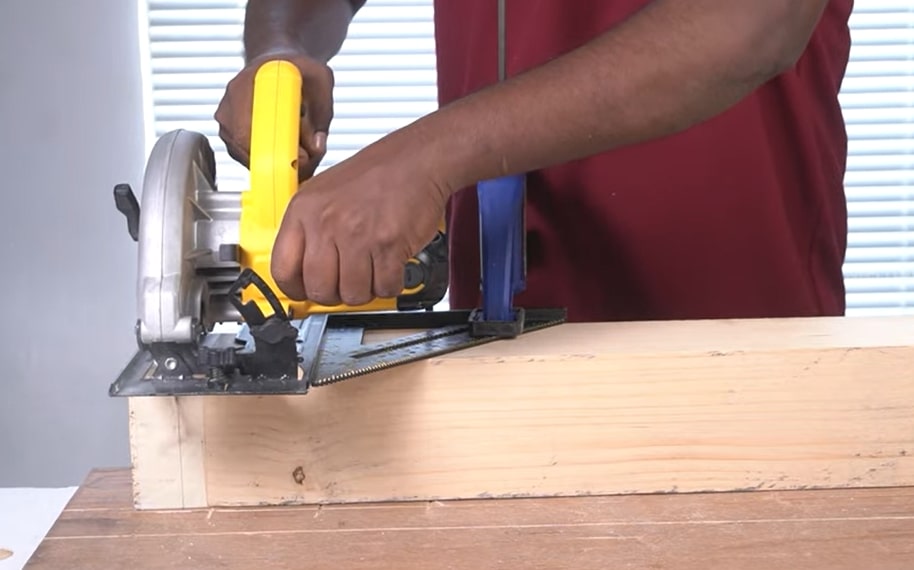
- Once aligned, clamp the straight edge securely in place, as this will give you a guide that will keep the circular saw straight throughout the cut.
- Finally, take your time with the cut to ensure the blade doesn’t deviate from the marked line.
By following these steps, you should be able to properly set up your circular saw and make clean, accurate cuts on your 4×4 board.
Preparing The Cut Materials
Measure and Mark
When it comes to cutting a 4×4 with a circular saw, measuring and marking the cut is one of the most critical steps to ensure accuracy.
Here are a few tips to help you measure and mark the material with precision and avoid costly mistakes:
- Use a reliable measuring tape or ruler to measure the 4×4’s length and width accurately.
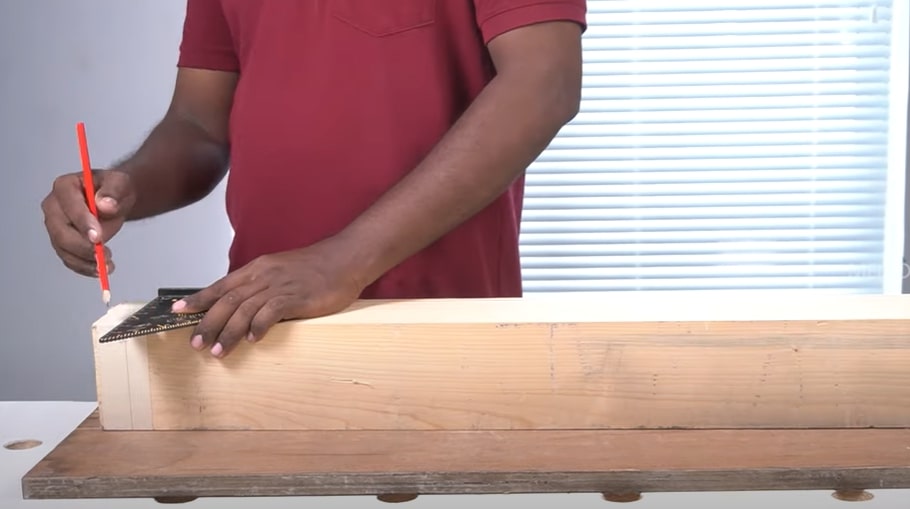
- Once you have determined the length of the cut, use a framing square to draw a straight line along with the wood’s length. This line will act as a guide for the circular saw blade, ensuring a straight cut.
- Double-check your measurements before cutting to avoid any errors that could ruin the piece of wood.
- Mark the measurements using a sharp pencil or chalk to avoid any unwanted deviation from the cut line. It’s also essential to mark each side of the 4×4 if you’re looking to make multiple cuts.
- To make angled cuts, use a combination square or protractor to measure and draw the cut line accurately. It’s important to ensure that the blade is set at the right angle before making the cut.

Secure the Wood
Clamp the 4×4 to a sturdy work surface to prevent it from moving while cutting.
Making the Cut
When it comes to cutting a 4×4 with a circular saw, it is crucial to get it right. Making an incorrect cut can leave you with uneven and jagged edges, rendering the material unusable for your project.
Follow these tips to achieve a clean and straight cut every time.
Stance and Grip
Stand strong like a superhero with your feet shoulder-width apart. Hold onto the circular saw with both hands, and get ready to feel the power!
Guide the Cut
You can use a speed square clamped to the wood as a guide for your circular saw. Align the saw blade with the cut line marked on the 4×4.
Slow and Steady Wins the Race
Now, slowly guide the circular saw along the wood, just like drawing a line with a colorful crayon. Don’t rush; take your time!

Make Multiple Cuts
Since the blade won’t cut all the way through, you’ll need to make multiple passes.
Here are two options:
- Four-Side Cutting: Make a cut on each of the four sides of the 4×4, following the line and using the previous cut notch for reference on subsequent cuts.
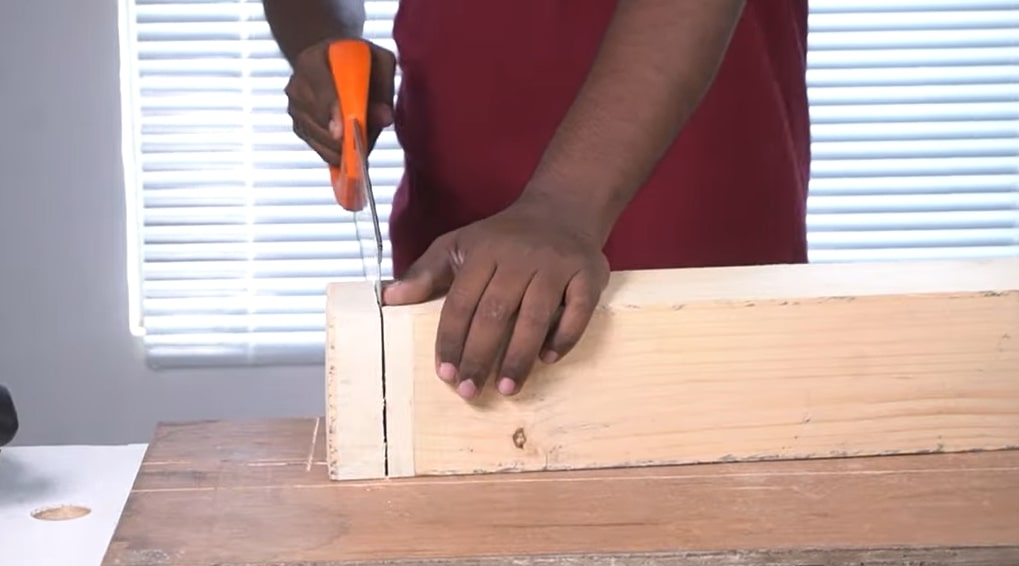
- Three-Side Cut and Assist: Cut three sides with the circular saw as described above. Then, use a handsaw inserted into the kerf (cut notch) to complete the cut on the final side.
Completing the Cut
As you near the end of the cut, slow down the saw’s pace to avoid splintering, fraying, or breaking the remaining segment of the wood.
Once the cut is complete, release the saw’s trigger and wait for the blade to come to a complete stop before lifting the saw from the material.
If there are any rough edges or splinters, they can be removed using sandpaper or a wood file.
After making the circular saw passes on all four sides, there might still be a small section connecting the pieces. Use a handsaw to cut through this remaining section to fully separate the wood.

Finishing Up
Sanding
After cutting, we might have some rough edges. We can use sandpaper to make them smooth, just like polishing a shiny treasure!
Admiring Your Work!
Wow, look at what we’ve made! Take a moment to admire your creation and feel proud of what you’ve accomplished.
Tips For Operating A Circular Saw
Using a circular saw to cut 4x4s safely involves using it according to its instructions. Here are a few tips:
- Read the saw’s manual before using it to familiarize yourself with how it works.
- Ensure that the saw blade is sharp enough and installed correctly. Additionally, make sure you are using the right kind of saw blade.
- Adjust the saw’s base plate depth according to the thickness of the 4×4.
- Hold the saw firmly with both hands while cutting to have better control.
- Do not force-feed the saw through the wood, as this can cause kickback.
- Always turn off the saw and unplug it before making any adjustments to the blade or switching the blade.
Common Safety Mistakes To Avoid
While using a circular saw, there are mistakes you should avoid to ensure your safety. Here are few common safety mistakes to avoid:
- Avoid using a dull or incorrect blade, as it may snag or bind, causing a messy cut and potentially leading to kickback.
- Do not force or push the saw through the material too quickly, as it may cause the blade to deflect and produce an uneven cut.
- Avoid starting the saw with the blade touching the material, as it may catch on the surface and cause kickback. Instead, start the saw with the blade not touching the material, then lower it smoothly.
- Do not remove or disable the blade guard, as it protects your hands from the blade’s spinning motion.
- Do not reach around the saw blade while it’s still spinning, as this can lead to a severe injury.
- Do not operate the saw when distracted, as this increases the possibility of making mistakes.
- Do not cut any material without securing it or clamping it to prevent movement during the cut.
- Never leave the saw unattended while the blade is still spinning.
Following the safety precautions while cutting 4x4s with a circular saw is crucial. Wear the appropriate safety gear, operate the saw correctly, and avoid common mistakes. Stay vigilant while cutting, and always prioritize your safety to prevent accidents from happening.
Troubleshooting
Cutting a 4×4 with a circular saw is a relatively straightforward process. However, certain issues may arise during the task. Here are some tips to troubleshoot some common problems and how to avoid them.
Blade Binding
Blade binding is a common issue faced while cutting a 4×4 with a circular saw. It occurs when the blade gets stuck in the wood due to improper sawing techniques or a blunt blade.
Here are some tips on how to fix blade binding:
- Stop the saw immediately when you detect binding.
- Remove the blade from the saw and check for any damage to the blade or motor.
- Adjust the blade’s cutting depth if it is too high or too low.
- Use a sharp blade to avoid binding in the first place.
- Clear any debris from the blade path and fence.
Kickback
Kickback occurs when the blade binds or when the wood splits, and the saw jerks back towards the user. It is a potentially dangerous situation that can cause injuries if not handled properly.
Here are some tips on how to avoid and fix kickback:
- Always stand to the side of the saw blade, not behind it.
- Use a blade guard to prevent contact with the blade.
- Keep the blade sharp to prevent binding and kickback.
- Use a riving knife to prevent kickback.
- Firmly hold the saw’s handles with both hands and keep a steady grip.
- Never force the saw or push it too hard, as it can lead to kickback.
- In case of kickback, release the saw’s trigger immediately and do not try to stop it with your hands.
By following these tips and tricks, you can troubleshoot any issues that may arise while cutting a 4×4 with a circular saw and ensure a safe and precise cut.
FAQs: How to Cut a 4×4 with Circular Saw?
How Do I Cut a 4×4 With a Circular Saw?
To cut a 4×4 with a circular saw, first mark the cut line, then position the saw blade properly, and finally, make the cut with consistent pressure.
What Type of Blade Should I Use to Cut a 4×4?
Use a diamond-tipped blade or a carbide-tipped blade with a 24-tooth count.
How Can I Ensure the Safety of My Cutting Process?
Wear appropriate safety gear, including eye and ear protection, and gloves. Make sure the saw is unplugged when adjusting it or changing the blade.
Can I Cut a 4×4 With One Pass?
Generally not. Cut halfway through, flip the board, and complete the cut from the other side.
How Do I Keep the Saw From Binding Mid-Cut?
Set the blade depth slightly deeper than the material thickness, make sure the blade is sharp, and keep consistent pressure on the saw.
Can a Novice Perform the 4×4 Cut With A Circular Saw?
Yes, but take it slow. Follow the safety guidelines and best practices, and take the time to practice before making the final cut.
Do You Need Special Training to Use a Circular Saw?
It’s a good idea to learn from someone who knows how to use it safely, like a parent or teacher.
Conclusion
So, are you ready to unleash your inner carpenter and create awesome wooden wonders? Grab your circular saw, put on your safety gear, and let’s get building! Remember, practice makes perfect, so don’t be afraid to make mistakes along the way. Happy sawing!
Recent Posts
Woodworking in 2025 is all about efficiency, precision, and smart technology. Whether you're a beginner or a seasoned craftsman, having the right tools can make all the difference. Here are the top 7...
Ever tried drilling into a piece of wood only to end up with a splintered mess or a wobbly hole? Yeah, it's more common than you think. Wood might seem like an easy material to work with, but...

