
Connecting baseboards at the lower part of the divider turned into a famous and non-missing piece of home improvement since the early 1800s. Notwithstanding, individuals saw that baseboards left a minor yet noticeable gap between the floor and wall. It is a direct result of the uneven surface of floor covers.
To limit this hole, individuals accompanied an answer and at the end of the 1800s, they began to utilize shoe trim or quarter round molding. Also, still, ongoing days utilizing quarter round embellishment isn’t become antedated.
Okay, you’ve understood the advantages of using quarter round and have decided to use it to fill in the gaps between the baseboard and the floor surface. Then this is an excellent decision because it is a generally low-cost and modest method for renovating your property. Before you begin, there are a few things to consider.
Whatever the things or information you want to introduce quarter round molding, we will attempt to cover every one of them here. Along these lines, remain tuned with us.
What Is Quarter Round Molding?
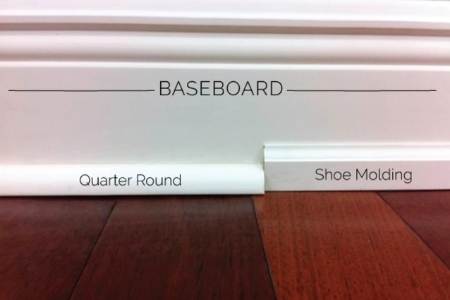
Quarter round is a decorative trim with a round edge implanted where the baseboard meets the floor. It is best used under raised baseboard or on an area where your flooring meets the walls.
It is made up of thin strips of wood that are sold in a variety of widths and thicknesses. The most commonly used is ¾ inch, but it is also available in ½ inch and 1-inch thickness. The thickness is a matter of preference, as it will determine the level of rigidity the molding provides. The thinner the molding, the less rigid it is, but the more it will “float” against the wall, creating a nice illusion of the floor and baseboard trim at dimension and depth.
When viewed from the end, quarter-round appears to be one-quarter of a full circle, which is how it got its name. It produces a flawless ninety-degree angle on the backside, with a smooth quarter radius on the front. It’s ideal for filling corners and softening any 90-degree connection between trim and moldings.
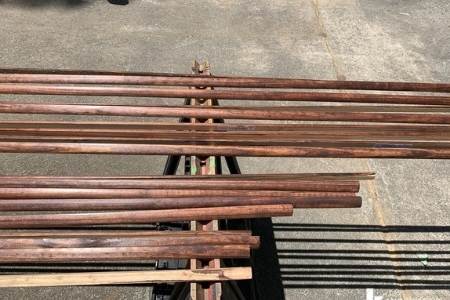
A long, flexible piece of wood, such as oak, pine, or hemlock, is used to make quarter rounds. Quarter-round trim constructed of MDF is also available. They’re all rip-cut from a long dowel and then finished to the specifications. Many tradesmen use a nail gun and compressor to secure quarter-round.
Are The Quarter-Round And Shoe Molding Same?
Both quarter round and shoe molding are intended to improve a home’s appearance and decor by covering the space between the baseboards and the floor caused by uneven floor tiles. They’re utilized in the same way and have a similar appearance when they’ve been installed. Their purposes and styles, however, differ.
Shoe molding, often known as “base shoe,” is a curved or circular trim that resembles quarter round. It is normally constructed up of a narrow strip of molding that is painted or finished to match the floor tiles and fits into the right angle created by the floor and baseboard.
While quarter-round is one-fourth of a round trip, with both feet facing the same width, shoe molding is somewhat taller and narrower, giving the trim a more finished appearance as it looks to embrace the baseboard. Shoe molding allows the floor installer or trims carpenter more flexibility, and the sleeker appearance makes it more preferable than its alternative. If you want to learn more details on quarter round vs shoe molding, you may visit this page.
What Are The Uses Of Quarter-Round Or Shoe Moldings
Quarter round is a popular product that’s used in many areas of the home. It’s a type of decorative veneer that’s installed on ceilings, walls, and floors to create an illusion of dimension and depth. However, they are mostly used to disguise slight gaps between the baseboard and floor tiles. They also contribute to the beauty of room décor by being joined at the bottom of baseboards.
Instead of lengthy quarter-round or shoe moldings, you can use scarf joints to cover a long wall with short pieces, but you won’t get the same smooth effect. Long, highly flexible, and easy to bend shoe and quarter-round moldings conform to the floor shape simply.
In addition to being used with baseboards, shoe moldings are also used in cabinets and countertops to cover gaps between transitions and provide a more appealing and finished appearance.
The downside of the shoe or quarter round is that they’re a bit expensive, and it can be challenging to install. Whatever, we’ll explain the process in an easy way in this blog post for your convenience.
How to Install Quarter Round Or Shoe Molding
We learned what a quarter or shoe molding is and how to utilize it. It’s now time to figure out how to place quarter round molding in your home.
We’ll explain you how to install quarter round to fill in gaps between your baseboard and flooring. The approach described in this article will be a combination of tools and supplies available at most home improvement stores and certain specialist stores.
I’ll break down the procedure into three parts (using a nail gun, not using a nail gun, and solely using glue) and make some predictions about how your method will turn out.
Let’s start.
How To Install Quarter Round With A Nail Gun
We must first complete some essential tasks whatever way we use to install quarter round. For example, we’ve to measure the room’s length where we’ll install quarter rounds, buy them by matching with the baseboards or floor tiles, then polish or paint and stain them, etc.
So, before we get into the installation process, let’s go over the prep work.
Purchasing Quarter Round According to Measurement
With a tape measure, calculate the length of room walls along the way of the bottom. You should collect as many measurements as possible because various rooms require varying lengths of molding. It’ll be easier if you sketch a diagram of your rooms and write down the sizes.
After you’ve completed your measurements, you’ll need to choose your molding materials. Consider the materials of your baseboard and flooring while you’re at it. It will look more professional if you use the same trim materials as you did for the flooring.
You will usually find 6 to 12 feet long quarter-round moldings at the store corners. It is always better if you choose longer trim pieces to avoid any joint. Using a single trim piece instead of a combination to mount in a wall will give you enough room for expansion or shrinkage due to weather changes.
Painting The Quarter Round
Quarter rounds are available in both pre-finished and unfinished forms. If you choose an unfinished quarter round, staining it before installing it is recommended. Because it’s tough to paint or stain quarter rounds after they’ve been nailed. Once you’ve finished nailing, you’ll still need to do some finishing work, but it’ll only take a few strokes of the brush.
To paint quarter rounds, first clean them with a tack cloth to remove dirt and debris, then sand them to make them smooth. After sanding carefully, remove the sawdust. Now stain or paint the area as desired. Wiping on the stain with a rag is frequently the easiest way for such little moldings.
There is some primed quarter round also available which are mainly white. They’ll give you flexibility to add any color to it. As a result, you may add a little touch of paint on it as per your desire before installing.
Things You’ll Need To Install Quarter Round
- Quarter round or shoe molding
- Tape measure
- Pencil
- A power miter saw or handsaw and miter box
- Brad nailer or finish nailer
- Finish nails/Brads (1-1/4 to 2 inches long)
- Cop saw and cop joints
- Wood paint and putty (if not prefinished)
Steps Of Installation Quarter Round With Nail Gun
Now follow the steps below to put the trims in place.
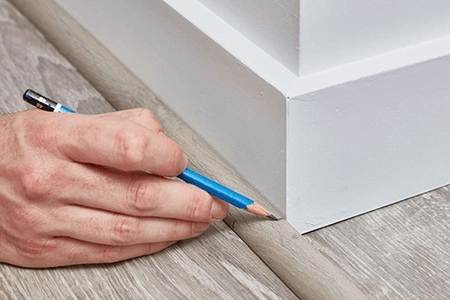
1. Measure And Mark The Trim Pieces
To avoid any mistakes, it is advisable to measure and cut a single piece at a time rather than an entire batch of trims. You should also be quite exact when measuring.
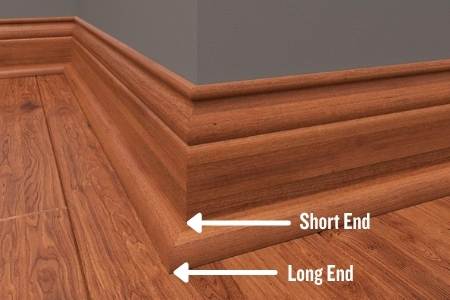
Angle measuring is a bit of a challenge. If you want to put a trim around a post or a wall arch, you’ll need to arrange the molding across the wall and use a pencil to mark the ends of the molding at the wall intersection. You’ll need to mark the short end of the molding to cut it at 45 degrees for the outer corner. That implies the molding’s long edge will be upright against the wall or baseboard.
Conversely, when you will need to put molding in an inside corner of a room, you need to mark the long end of the molding.
2. Miter Cut The Molding
You’ll need to cut a single piece at a time, just like you measured a single piece of molding at a time. To cut at a 45° angle, use a miter saw or hacksaw with a miter box. Place the molding on the miter box or saw base with the blade just touching the pencil mark’s outer edge. Cut the first quarter round piece.
After cutting the first piece of trim, reverse the miter saw blade and position it on the 45° base. The second piece of trim is then mitered cut.
When miter cutting your molding pieces, always mind the proverb “measure twice, cut once.”
You can also cope cut the end of your molding with a coping saw in the case of the inner corner. However, making a 45° angle at the end of the trim requires considerable skill.
3. Dry Fit Both The Pieces
When installing corner moldings, don’t nail down the first one until the second one is confirmed. Place the first piece against the wall, verify the size, and make sure it fits well. Then place the second cut piece of trim in place and double-check everything. You can re-cut the pieces if there is a disagreement at this point.
4. Mark The Quarter Round For Nailing
Though it is a tiresome task, marking the areas on the quarter round before nailing it would help.
Use a pencil to mark the nailing spots in the quarter round at a 12-inch (30-centimeter) distance from the edge. Make a mark in the center of the molding’s breadth. It will assist you in nailing the quarter round in an even and clean manner.
5. Nail The First Two Pieces
After you’ve placed both cut pieces of trim in a corner and determined that they’re perfect, you can use a nail gun to secure them. A nail gun can help you to complete the job in less time than other methods. Expert trim carpenters or woodworkers like to use a brad nailer or finish nail gun to install quarter round or shoe molding.
Because the quarter round is a relatively thin piece of wood, usually 3/4 inches wide, I prefer to use a brad nailer. Brad nailers are made to drive 18 gauge nails or brads, which are very thin and typically headless. So they are the most suitable option to join shoe or quarter round moldings without splitting them.
Perform a test on scrap trim and waste board before using the brad nailer to determine the proper depth of drive. After you’ve achieved the appropriate depth of drive, keep the nailer near-horizontal but inclined slightly downward. Keep the trim near the floor and baseboard while firing the nail gun for a precise seal or finish.
6. Continue Around The Room
Repeat the preceding processes for the entire room, including measuring, cutting, and nailing trim pieces. However, always do it one at a time.
7. Create A Return Piece
A quarter round can sometimes reach a point where it can’t be continued because no more trim has been added. In this scenario, cutting a returning piece and inserting the dead-end will improve the appearance.
At a 45° angle, cut the terminus of the last piece of quarter round. The return piece should likewise be cut at a 45° angle on one side before being joined to the long piece.
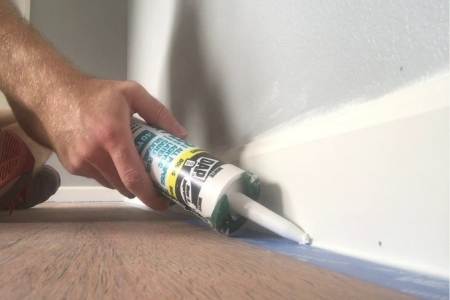
8. Caulk And Touch Up Paint
Hide the head marks left by the finished nails or brads with wood putty or caulk. If there are any protruding nail heads, you should inspect those as well. If there are any, use a nail set and hammer to fix them before adding putty.
To finish the job, touch up with paint or stain. If there is a gap between the baseboard and the quarter round, fill it with putty or caulk as needed.
How To Install Quarter Round Without A Nail Gun
You can install quarter rounds without using any nail gun too. For that, there are two methods. Let’s explain them below:
Method – 1: How To Install Quarter Round Without A Nail Gun by Using A Hammer
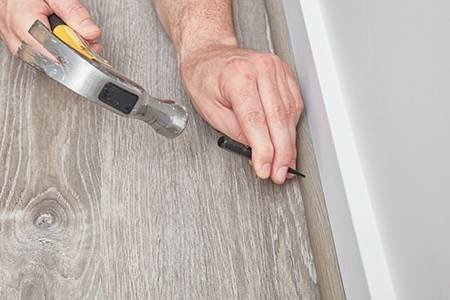
Installing quarter round or shoe molding without using a nail gun is a simple procedure. To nail down the quarter round, you’ll need a nail set and a hammer. A nail set is a metal pencil-like tool that allows you to pound the protruding nail head into the molding deeply.
However, you must use caution when hammering the nail head. Because if you hit the molding straight with the hammer, it may be destroyed.
In this method, you must follow the exact measuring, cutting, and finishing procedures as in shown above.
Let’s go over the rest of the steps in order:
1. Mop The Dirt And Debris
Remove any dirt or debris from the area where the molding will be installed. Mopping up trash will assist you in creating an even surface for quarter-round placement.
2. Place The Molding Against The Baseboard
Place the quarter round against the wall after measuring and cutting it. Make sure they’re flush against the baseboard or corner while mounting them.
3. Hammar The Nail
Because quarter rounds are made up of thin strips of wood, it’s better to use finish nails that are 1-1/4 to 2 inches long to avoid splitting the trim. Point the finish nail toward the middle of the molding while fixing. The first nail should be spaced about 2 inches apart from the quarter round’s edge. To make hammering easier, hold the nail in the molding slightly inclined towards the floor (approximately a 45-degree angle with the floor).
When hammering, use a few hard and solid strokes rather than a lot of little strokes to avoid damaging the molding. Also, make sure you hammer the trim against the baseboard rather than the floor.
When the nail protrudes about 1/8 inches from the molding, stop hammering.
4. Drive The Nail With A Nail Set
Now it is time to deep drive the jut nail with your nail set. Nail sets come in a variety of sizes; choose one with a tip that is less than the size of the nail head.
To drive the nail the rest of the way into the baseboard, gently tap the tip of the nail set top with a hammer. This section is a little tricky for a beginner. However, if you practice it a few times on scrap molding, you will quickly become accustomed to it.
You’re done when you’ve pushed the nail just near the baseboard’s ground. Continue driving nails about 18 inches or two feet apart throughout the width of your quarter round or shoe molding.
5. Apply Putty Or Sealant To Hide The Head Mark
For a smooth appearance, we can use wood putty or other basic sealants to hide the head mark left by nails and the gap between the molding and the baseboard or wall.
We can use a sealant applicator, but the finger is the ideal tool for the job. We might also remove access putty or caulk with a cloth.
6. Finish The Installation
After applying putty, use a paint brush to apply a finishing touch to hide any putty and nail marks. Follow the steps above to finish the quarter round or shoe molding installation for the entire house.
Method – 2: How To Install Quarter Round Without A Nail Gun by Using Glue
If you don’t want to bother with nails or nail guns for any reason, you can attach quarter rounds with glue or caulk instead.
While using adhesive or caulk to install quarter rounds is a straightforward technique, it does have some drawbacks.
First, if the quarter round is pre-painted, the glue or adhesive may not adhere properly to it.
Second, if you don’t apply the glue properly, you can end up with a messed-up floor. Furthermore, removing excess adhesive is a time-consuming task.
Finally and most importantly, if you use adhesive to adhere the quarter rounds, they will be tough to dislodge in the future if you need to do any renovation work.
As previously stated, using glue for this function does not necessitate any difficult processes.
When you know the steps, you’ll believe it:
Step 1: Sweeping the Area is the first step. If you’re going to use an adhesive, especially glue, make sure the area is clean first. It won’t stick perfectly if you don’t do it this way.
Step 2: Measure the length of the wall and cut the quarter round one by one, following the technique outlined above for installing quarter round with a nail gun.
Step 3: Using medium grit sandpaper, scuff the side of the quarter round where it will adhere to the baseboard. Scuff up the baseboard as well. For better adhesion between the baseboard and quarter round, use at least 5 strokes for each scuffing session.
Step 4: On the sanded side of the quarter-round molding, apply two thin beads of liquid floor adhesive. Align the molding with the baseboard and firmly press it into place. To allow the materials to bond, leave the quarter round in place for about a minute.
Step 5: Clean the adhesive that spilled out from the quarter round. You can use a clean rag to do so.
Repeat the above steps to complete the rest of the project.
FAQs On Installing Quarter Round Molding
Q1: Should You Glue Or Nail Quarter Round Molding?
The quarter round should be able to withstand the pressure of furniture legs and feet. As a result, I believe that nailing quarter round rather than gluing it is the superior option. Because nailed quarter rounds outlast glued quarter rounds in terms of durability and longevity.
Furthermore, low-quality adhesives might cause the molding to chip around the wall’s corners. It will also be difficult to remove the quarter round from the baseboard once it has been bonded. As a result, it will cause you problems if you need to undertake any renovation work.
Q2: Brad Nailer Vs Finish Nailer, Which One Is More Appropriate For The Installation Of Quarter Round?
Because quarter round moldings are typically made of thin, delicate wood, employing larger gauge nails can easily split them. Also, nails with a larger head may leave a noticeable hole that does not look good. Given the foregoing, it appears that a brad nailer, rather than a finish nailer, should be used to install quarter round.
To discover more about the differences between the two, see our article on brad nailer vs finish nailer.
Q3: Should You Caulk Around Quarter Round Molding?
Caulking isn’t mandatory when installing quarter round molding, but it does help to give the quarter rounds a clean finish. Where there are obvious thin lines or gaps between the quarter round and the baseboard, caulk should be used. Additionally, caulk contains adhesive; it enhances the binding between the board and the quarter rounds, resulting in a more robust installation.
Q4: What Size Brad Nails For A Quarter Round?
In general, an 18-ga and 1-1/4″ or 1-1/2″ finishing nails or brads should suffice; they’re thin enough not to break the quarter-rounds and penetrate deep enough to anchor the molding effectively.
Q5: How Far Apart Do You Put Nails In Quarter Round?
If you’re using 3/4 quarter round molding, space the nails no more than 18 inches apart. Set nails closer together if there are any irregularities in the floor or if the quarter round does not lay flat naturally. Use brad nails that are at least 1-1/4″ long and can penetrate the base wall by 1/2″ for stronger binding.
Best Nail Gun For Quarter Round – Our Top Picks
Quarter round or shoe molding installation is a careful and creative task. If you opt to nail them down, you should use a power nail gun because it will provide you with more speed and precision. Once you’ve decided to utilize a nail gun, the next step is to choose the right type.
We may have got some thoughts about it from the initial conversation. The quarter round nail gun should be able to drive nails through thin and delicate trimmings. It won’t split the trim or make holes in the quarter. Despite having a small head, it will be able to give sufficient gripping power.
Considering all of the criteria, a brad nailer with 18 gauge nails will suffice.
Let’s look at our top picks, which are listed below.
1. WEN 61721 – Best Bang For The Buck
If you plan to perform the quarter-round installation yourself, you’ll want to invest in a nail gun that’s both affordable and durable. WEN 61721 will be the best match in this case.
It has an easy-to-use feature that allows you to drive 18 gauge 3/8 to 2 inch long brads into any wood moldings. While actuating brads, the WEN 61721 uses relatively little air (0.028 CFM @ 88 pressure per nail). And the tool-less depth change wheel is a great addition for nailing quarter round or shoe moldings because it’s simple to rotate.

Key Features Of WEN 61721 Brad Nailer:
Lightweight Body – It weighs only 2.7 pounds, making it easy to maneuver all day without fatigue.
Hassle-Free Nose Latch – allows you to open the nose quickly during jam clearing.
Adjustable Exhaust Port – provide you the disturbance-free nailing by directing the expelled air away from your face.
Spring Loaded Magazine – makes nail reloading a breeze and holds up to 106 nails for minimal downtime.
Rubber Grip Handle – give you a secure and comfortable nailing experience.
Nail Reload Indicator – It consists of a nail gauge in its magazine to assist you in determining the reload time and prevent dry firing.
Well-Finished – It has a powder-coated finish that protects it from everyday wear and tear.
Warranty – WEN offers a comprehensive 2 years of warranty and good customer support.
- Supper Affordable
- Powerful and reliable
- Simple-to-use and maintain
- Having some jam issue
- Leaking air with included NPT valve
2. DEWALT DWFP12231 – Best Pneumatic Nail Gun For Quarter Round
If you want to install quarter round like an expert, the Dewalt DWFP12231 is the tool for you.
This 18 Gauge pneumatic brad nailer can drive 18 gauge brad nails from 5/8″ to 2″ in length, making it suitable for quarter round molding, casing, kitchen crown, and shoe molding installation. The DWFP12231 is ready to handle a wide range of woodworks with its long-life, maintenance-free motor.

Key Features Of Dewalt DWFP12231
Tool-Free Depth Of Drive Adjustment – This will assist you in rapidly determining your desired depth of drive. Its detents mechanism also allows you to place the nail head precisely.
Sequential Style Trigger – allows you to drive nails securely and precisely every time.
Tool-Free Jam Release Mechanism – allows you to remove any jammed nail quickly without the need for any extra tools.
Rear Exhaust Port – direct the expelled air and other contaminants away from the user.
Non-Marring Nose Tip – It has a non-marring nose tip that protects quarter rounds and other delicate moldings from damage during nailing. It is simple to disassemble and store on the tool when not used.
Rubber Grip – It has an integrated rubber grip to ensure comfort during long day use with a secure grip.
Sturdy And Lightweight Body – Its body is made of magnesium metal which makes it both durable and lightweight for easy maneuver and long-lasting performance.
Warranty – Dewalt offers 3 years of industry best warranty for its DWFP12233 brad nailer.
- Sturdy and long-lasting
- Easy to use
- Comfortable
The trigger may malfunction.
3. PORTER CABLE 18GA BRAD NAILER – Best Cordless Nail Gun For Quarter Round
If tangling the hose and air compressor is a pain, the Porter-Cable PCC790LA, the best nail gun for quarter round that runs on battery alone, will be a wise choice for you.
You will get consistent firing power from this PCC790LA brad nailer thanks to its innovative engine design. As a result, it will be simple to drive nails into a variety of materials, such as quarter round or shoe molding. It will also give you the flexibility to operate in a broad climate condition.

Key Features Of Porter Cable 18ga Brad Nailer
Long Operational Time – Its 20v li-ion battery will give you a longer run time to drive up to 1300 nails per charge.
Cut Extension Cords – Because it is cordless, it does not require a hose, an air compressor, or even pricey gas cartridges.
Tool-Free Settings – It has a stall release lever for swiftly opening the latch and clearing the jammed nails, as well as a depth-changing wheel to establish the desired depth of drive on the go.
Multi-Functional Dual LED – helps to eliminate workspace darkness while also showing mistakes.
Well-Balanced Design – You’ll find a fantastic blend of a lightweight body and an appropriate center of gravity, allowing you to use it comfortably in any posture.
Warranty – A good product comes with a complete warranty, and a reputable company like Porter-Cable backs up its PCC790LA brad nailer with a three-year warranty.
- Cordless - no compressor or gas cartridges needed
- Well balanced and easy to use
- Comfortable
It has no window to check the number of remaining nails.
If you want to explore more options of brad nailer, you may check our list and reviews of the 10 best brad nailers by clicking here.
Wrapping It Up
Quarter round molding installation is a little tricky but not difficult, and it may be done with or without the assistance of a nail gun. Nailing, on the other hand, is a faster and easier approach to secure molding, and it lasts longer than glue. In the preceding part, we tried to cover every last detail on how to install quarter round with a nail gun, without a nail gun using a hammer, and with adhesive. I hope it proves to be useful.
Prime, sand, and paint the existing baseboard before installing quarter round molding. Install the quarter round after the paint has dried. The floorboards will appear clean and glossy as a result of this.
Recent Posts
Woodworking is one of the most rewarding hobbies and professions, but it also comes with serious risks if proper precautions are not taken. Whether you're working with a table saw, planer, or simple...
What to Use If You Don't Have a Brad Nailer: Handy Alternatives
You can use a hammer and finishing nails paring with nail set or wood glue if you don't have a Brad Nailer. These tools effectively secure trim and small woodworking projects. So, if you’re in...