
After you’ve learned the basics about framing, you may feel prepared to tackle more substantial projects. But have you ever wondered just how toenailing works?
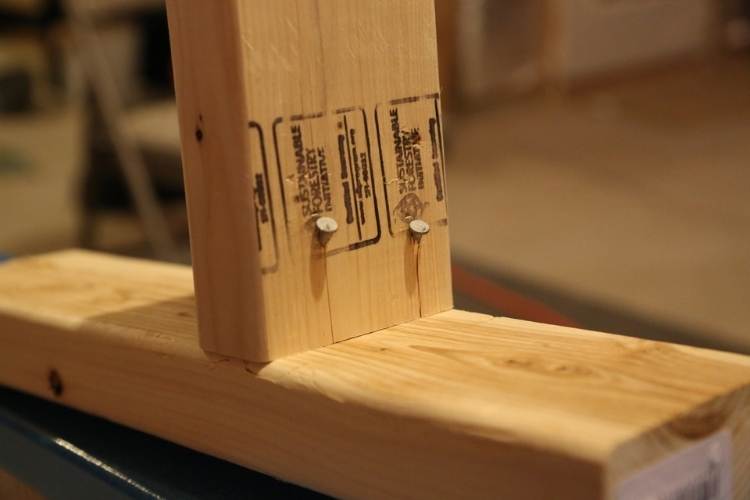
Toenailing is the process of driving a nail at an angle through a standing stud into a baseboard to secure it.
Sure, you could use a hammer to do toenailing, but you’ll have to keep holding the hammer with one hand and the nail to the frame with another, which may put your finger at risk.
Another option is to use a framing nailer, which will allow you to position the nail with a simple push of a button.
Want to know how to toenail with a framing nailer correctly? Here is a quick and easy tutorial that will show you how to get the job done and have a great looking toenails at the same time.
What Is Toenailing?
Toenailing or skew-nailing is the process of creating a through connection between two pieces of wood, by driving a nail through one piece and into the other at an angle. This is a necessary step for creating the frames for many types of woodworking projects, such as house frames, picture frames, cabinets, and furniture.
Toenailing requires driving the nail at an angle (typically 45 degrees) so that it can pass through both the standing wood and the foundation piece at the same time.
When toenailing, you should normally use two nails, one on each side of the top wood piece. However, if the thickness is significant, you can secure it with more nails.
What Are The Applications And Benefits Of Toenailing?
Toenailing is a typical carpentry technique that has a number of advantages, including the formation of a secure joint between two pieces of wood that is less likely to break. When fixing wood flooring tiles to their base frame or attaching a wall stud to a bottom plate in stud framing, a carpenter usually uses the toenailing method. Attaching a rafter to the top plate of a wall at its birdsmouth is another popular use of toenailing.
Toenailing is also employed in the butt joint. This is a technique that entails riveting the ends of two pieces of wood together and then driving a nail through at an angle to secure the two together.
Toenailing not only secures two pieces of wood in place, but it also gives them stability because nailing at an angle increases the possibility of following the wood grain. As a result, toenailing is an important skill that everyone carpenter should learn.
How To Toenail With A Nail Gun – A Step By Step Guide
The skilled carpenter is well-versed in the use of a hammer and ordinary nails for toenailing. On the other hand, toenailing has become a more enjoyable and quick activity for them since the development of pneumatic nail guns. It is, however, a little difficult for newcomers.
We’ll go over both toenailing procedures (with using a hammer and with using a nail gun) briefly below so that you can compare which method is more appropriate for you –
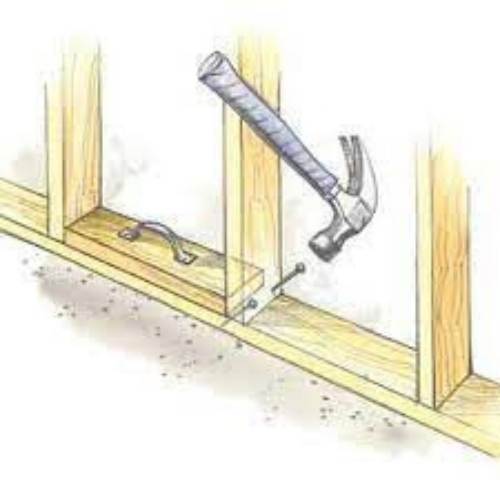
How To Toenail With A Hammer
Toenailing with a mallet needs sufficient expertise and prior calculation. You need to compute the point of drive and put sufficient power to attach two bits of wood together. Let’s find the steps of toenailing with a hammer below.
Setting the wood pieces – Prior to putting down the nail, it is a decent practice to mark one of the pieces where you will join another.
Place the nail – Once you place the two pieces of wood in their position, it’s an ideal opportunity to nail down them. For that, you should initially put the nail perpendicular in the upper stud and corresponding to the base plate.
Securing nail into the top wood – After placing the nail, first, you need to crash it straightly into the stud about ¼” against your toe. Additionally, place the top stud ¼” aside from the imprint with the goal that the nail will drive it into position while toenailing.
Bending the nail at an angle – After the nail goes into the wood about ¼” straightly, then, at that point, pull it upwards to make an angle of 45 to 50 degrees with the ground or base plate.
Secure the nail – Now hit on the nail head with the hammer by following a couple of strongly grounded strikes. Place your toe against the stud or wood in the opposite direction of nailing during hitting to give it firm support.
Be cautious during driving nails straight. Try not to put overabundance force as it might harm your toe. At the point when you drive nails straight up to the ¼” way, follow some delicate strokes.
You can also use a 2×4 board instead of using your toe to support the impedance of nailing. For that, you have to cut the board at the size of the gap between two studs and place it in that gap during toenailing.
Remember that toenailing requires a decent command over the hammer than the normal nailing. Master treatment of the hammer is the fundamental variable in accomplishing the ideal toenail. A relaxed, however, strong grasp on the mallet in addition to a sluggish swing with a little wrist snap toward the end ought to get it done.
How To Toenail With Framing Nailer
Using a framing nailer instead of a hammer makes toenailing much easier. It’s as simple as pressing a button. You don’t have to keep swinging your hammer over and over. A framing nailer also allows you to drive the nail at the proper angle, which is not always achievable with a hammer.
If this is your first time using a framing nailer, however, you can use the following toenailing recommendations. They will assist in the production of strong joints as well as the installation of rigid boards.
Safety First
Framing nailers, often known as nail guns, are designed to handle heavy-duty tasks and are an excellent choice for both experts and DIYers. It’s a remarkable gadget that simplifies the jobs of specialists all around the world, especially in large-scale projects, including framing a house, deck building, fencing, or furniture making.
It does, however, cause thousands of injuries each year.
Wearing protective gear such as safety glasses, gloves, and a hard hat while nailing is crucial.
These safety gears are included with some framing nailer models. You may, however, readily obtain them from your local stores.
Understanding The Machine
We’ll assume you’re familiar with how a framing nailer works. If you’re a first-time user and aren’t sure how a framing nailer works, you can learn more about it in a separate post by clicking here.
However, for a quick overview, I’d want to go over some fundamentals and see how they might help you with toenailing. For example, one should be aware of how their nailer’s trigger system operates.
There are two types of trigger systems in most framing nailers: contact and sequential mode. In contact or bump firing mode, the nail gun will fire nails whenever you touch the tip of the nail gun on the surface you’re going to fasten. To shoot nails in sequential mode, however, you must first pull the trigger and then press the nose.
The latter is the safer and more precise way, and you should use it while toenailing.
Steps Of Toenailing With Framing Nailer
When using a framing nailer to toenail, we must follow some processes that are similar to toenailing with a hammer. For instance, before nailing, you must mark the position of the wood. Once you’ve achieved your position, it’s time to settle them down. Let’s have a look at the techniques that will be used.
Choose the Correct Size of Nails: Insert the right size nails into the framing nailer magazine. If you wish to nail down 2×4 studs, for example, you should use 16d or 3-1/2″ framing nails to provide a solid binding.
The toenailing joint will be more secure if the framing nails are longer. However, you must ensure that the nail point does not pierce the entire end wood.
Fix the Position of the Nail: It’s time to correctly drive the nails after you’ve marked and placed the two wood pieces in place. To do so, position the frame nailer’s nose where you want to drive your toenail nails. When putting the nailer tip, keep a minimum of 3/4 inch clearance from the end of the timber. But it shouldn’t exceed 1¼ inches.
The framing nail will run through this spot, securing the two boards diagonally.
Set the Framing Nailer at an Angle: Set the nailer at an angle of 45 to 50 degrees with the bottom wood to achieve the diagonal direction of the nail.
Pull the Trigger to Shoot Nails: It’s time to fire nails after you’ve established the angle right. To do so, simply pull the trigger and push the nailer’s tip. Make sure the trigger mode is set to sequential firing.
Set the Desired Depth: Prior to firing nails for toenailing, it’s critical to determine the desired depth. It can be done in two ways: by adjusting the nailer’s depth of drive and by regulating the compressor pressure.
The depth-changing wheel on most current framing nailers allows you to select the appropriate depth by rolling it up and down. It is a simple procedure that does not necessitate the use of any tools.
You can also control how far the nail will go by adjusting the air pressure at the air compressor. Please test on a scrap before firing nails into the finished wood piece, regardless of the method you use.
Using the Right Number of Nails: Using the correct amount of nails is critical while toenailing, since using fewer nails than necessary might weaken the structure, and using too many nails can break or fracture the wood piece.
As a result, if you’re working on the framing of your home, you should check the nail schedules in your local building code. If you’re using 2×4 studs, for example, you need to use at least two nails per bottom. And if it’s a 2×6, there should be at least 3 and no more than 4 nails per bottom.
Repeat the steps above to complete your framing or door or window task successfully. Also, don’t forget to read the instruction manual that comes with your framing nailer to get any tool-specific advice for toenailing.
The 3 Best Framing Nailer For Toenailing
If you thinking to have a framing nailer on your own, you may check the following three best framing nailers which are good for toenailing along with other general tasks.
NuMax SFR2190 Framing Nailer - Best Seller


- 21-degree pneumatic framing nailer.
- Features a lightweight and durable magnesium body.
- Ergonomic secure handle, and interchangeable trigger for quick-fire or single-shot function.
- It's ideal for professional construction contractors and homes DIY projects.
- Versatile and Powerful: The framing nailer features depth adjustment and a no-mar tip, making it adaptable for different working surfaces.
- It's perfect for framing, and it can also be used to install subfloors, roof decking, wood fencing, and sheathing.
- Minimum Recommended Air Delivery SCFM @ 90PSI:2.4
Metabo HPT NR90AES1 Framing Nailer - Best Overall


- 21 degree plastic collated framing nailer
- Great for flooring and framing, truss build-up, window build-up, subflooring, roof decking, wall sheathing, and housing construction
- LIGHTWEIGHT: At only 7. 5 lbs and well-balanced allowing for ease of maneuverability and less user fatigue
- SELECTIVE ACTUATION: Allows for quick changes between sequential and contact nailing with the flip of a switch
- TOOL-LESS depth adjustment to countersink or flush drive into a variety of materials
- Accepts 2-in up to 3-1/2-in plastic collated framing nails
BOSTITCH F21PL Framing Nailer - Honorable Mention


- Two nailers in one: includes two quick-change nosepieces to convert tool to either framing or metal connector applications
- Patented push-button adjustable depth guide of the framing nailer gun sets nails to desired depths
- Lightweight magnesium design for durability
- Adjustable rafter hook allows users to hang tools on rafters and joists
- Drives plastic collated 1-1/2-inch and 3-1/2-inch metal connector nails (.131-inch - .148-inch diameter)
- 1,050 inch-pounds of driving power; sequential and bump trigger
- 14-1/4 by 20-1/2 inches; 8.1 pounds; 7-year limited warranty
FAQs On How To Toenail With A Nail Gun
Q1. Is there any alternatives to toenailing?
You can avoid toenail if you don’t want to for whatever reason. Toenailing can be replaced with joist hangers, hurricane ties, and other engineered steel connectors. If you don’t have options other than driving nails perpendicularly, you can use joist hangers or hurricane ties, which don’t need you to angle your nail gun.
Q2. Is brad nailer good for toenailing?
The project you’re working on will determine whether or not you can use a brad nailer for toenailing. You’ll need a nail that’s at least 3 inches long to connect a 2×4 stud to a base plate. As a result, you will be unable to utilize a brad nailer in this situation.
A brad or finish nailer, on the other hand, can be used to toenail when installing a photo frame, trim molding, or other light woodworks that require little nails.
Q3. Can I use screws instead of nails for toenailing?
Using screws instead of nails for toenailing is also a great idea. When carpenters use a screw, they refer to it as “toe-screwing,” and many carpenters prefer to use screws when rebuilding or adding a few blocks to a nearly finished wall frame. Because it generates less vibration than a framing nailer.
For this, hardened steel #9 x 3-1/8″ GRK R4 screws will suffice. They have a gold hue, a Torx drive, and a flat head. They are branded as multi-purpose screws.
You may enjoy the below video on how to toe-screwing with a drill driver.
Final Words
In conclusion, I think the framing nailer is a very handy tool to have around. It saves you time and money. I hope that I have helped you to get a better understanding of how to toenail with a framing nailer.
Recent Posts
Woodworking is one of the most rewarding hobbies and professions, but it also comes with serious risks if proper precautions are not taken. Whether you're working with a table saw, planer, or simple...
What to Use If You Don't Have a Brad Nailer: Handy Alternatives
You can use a hammer and finishing nails paring with nail set or wood glue if you don't have a Brad Nailer. These tools effectively secure trim and small woodworking projects. So, if you’re in...