
“Should I use a nailer on roofing materials or not?” – The answer to this question holds pivotal importance for anyone embarking on a roofing project. As the construction industry evolves, the integration of advanced tools like nailers has become commonplace, revolutionizing the efficiency and precision of various tasks.
However, the decision to employ a nailer in roofing applications requires careful consideration of factors such as material type, project scale, and desired outcomes.
In exploring this inquiry, we delve into the merits, considerations, and potential challenges associated with the use of nailers on roofing materials, seeking to provide clarity for those contemplating this crucial decision in the realm of construction.
What Sets Power-Driven Nailers Apart?
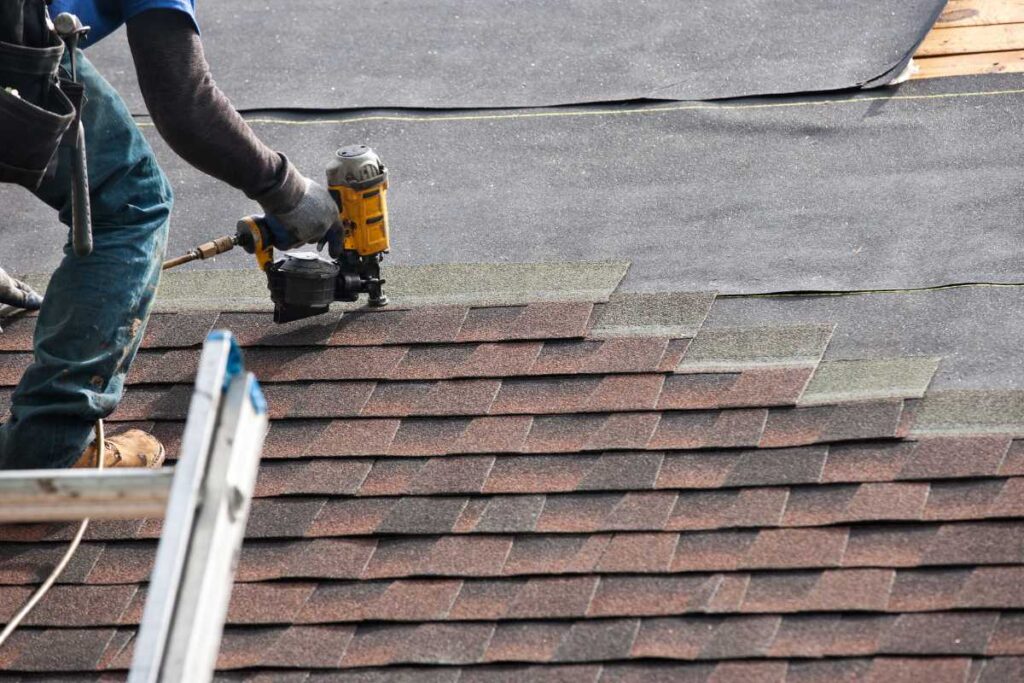
Power-driven nailers, commonly known as pneumatic or electric nail guns, distinguish themselves in the realm of roofing projects by offering a unique blend of speed and accuracy.
These tools are designed to streamline the installation process, setting them apart from traditional methods.
To understand “When should I use a nail gun for roofing?” you have to consider the benefits and drawbacks of utilizing a nail gun.
Let’s find some critical benefits and drawbacks of using nailers for roofing materials:
Advantages of Using a Power Nailer on Roofing Materials:
- Efficiency and Speed: Power-driven nailers significantly expedite the roofing process, allowing for faster installation compared to traditional hand-nailing methods. This efficiency is especially beneficial for large-scale projects.
- Consistent Nail Placement: Nailers ensure uniform and consistent placement of fasteners, reducing the likelihood of human error. This precision contributes to the overall quality and durability of the roofing installation.
- Reduced Physical Strain: Unlike manual nailing, power-driven nailers require less physical effort from the operator. This reduction in strain enhances worker comfort and helps maintain productivity throughout the project.
- Versatility: Power-driven nailers are versatile tools suitable for a variety of roofing materials, including asphalt shingles, metal roofing, and wooden shakes. This adaptability makes them valuable across diverse construction scenarios.
- Adjustable Depth Settings: Many nailers feature adjustable depth settings, allowing operators to control the penetration depth of the nails. This adaptability is crucial for preventing damage to different roofing materials.
Challenges of Using a Power Nailer on Roofing Materials:
- Initial Cost: Acquiring a power-driven nailer and, if applicable, an air compressor (for pneumatic nailers) can entail a significant upfront cost. However, this investment may be justified by increased efficiency and long-term benefits.
- Learning Curve: Proper operation of power-driven nailers requires training and familiarity. Ensuring that operators are skilled in adjusting settings, handling the tool, and following safety protocols is essential to avoiding errors and accidents.
- Maintenance Requirements: Regular maintenance is crucial for the optimal performance and longevity of power-driven nailers. Neglecting maintenance can lead to malfunctions, affecting the quality of the roofing installation and potentially causing safety hazards.
- Material Compatibility: Care must be taken to select the appropriate nailer and fasteners that are compatible with the specific roofing material. Using the wrong tool or fasteners may compromise the integrity of the roof.
- Noise and Vibration: Power-driven nailers can produce noise and vibration during operation. Adequate safety measures, including the use of hearing protection, are essential to mitigate potential health risks associated with prolonged exposure.
In conclusion, while power-driven nailers offer significant advantages in terms of efficiency and precision, careful consideration of the associated challenges is crucial.
Addressing these challenges through proper training, maintenance, and material compatibility ensures that the benefits of using a power-driven nailer on roofing materials outweigh potential drawbacks.
Types of Power-Driven Nailers
Power-driven nailers come in various types, with pneumatic and electric nail guns being the two primary categories.
Distinguishing between these types, understanding their applications, and choosing the right one for specific roofing materials are crucial considerations in the realm of construction.
Pneumatic Nail Guns:
Pneumatic nail guns, powered by compressed air, are renowned for their reliability and versatility in roofing projects. They are widely favored for their consistent power output and speed.
Applications:
- Versatility: Pneumatic nail guns are suitable for a broad range of roofing materials, including shingles, underlayment, and siding.
- High Volume Jobs: Ideal for large-scale projects due to their efficiency and continuous usage capabilities.
Considerations:
- Air Compressor Requirement: Requires an external air compressor, which may add to the overall equipment cost.
- Maintenance: Regular maintenance is necessary to ensure consistent performance.
Electric Nail Guns:
Electric nail guns operate using an electric power source, either corded or cordless, and have gained popularity for their convenience and ease of use.
Applications:
- Precision Jobs: Electric nail guns are well-suited for precision work, making them ideal for intricate roofing tasks.
- Portability: Cordless electric models offer increased mobility, allowing access to areas where cords may be impractical.
Considerations:
- Power Source: Corded models require a power outlet, limiting mobility; cordless models rely on battery power, necessitating occasional recharging.
- Task Specificity: This may be more suitable for specific roofing tasks than comprehensive applications.
Choosing The Right Type Of Nailer For Specific Roofing Materials:
Using the right type of power-driven nailer on the most common roofing materials will ensure a secure fit without compromising the integrity of the shingles.
Let’s find some recommendations for choosing the right type for specific roofing materials:
Asphalt Shingles:
When using a power-driven nailer on asphalt shingles, precision and secure attachment are paramount. Here are guidelines to ensure a seamless installation without compromising the integrity of the shingles:
Nailer Type: Opt for a pneumatic nail gun with adjustable depth settings to control the penetration depth of the nails.
Nail Placement: Aim for the nailing strip of the shingle, ensuring that the fasteners secure the shingle firmly without causing any damage.
Spacing: Adhere to manufacturer guidelines for nail spacing to maintain the structural integrity of the roofing system.
Angle and Technique: Hold the nail gun at the recommended angle, typically 45 degrees, to prevent overdriving or underdriving the nails, ensuring a secure fit.
Metal Roofing:
Installing metal roofing presents unique challenges that demand precision and careful handling. Here’s how to navigate these challenges:
Nailer Type: Choose a pneumatic nail gun with adjustable depth and pressure settings to accommodate the different thicknesses of metal roofing materials.
Material Compatibility: Verify that the fasteners used are compatible with metal roofing to prevent corrosion and ensure longevity.
Technique: Apply consistent pressure to avoid denting or damaging the metal surface, and be mindful of temperature fluctuations that may affect material expansion and contraction.
Wooden Shakes:
Working with wooden shakes requires a delicate balance of power and finesse to preserve their natural aesthetics. Here’s how to achieve this balance:
Nailer Type: Consider using a cordless electric nail gun for enhanced maneuverability and control, reducing the risk of overdriving nails into the delicate wood.
Depth Control: Adjust the depth settings to prevent the nails from protruding or penetrating too deeply, safeguarding the integrity of the shakes.
Spacing: Follow manufacturer recommendations for nail spacing to ensure even and secure attachment without compromising the wooden shakes’ structural integrity.
Tile Roofing:
Tile roofing demands special considerations to avoid cracks and breakage during the nailing process. Here are guidelines for optimal results:
Nailer Type: Opt for a pneumatic nail gun with adjustable depth and pressure settings to accommodate the varying thicknesses of tile roofing materials.
Angle and Pressure: Hold the nail gun at the correct angle to prevent cracking and apply consistent but controlled pressure to secure the tiles without causing damage.
Fastener Selection: Use fasteners specifically designed for tile roofing to ensure a secure fit without compromising the integrity of the tiles.
By adhering to these guidelines specific to each roofing material, professionals can optimize the use of power-driven nailers, ensuring a secure and long-lasting installation while preserving the unique characteristics of each roofing type.
Step-by-Step Guide: Installing Roofing Materials Using a Nail Gun
Installing roofing materials with a power-driven nailer can significantly streamline the process while ensuring a secure and efficient outcome.
Follow this comprehensive step-by-step guide for a successful roofing installation:
Step 1: Safety First
Before starting the installation, prioritize safety.
Personal Protective Equipment (PPE): Wear appropriate safety gear, including eye protection and hearing protection.
Tool Inspection: Thoroughly check the power-driven nailer for any defects or malfunctions.
Step 2: Prepare the Roofing Surface
Ensure the roof deck is clean, dry, and free from debris. Repair any damaged or rotten sections, and install the underlayment as per the manufacturer’s recommendations.
Step 3: Choose the Right Nailer and Fasteners
Select a power-driven nailer suitable for the roofing material and adjust its settings based on the specific requirements. Choose fasteners compatible with the material and follow manufacturer guidelines for size and type.
Step 4: Start at the Eaves
Commence the installation at the eaves of the roof.
Overhang Alignment: Ensure proper alignment of overhanging shingles or tiles.
Starter Course: Install a starter course using the power-driven nailer, securing it along the eaves.
Step 5: Set Spacing and Overlapping
Maintain consistent spacing between roofing materials and follow the recommended overlapping guidelines. Use chalk lines or other marking methods to guide the placement of subsequent courses.
Step 6: Nailing Technique
Master the proper technique for using the power-driven nailer:
Angle and Depth: Hold the nailer at the correct angle (usually 45 degrees) and adjust the depth settings to prevent underdriving or overdriving.
Consistent Pressure: Apply consistent pressure to ensure the fasteners penetrate and secure the materials adequately.
Step 7: Flashing Installation
If flashing is required for valleys, roof transitions, or penetrations, install it carefully, securing it with the power-driven nailer according to manufacturer specifications.
Step 8: Ridge and Hip Installation
Complete the roofing installation by addressing the ridges and hips:
Capping: Install ridge caps or hip caps using the power-driven nailer, ensuring a secure and weather-tight fit.
Finishing Touches: Trim any excess material and ensure a clean, professional finish.
Step 9: Final Inspection
Conduct a thorough inspection of the entire roofing installation.
Secure Fastening: Ensure all fasteners are securely in place.
Alignment: Verify the alignment and uniformity of the roofing materials.
Step 10: Cleanup
Clean up the worksite, removing any debris or leftover materials. Store the power-driven nailer properly for future use.
By following these step-by-step guidelines, you can leverage the efficiency and precision of a power-driven nailer to install roofing materials effectively, resulting in a durable and aesthetically pleasing roof.
Tips From The Pros For Using Power Driven Nailer
Adjusting Nail Depth
Adjusting nail depth is a critical factor when working with different roofing materials. Professionals offer the following insights:
- Material Thickness: For thinner materials like asphalt shingles, set a shallower depth to prevent over-penetration. Conversely, with thicker materials like wooden shakes, adjust for a deeper penetration to ensure a secure hold.
- Manufacturer Guidelines: Always refer to the manufacturer’s recommendations for nail depth settings specific to the roofing material being used. This ensures optimal performance and prevents potential damage.
- Test Runs: Before starting a project, conduct test runs on scrap material to fine-tune the nail depth settings. This practice allows roofers to make the necessary adjustments and achieve the desired results.
Sequential vs. Contact Trigger
Understanding the nuances between sequential and contact triggers assists roofers in selecting the right mode for their projects.
Sequential Trigger:
- Advantages: Offers precise control, minimizing the risk of accidental discharges. Ideal for tasks requiring accuracy and a measured approach.
- Disadvantages: May be slower compared to contact triggers, as each nail must be individually triggered.
Contact Trigger:
- Advantages: Provides rapid-fire capability, boosting efficiency in high-volume applications. Well-suited for large-scale projects with repetitive nailing patterns.
- Disadvantages: Requires heightened attention to prevent unintended nail discharges. Professionals emphasize the need for strict adherence to safety protocols.
- Project Considerations: The choice between sequential and contact triggers often depends on the nature of the project.
For intricate tasks demanding precision, a sequential trigger is favored, while large-scale projects benefit from the speed of a contact trigger.
Regular Maintenance
Emphasizing the significance of regular maintenance for power-driven nailers, industry experts offer the following tips:
- Cleaning: Regularly clean the nailer, removing dirt, debris, and accumulated residues. A clean tool ensures smoother operation and reduces the risk of jams.
- Lubrication: Apply lubricant to moving parts as recommended by the manufacturer. Proper lubrication minimizes friction, prolonging the lifespan of the nailer.
- Inspection: Conduct routine inspections for wear and tear. Replace worn-out or damaged components promptly to maintain optimal performance and prevent safety hazards.
- Calibration: Periodically calibrate the nailer to ensure accurate nail depth and consistent performance. This step is crucial for achieving the desired results in various roofing applications.
By heeding these professional tips, roofers can enhance their proficiency with power-driven nailers, adapting their approach based on the roofing material, trigger mode, and the overall condition of the tool.
Incorporating these insights into their workflow ensures not only efficient installations but also the longevity of their equipment.
Is It Better To Hand Nail A Roof?
The choice between hand nailing and using a power-driven nailer for roofing depends on various factors. Power-driven nailers are generally faster and can enhance efficiency, especially on larger roofing projects.
However, some roofers prefer hand nailing for its precision and control, particularly in delicate or complex situations. It ultimately depends on the roofer’s skill, the project requirements, and personal preference.
Do roofers use nail guns or hammers?
Roofers commonly use both nail guns and hammers. Nail guns are preferred for their speed and efficiency, especially on larger roofing projects. They can significantly expedite the installation process.
However, hand nailing with hammers is still utilized in certain situations where precision and control are crucial, such as in delicate areas or for specific roofing materials.
The choice between nail guns and hammers often depends on the specific requirements of the roofing job and the preference of the roofer.
When Should I Use A Nail Gun On Asphalt Shingles?
Asphalt shingles present a unique set of challenges. You can use a power-driven nailer on asphalt shingles when efficiency and speed are crucial.
The tool ensures secure and consistent attachment, and adjusting nail depth settings helps prevent over-penetration, preserving the integrity of the shingles.
It is particularly beneficial for large roofing projects where timely completion is a priority.
When Should I Use A Nailer On Metal Roofing?
Metal roofing requires a tailored approach. It’s therefore beneficial to use a power-driven nailer on metal surfaces to ensure a secure attachment without compromising the material.
It is crucial to choose a pneumatic nail gun with adjustable depth settings to accommodate different metal thicknesses. Also, ensure compatibility between the fasteners and metal to prevent corrosion.
The tool’s consistent pressure application helps avoid denting or damaging the metal surface, making it ideal for secure and efficient metal roofing installations.
When Should I Use A Nailer On Wood Shakes?
Wood shakes add a touch of traditional elegance to roofs. We can achieve a delicate balance of power and finesse by using a power-driven nail gun on wood shakes.
Opt for a cordless electric nail gun for enhanced control, adjusting depth settings to prevent damage to the delicate wood.
Follow manufacturer guidelines for spacing and ensure secure attachment without compromising the natural aesthetics of the wood shakes.
FAQs: Should I Use a Nailer On Roofing Materials Or Not?
Can I use a power nailer on all types of roofing materials?
Yes, but it’s crucial to understand each material’s requirements and adjust the nailer settings accordingly.
How do I identify the correct nail size?
Matching the nail size to the roofing material requirements is vital. Consult the manufacturer’s guidelines for the roofing material and choose the appropriate nail size accordingly.
What safety precautions should I take when using a power nailer?
Wear appropriate safety gear, stabilize ladders, and follow the manufacturer’s guidelines for safe operation.
How often should I perform maintenance on my power-driven nailer?
Regularly check and lubricate your nailer according to the manufacturer’s recommendations, typically after every 10,000 nails.
Are there specific power nailers for DIY roofing projects?
Yes, there are models suitable for DIYers, but always prioritize safety and follow guidelines closely. You can use a cordless roofing nailer to DIY your roofing projects.
Where can I get access to quality power-driven nailers and roofing supplies?
You can find quality power-driven nailers and roofing supplies at local hardware stores, home improvement centers like Home Depot or Lowe’s, specialized tool retailers, online platforms such as Amazon or eBay, construction supply companies, and by consulting with local builders or contractors.
Conclusion
In conclusion, mastering the art of using a power-driven nailer on roofing materials is a game-changer for any construction professional.
This article has equipped you with the knowledge needed to navigate the nuances of different materials, choose the right tool, and execute roofing projects with precision.
Recent Posts
Woodworking is one of the most rewarding hobbies and professions, but it also comes with serious risks if proper precautions are not taken. Whether you're working with a table saw, planer, or simple...
What to Use If You Don't Have a Brad Nailer: Handy Alternatives
You can use a hammer and finishing nails paring with nail set or wood glue if you don't have a Brad Nailer. These tools effectively secure trim and small woodworking projects. So, if you’re in...