
Using a palm nailer can make your DIY projects much easier and more efficient. This compact, handheld tool is designed to drive nails quickly and accurately, even in tight spaces where a traditional hammer might struggle. Whether you’re building furniture, repairing a deck, or tackling any other nailing task, a palm nailer is a handy tool to have.
In this guide, we’ll walk you through the steps of using a palm nailer, ensuring you get the job done safely and effectively.
What Is a Palm Nailer? 🤔
Okay, let’s start with the basics. Imagine a tool that’s like a tiny robot hand, ready to help you drive nails into wood or other materials. That’s what a palm nailer is! It’s a small, handheld tool that does the hard work of hammering nails for you. Instead of using a big hammer, you just press this tool on the nail, and it does the rest—how cool is that? 😄
Why Should You Use a Palm Nailer? 🛠
Ever tried hammering a nail and missed? Ouch! That’s where a palm nailer comes in handy. It’s super helpful because it’s more accurate and less tiring than swinging a hammer all day. Plus, it’s great for tight spaces where a big hammer just won’t fit. With a palm nailer, you can be a nailing pro without breaking a sweat! 💪
Getting to Know Your Palm Nailer 👋
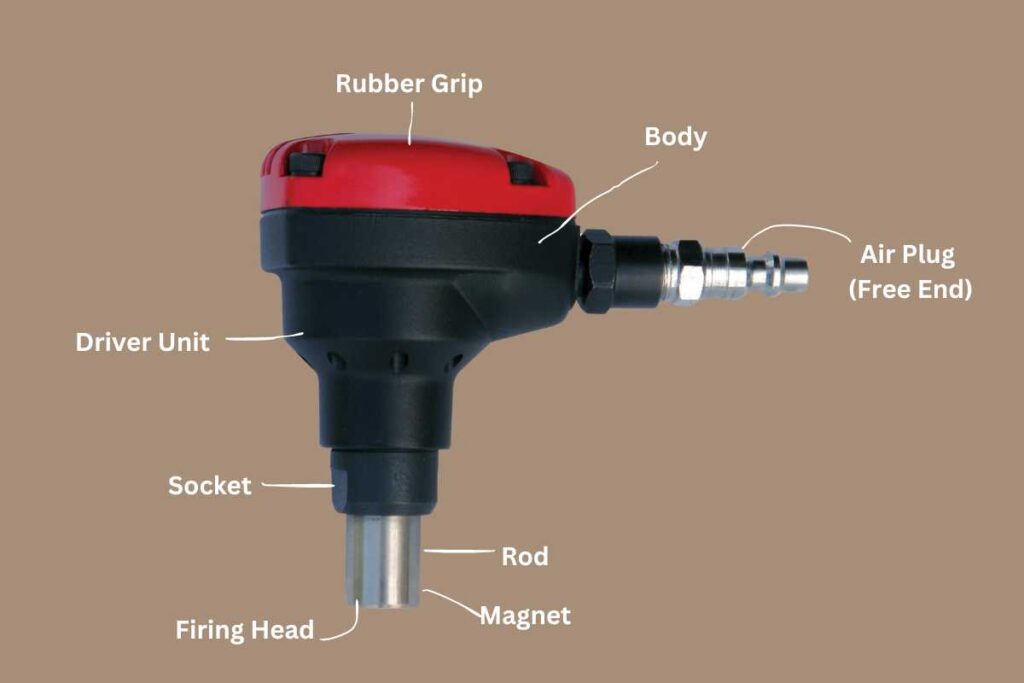
Parts of a Palm Nailer
Let’s take a closer look at our new tool, buddy. A palm nailer has a few simple parts:
- Nose: This is the front part where the nail goes.
- Trigger: Some palm nailers have a trigger to start the nailing.
- Body: This is the main part you hold, and it’s shaped to fit nicely in your hand.
- Air Hose (for pneumatic nailers): This connects the nailer to an air compressor.
Key Features of Palm Nailers:
- Compact Size: Fits easily in the palm of your hand.
- Power Source: Can be pneumatic (air-powered) or electric.
- Precision: Offers greater accuracy in nail placement.
- Speed: Drives nails faster than traditional methods.
| Feature | Pneumatic | Electric |
|---|---|---|
| Power Source | Air Compressor | Battery/Electricity |
| Portability | Less Portable | More Portable |
| Cost | Generally Cheaper | Generally More Expensive |
Most palm nailers come with different nose tips to accommodate various nail sizes. This versatility makes them ideal for a range of tasks, from framing to decking.
Benefits Of Using Palm Nailers
Using a palm nailer offers numerous advantages that make it a valuable tool for any DIY enthusiast or professional. Here are some key benefits:
Efficiency and Speed:
- Drives nails faster than a traditional hammer.
- Reduces the time spent on projects.
Precision and Accuracy:
- Enables precise nail placement.
- Reduces the risk of bending or misplacing nails.
Ease of Use:
- Lightweight and easy to handle.
- Requires less physical effort than hammering.
Versatility:
- Suitable for various applications like framing, decking, and fencing.
- Compatible with different nail sizes.
Improved Safety:
- Minimizes the risk of hitting your fingers with a hammer.
- Offers better control in tight spaces and awkward angles.
Overall, palm nailers are a game-changer in the world of nailing. Their efficiency, precision, and ease of use make them an indispensable tool for many projects.
How It Works: A Simple Breakdown
Here’s the magic: When you press the palm nailer against the nail, it uses air or electricity to drive the nail into the wood. You don’t even have to swing your arm—just press and let the tool do the work! 🚀
Safety First! 👷♂️
Before we start having fun, let’s talk about being safe. After all, even the coolest tools need to be handled with care. 😊
Gear Up for Safety
First things first: Always wear safety gear. That means:
- Safety glasses: To protect your eyes.
- Ear protection: Some palm nailers can be noisy!
- Gloves: To protect your hands.
Handling with Care
Make sure to hold the nailer firmly but gently. Don’t press too hard; let the tool do its job. And always keep your fingers away from the nail area—no one wants a squished finger! 😅
How to Use a Palm Nailer: Step-by-Step Guide 🚀
Ready to start nailing? Here’s how you do it:
Step 1: Choosing The Right Palm Nailer🛒
Using a palm nailer can save you time and effort, especially in tight spaces. Choosing the right palm nailer is crucial for getting the job done efficiently. Here, we will help you understand what to look for and which brands and models are worth considering.
Factors To Consider
When choosing a palm nailer, several factors can influence your decision. Here are some key considerations:
| Feature | Consideration |
|---|---|
| Power Source | Pneumatic or Cordless: Pneumatic nailers are more powerful but require an air compressor. Cordless models offer more mobility but may lack some power. |
| Weight | Should balance power and comfort. A lighter-weight palm nailer reduces fatigue, especially for extended use. Look for models that balance weight and power effectively. |
| Grip Comfort | An ergonomic grip ensures comfortable use. Check if the handle is cushioned or textured for better control. |
| Compatibility | Ensure the nailer can handle the range of nail sizes you’ll use. Some models support various lengths and types, offering more versatility. |
| Noise Level | Consider the decibel rating. Some palm nailers are quieter than others. If you’re working in noise-sensitive areas, consider the decibel rating. |
| Brand | Go with a reliable brand known for quality tools. |
Top Brands And Models
Several brands stand out for their quality and performance. Here are some of the top models:
- Metabo HPT NH90AB: This pneumatic palm nailer is known for its durability and power. It features a magnetic nose for easy nail placement.
- Bostitch PN100K: This model includes multiple nose tips for versatility. It’s lightweight and has a comfortable grip, making it ideal for long projects.
- Freeman PMPN: This palm nailer offers a good balance of power and weight. It’s compatible with various nail sizes, making it versatile for different tasks.
- Senco PC0781: Known for its robust build, this pneumatic nailer is reliable and efficient. It features an ergonomic design for better user comfort.
- Milwaukee M12: This cordless model is perfect for mobility. It offers decent power and comes with a rechargeable battery, making it ideal for remote job sites.
Here’s a quick comparison of the above five palm nailers:
| Brand | Model | Power | Features |
|---|---|---|---|
| Metabo HPT | NH90AB | Pneumatic | Durable, magnetic nose |
| Bostitch | PN100K | Pneumatic | Multiple nose tips, lightweight |
| Freeman | PMPN | Pneumatic | Balanced power and weight, versatile |
| Senco | PC0781 | Pneumatic | Robust build, ergonomic design |
| Milwaukee | 2458-21 M12 | Battery | Cordless, rechargeable battery |
Step 2: Get Ready
First, make sure your palm nailer is ready to work, and then check that it is connected to the power source—either an air compressor or a battery. Check that everything is working properly.
Here is a quick checklist for preparing the tool:
| Task | Action |
|---|---|
| Read Manual | Understand the specifics of your tool |
| Inspect Tool | Check for damage or wear |
| Gather Supplies | Have nails and safety gear ready |
| Wear Safety Gear | Use goggles and gloves |
| Lubricate Tool | Apply oil if needed |
Step 3: Connecting Air Supply
Next, connect your palm nailer to the power supply – with a compressor or a battery. Proper connection ensures the tool operates at its best.
You may follow the following steps to connect the air supply correctly:
- Select the Right Compressor: Ensure your air compressor matches the nailer’s requirements. Check the PSI and CFM ratings.
- Attach Air Hose: Connect the air hose to the compressor. Ensure the connection is secure to prevent air leaks.
- Check Air Pressure: Adjust the compressor to the correct pressure. Refer to the manual for the recommended PSI.
- Connect to Palm Nailer: Attach the other end of the air hose to the palm nailer. Make sure the connection is tight.
- Test the Connection: Before starting, test the tool. Ensure air flows properly and the nailer functions smoothly.
Once connected, your palm nailer is ready to use. Proper setup ensures efficient and safe operation.
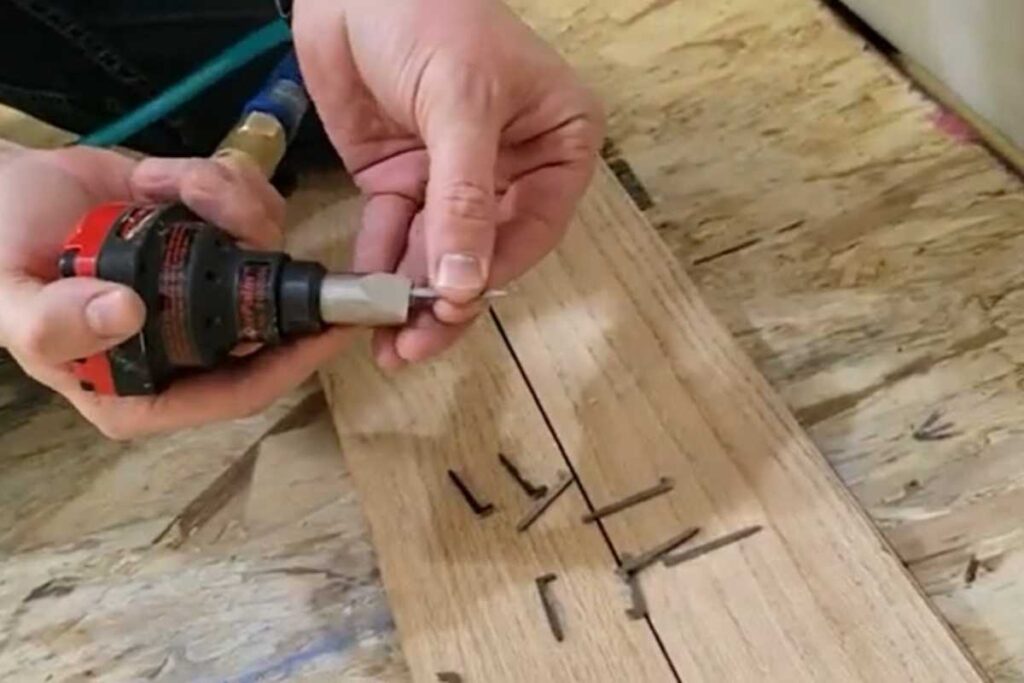
Step 4: Load the Nail
Next, place the nail into the nose of the palm nailer. The pointy end should face out, ready to go into the wood. 😊
Step 5: Hold the Nailer
Hold the palm nailer comfortably in your hand, with your fingers wrapped around the body. Make sure you have a good grip, but don’t squeeze too tight!
Keep in mind that getting the right grip and position is crucial for effective nailing. Follow these steps to ensure you have proper control over the palm nailer:
- Hold the palm nailer firmly: Use your dominant hand to grip the tool. Make sure your hand is wrapped around the body of the nailer.
- Position your hand comfortably: Your hand should be in a comfortable position, with your wrist straight. This prevents strain and gives better control.
- Align the nailer with the nail: Place the nose of the nailer directly over the nail head. Ensure the tool is perpendicular to the surface you are nailing into.
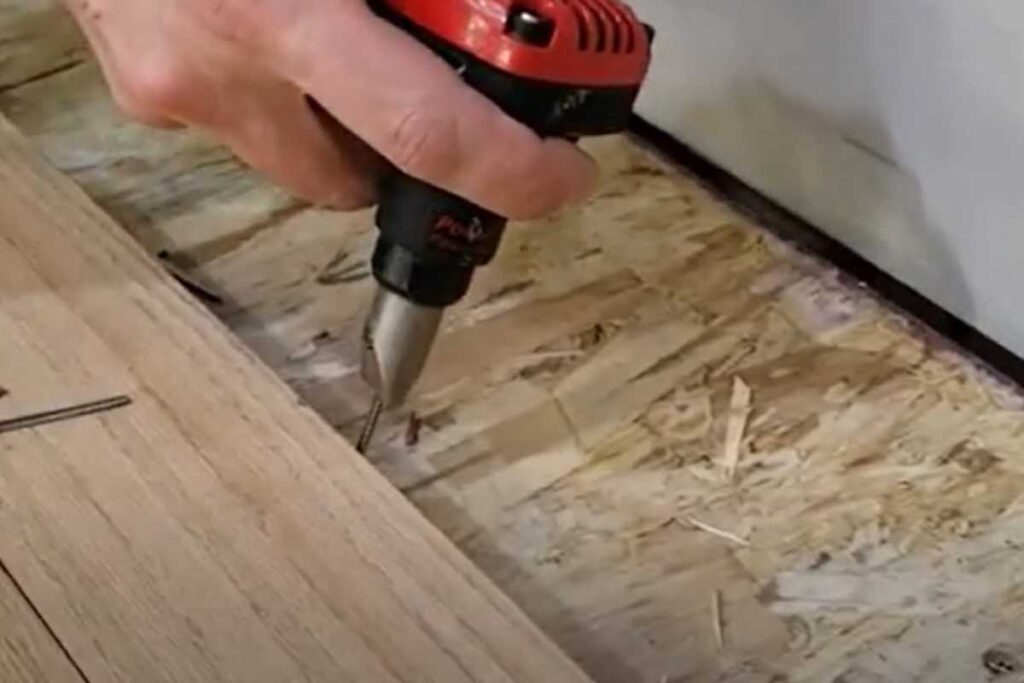
Step 6: Start Nailing
Now, press the nose of the nailer against the spot where you want to drive the nail. Gently press the nailer down, and it will start driving the nail into the wood. You might feel a little “bump” as the tool works, but that’s normal!
Step 7: Finish Up
Once the nail is all the way in, lift the nailer off and check your work. If everything looks good, you’re done! 🎉
Tips and Tricks for Perfect Nailing 👍
Want to become a palm nailer master? Here are some tips:
- Start Slow: If you’re new to using a palm nailer, start slow and get the hang of it before speeding up.
- Use the right nails: Make sure you use nails that are compatible with your palm nailer. Check the manufacturer’s guidelines for the correct size and type.
- Check air pressure: If your palm nailer is pneumatic, ensure the air pressure is set correctly. Refer to the tool’s manual for the recommended PSI (pounds per square inch).
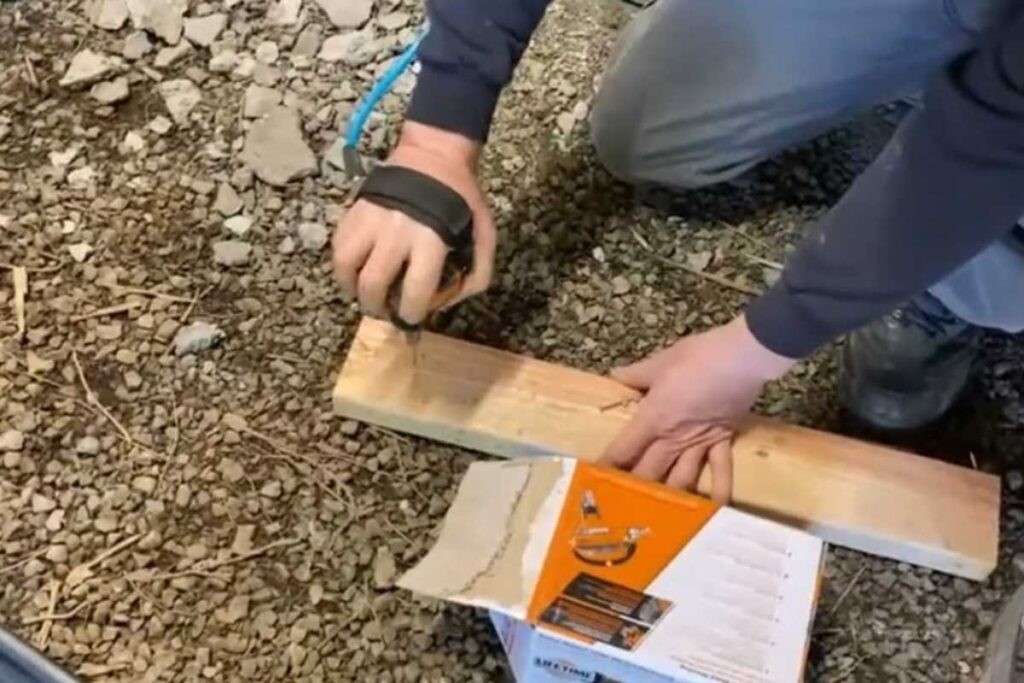
- Practice on Scrap Wood: Before working on your project, practice on some scrap wood to get comfortable.
- Keep the Nailer Clean: Dirt and debris can mess up your tool, so keep it clean for the best results.
Common Mistakes and How to Avoid Them 🚫
Everyone makes mistakes, but with these tips, you can avoid the most common ones:
- Holding the Nailer Too Tightly: This can make your hand tired and affect your accuracy. Relax your grip a bit!
- Not Using Safety Gear: Always wear your safety gear—better safe than sorry!
- Pushing Too Hard: Let the nailer do the work. Pushing too hard won’t make it faster and can damage your tool.
When to Use a Palm Nailer vs a Hammer 🔨
So, when should you use a palm nailer instead of a hammer? Great question! Use a palm nailer when:
- You need to work in tight spaces where a hammer won’t fit.
- You have a lot of nails to drive, and you want to save your energy.
- You want more precision, especially for delicate projects.
But if you just need to drive one or two nails, or you’re working on something simple, a hammer might be easier and quicker.
Maintenance Tips
Learning how to use a palm nailer can make your woodworking projects easier and faster. Proper maintenance ensures your tool lasts long and functions efficiently. Below are essential maintenance tips that will help you keep your palm nailer in top condition.
Cleaning The Palm Nailer
Regular cleaning of your palm nailer is crucial for its longevity. Dust, dirt, and debris can affect its performance. Follow these steps to clean your palm nailer:
- Disconnect the tool: Always disconnect the tool from the air supply before cleaning.
- Use compressed air: Blow out dust and debris using compressed air, focusing on the nailer’s interior parts.
- Wipe the exterior: Use a clean, dry cloth to wipe the exterior. Avoid using water or solvents.
- Lubricate moving parts: Apply a few drops of pneumatic tool oil to the moving parts to ensure smooth operation.
A clean palm nailer performs better and lasts longer. Regular cleaning also helps you spot any potential issues early.
Troubleshooting: When Things Go Wrong 😬
Even with regular maintenance, you may encounter some issues with your palm nailer. Here are common problems and their solutions:
- Jamming: Nails can get stuck in the nailer.
- Solution: Remove the jammed nail carefully using pliers.
- Check for bent or damaged nails and replace them.
- Air Leaks: An air leak can reduce the efficiency of the nailer.
- Solution: Check the hose and fittings for leaks.
- Tighten any loose fittings and replace damaged hoses.
- Inconsistent Nailing: The nailer may not drive nails consistently.
- Solution: Ensure the air pressure is at the recommended level.
- Clean and lubricate the nailer to ensure smooth operation.
Regularly checking and troubleshooting your palm nailer helps maintain its performance. Addressing issues early prevents bigger problems later.
Applications Of Palm Nailers
Palm nailers are small, handheld tools that drive nails with speed and precision. They are perfect for tight spaces where a hammer or larger nailer cannot reach. Knowing how to use a palm nailer can greatly improve your nailing tasks. Below, we explore the various applications of palm nailers.
Ideal Projects
Palm nailers are excellent for various projects. Their compact size allows them to fit into tight spaces, making them ideal for:
- Framing: Perfect for nailing in tight corners and between studs.
- Deck Building: Great for securing deck boards, especially in hard-to-reach areas.
- Joist Hangers: Simplifies the process of nailing joist hangers, ensuring a secure fit.
- Fencing: Useful for nailing fence pickets and rails.
- Sheathing: Ideal for attaching plywood or OSB sheathing.
For a better understanding, here’s a table outlining the best uses of palm nailers:
| Project | Usefulness |
|---|---|
| Framing | High |
| Deck Building | Moderate |
| Joist Hangers | High |
| Fencing | Moderate |
| Sheathing | Low |
Limitations Of Palm Nailers
Despite their usefulness, palm nailers have some limitations. These tools are not suitable for all nailing tasks. Key limitations include:
- Power: Palm nailers generally have less power than larger nail guns.
- Speed: They are slower for large-scale projects requiring many nails.
- Fatigue: Prolonged use can cause hand and wrist fatigue.
- Noise: Palm nailers can be quite noisy, requiring ear protection.
- Air Supply: They need a constant air supply from a compressor, limiting portability.
Consider these limitations before choosing a palm nailer for your project. Here’s a quick comparison table:
| Limitation | Impact |
|---|---|
| Power | Moderate |
| Speed | High |
| Fatigue | Moderate |
| Noise | Low |
| Air Supply | High |
DIY Projects You Can Do with a Palm Nailer 🏡
Now that you know how to use a palm nailer, here are some fun projects to try:
- Build a Birdhouse: Perfect for practicing your nailing skills and making something cute!
- Deck Repair: Use your palm nailer to fix up your deck quickly and easily.
- Install Trim: Get those tricky nails in tight corners without breaking a sweat.
FAQs: How to Use a Palm Nailer?
Do You Oil A Palm Nailer?
Yes, you should oil a palm nailer. Regular oiling ensures smooth operation and extends the tool’s lifespan. Use pneumatic tool oil.
Can You Frame With A Palm Nailer?
Yes, you can frame with a palm nailer. It’s ideal for tight spaces and quick tasks. For extensive framing, use a full-size nailer.
How Many Nails Does A Palm Nailer Hold?
A palm nailer typically holds one nail at a time. It’s designed for precision work, not bulk nailing.
How Does A Milwaukee Palm Nailer Work?
A Milwaukee palm nailer drives nails using compressed air. It fits in your palm, offering precision and ease in tight spaces.
What Is A Palm Nailer?
A palm nailer is a small, handheld tool used to drive nails into wood or other materials with precision.
How Does A Palm Nailer Work?
A palm nailer uses compressed air or electricity to drive nails quickly and efficiently into various surfaces.
Can A Palm Nailer Drive All Nail Sizes?
Most palm nailers can drive nails ranging from 1. 5 inches to 3. 5 inches in length.
Conclusion
Mastering the use of a palm nailer can boost your efficiency. Practice regularly to improve your skills. Follow safety guidelines to prevent injuries. With these tips, you can handle any nailing task effortlessly. Enjoy the convenience and precision that a palm nailer offers.
Happy nailing!
Recent Posts
15 Ga vs 16 Ga Finish Nailer: Which One Is Right for Your Project?
If you're diving into the world of finish carpentry or simply trying to upgrade your home tool kit, you've probably run into the question: 15 ga vs 16 ga finish nailer—what’s the big deal? They...
Woodworking in 2025 is all about efficiency, precision, and smart technology. Whether you're a beginner or a seasoned craftsman, having the right tools can make all the difference. Here are the top 7...