
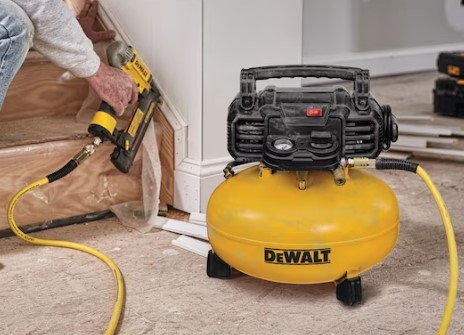
To use a nail gun with an air compressor, first, attach the air hose to the compressor and the nail gun. Then, set the desired pressure and load the appropriate nails into the nail gun.
Using a nail gun with an air compressor is a popular alternative to using a hammer because it saves time and effort and reduces the risk of injury. This device is perfect for conducting any type of nailing work, such as framing, molding, cabinetry, and construction.
For beginners, understanding how to use a nail gun with an air compressor can be a bit daunting, but with proper guidance, it can be done with ease.
This guide will simplify the process of how you can safely and efficiently use a nail gun with an air compressor, ensuring that your project will be completed with precision and accuracy.
Understanding Your Equipment
Nail guns with air compressors are incredibly efficient and make for fast and precise nail placement. However, before using the nail gun with an air compressor, it’s essential to have a basic understanding of the equipment.
Parts Of A Nail Gun
A nail gun consists of specific parts that ensure the equipment operates effectively. The essential parts of a nail gun include the trigger, magazine, nosepiece, and depth adjustment.
- Trigger: The trigger controls the release of the nail from the nail gun.
- Magazine: The magazine is the part of the nail gun that holds the nails.
- Nosepiece: The nosepiece is the tip of the nail gun that comes in contact with the material being nailed.
- Depth adjustment: The depth adjustment controls how deep the nail goes into the wood.
Air Compressor Parts
An air compressor is required to power the nail gun. Here are the critical parts of an air compressor.
- PSI setting: PSI stands for pounds per square inch, which determines the air pressure running through the nail gun. You have to ensure that the PSI setting matches your nail gun’s requirements.
- Connector: The connector connects the air compressor to the air hose.
- Air Hose: The air hose delivers compressed air from the compressor to the nail gun.
Choosing the Right Nail Gun
Selecting the correct nail gun is crucial for a successful project. Different nail guns suit various applications, and compatibility with an air compressor is paramount. From framing nailers to brad nailers, understanding the types is the first step in making an informed decision.
Factors like nail size, magazine capacity, and firing mechanism should also be considered.
Selecting the Correct Air Compressor
Choosing the right air compressor is a critical step in ensuring the seamless operation of your nail gun. The power requirements for nail guns can vary significantly, and understanding your air compressor’s capacity is key to achieving optimal performance.
Let’s delve into this crucial aspect to make the best choice for your specific needs.
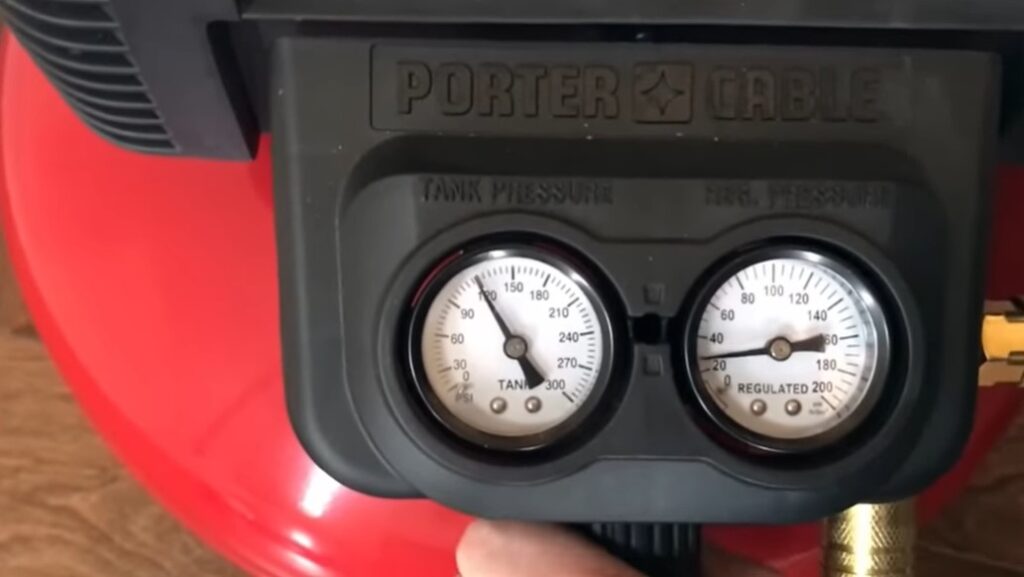
Understanding PSI:
PSI refers to the pressure of the air delivered by the compressor. Different nail guns operate optimally at different PSI levels. Check the manufacturer’s recommendations for your specific nail gun model.
As a general guideline, framing nailers may require a higher PSI (around 100–120) compared to finish or brad nailers.
Deciphering CFM:
CFM is the volume of air the compressor delivers per minute. It’s crucial to match the CFM rating of the compressor with the requirements of the nail gun.
Heavy-duty nail guns, such as framing nailers, often need a higher CFM (around 2-5) to maintain consistent power.
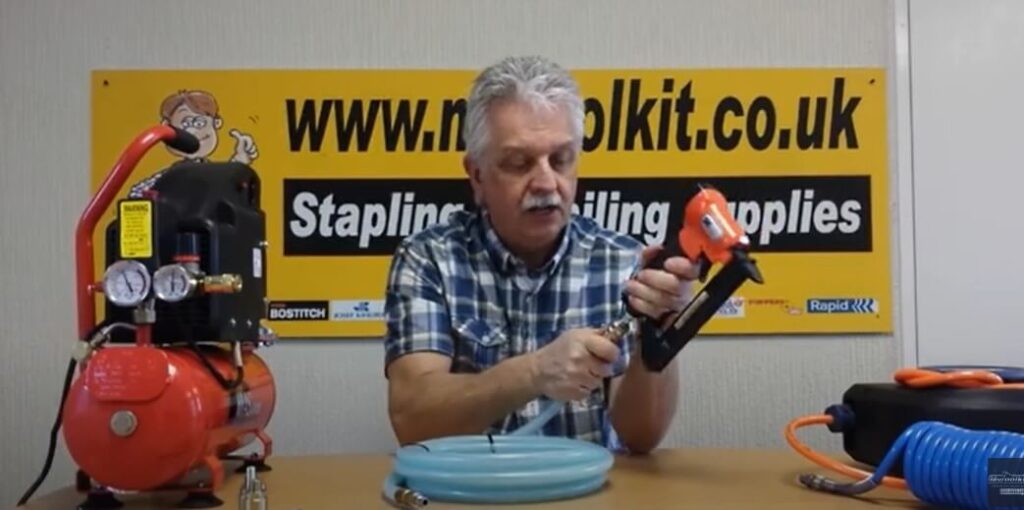
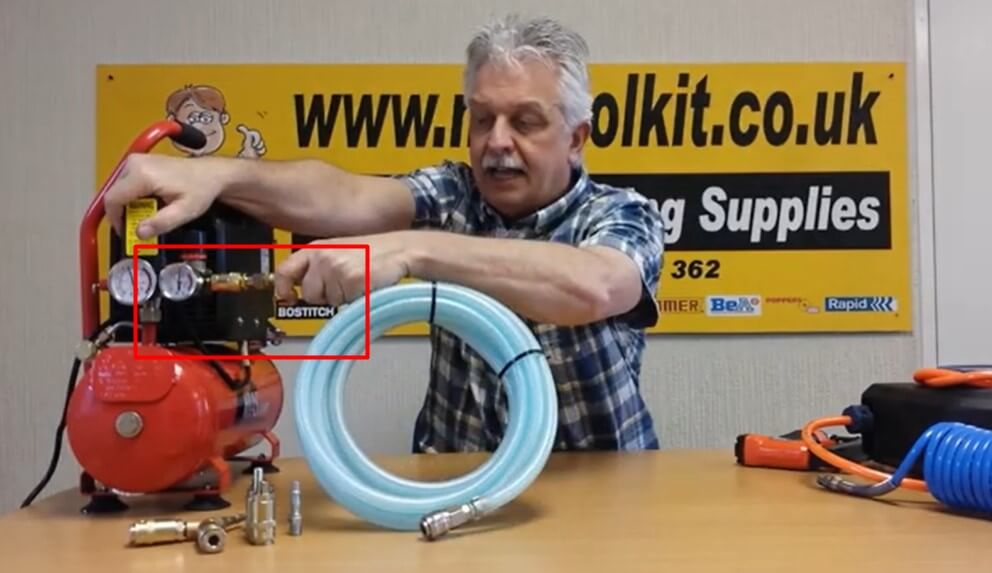
How To Connect Air Gun To Compressor?
Connecting an air gun to a compressor is a straightforward process. First, ensure that both the air gun and the compressor are compatible in terms of fittings. Most air guns and compressors use standard connectors. If they don’t match, you might need an adapter.
- Prepare the Air Gun: If your air gun has a quick-connect fitting, simply pull back the collar, insert the fitting, and release the collar. If not, use a wrench to securely attach the air hose to the gun.
- Prepare the Compressor: Attach the other end of the air hose to the compressor. Again, ensure a tight connection to prevent air leaks. If your compressor has adjustable pressure settings, set it to the desired level.
- Turn On the Compressor: Power up the compressor, and it will start building air pressure. Monitor the pressure gauge to make sure it reaches the appropriate level for your task.
- Test the Air Gun: Once the compressor reaches the desired pressure, test the air gun by pulling the trigger. You should hear a burst of air. Adjust the pressure if needed, depending on your application.
Remember to follow safety guidelines, such as wearing protective gear and using the air gun in a well-ventilated area.
If you have specific models or additional details, feel free to provide them for more tailored instructions.
How To Disconnect Nail Gun From Air Compressor?
Disconnecting a nail gun from an air compressor is a breeze.
Here’s a quick guide:
- Release Pressure: Before disconnecting, release the pressure in the air compressor. Most compressors have a release valve—turn it counterclockwise to let out the air. Ensure the pressure gauge reads zero.
- Locate the Disconnect Mechanism: Check for a quick-connect coupling or similar mechanism where the air hose attaches to the nail gun. It’s usually a collar or lever that needs to be manipulated.
- Depressurize the Hose: If your nail gun has a built-in pressure release, activate it. This ensures there’s no residual pressure in the hose.
- Disconnect the Hose: Once depressurized, push back the collar or release the lever on the quick-connect coupling and pull the air hose away from the nail gun.
- Secure the Hose: If you plan to store the hose, it’s good practice to secure the free end to prevent any damage.
Always prioritize safety and follow any manufacturer-specific instructions for your particular nail gun and air compressor models.
How To Use An Air Compressor For The First Time?
Using an air compressor for the first time is a straightforward process. Here’s a step-by-step guide to get you started:
- Read the Manual: Before anything else, familiarize yourself with the user manual that comes with your air compressor. It provides essential information about safety, setup, and operation specific to your model.
- Choose a Suitable Location: Place the air compressor on a level surface in a well-ventilated area. Ensure there’s enough space around it for proper airflow and maintenance.
- Inspect the Compressor: Check the compressor for any visible damage or loose parts. Ensure that all components, including hoses and fittings, are in good condition.
- Connect Power: Plug in the air compressor to a suitable power source. Make sure to use the correct voltage and follow any safety guidelines regarding electrical connections.
- Attach the Air Hose: Connect one end of the air hose to the compressor’s outlet. Use a wrench to tighten the connection securely.
- Connect Tools: If you’re using pneumatic tools, connect them to the other end of the air hose. Ensure that the fittings match, and use adapters if necessary.
- Adjust Pressure Settings: Set the desired pressure level on the compressor. Refer to the pressure recommendations for your specific tools or application.
- Turn On the Compressor: Start the compressor using the power switch or button. Allow it to build up pressure until it reaches the set level. Most compressors have a pressure gauge to monitor this.
- Use Pneumatic Tools: With the compressor pressurized, you can now use your pneumatic tools. Pull the trigger on the tool to release compressed air and perform your task.
- Turn Off and Disconnect: Once you’re done, turn off the compressor and release any remaining pressure using the release valve. Disconnect tools and hoses safely.
Remember to wear appropriate safety gear, such as eye protection and ear protection, when using pneumatic tools.
If you have any specific concerns or details about your air compressor, refer to the manual or provide additional information for more tailored advice.
How To Use Porter Cable Air Compressor And Nail Gun?
To use a Porter Cable air compressor and nail gun, start by placing the compressor on a stable surface and ensuring it’s in a well-ventilated area.
Connect the air compressor to a suitable power source and attach the air hose to the compressor’s outlet, securing the connection with a wrench.
Power on the compressor and set the desired pressure level using the pressure regulator.
For the nail gun, load the appropriate nails into the magazine and adjust the depth setting if necessary.
Connect the nail gun to the air hose, making sure the fittings match.
Once the compressor reaches the set pressure, you can use the nail gun by pressing the trigger to drive nails into your work surface.
Always follow safety guidelines, wear protective gear, and refer to the Porter Cable user manual for model-specific instructions.
How To Adjust The Nail Gun For Using With An Air Compressor?
Before using a nail gun with an air compressor, it is crucial to adjust the nail gun according to the project’s requirements. Here are some essential adjustments that should be made:
PSI Settings
The PSI (pounds per square inch) setting is crucial when using a nail gun. The right PSI setting ensures that the nailer correctly drives the nails into the wood, and the wrong PSI setting can result in under-driven or over-driven nails.
Here’s how to adjust the PSI:
- First, check the nail gun’s user manual to determine the recommended psi range. For example, a brad nailer typically requires 60–100 psi, while a framing nailer requires 100–130 psi.
- Next, attach the hose and nail gun to the air compressor and turn on the compressor.
- Adjust the pressure until the required PSI setting is reached by turning the regulator knob.
- Test the nailer on a piece of scrap wood to make sure the nail is driven in perfectly.
Depth Adjustment
Adjusting the nail gun’s depth is critical when working with different types of wood or if the nails are not driven deep enough.
Here’s how to adjust the depth:
- Use a test piece to set the nail depth. Adjust the depth by turning the depth adjustment wheel.
- If the nail head is not sunk sufficiently, increase the depth of the nail gun. If it is driven too deep so that it protrudes from the wood, decrease the depth setting.
Angling Of The Nail Gun
The angle of the nail gun is another crucial adjustment that should be made. It determines the precise position where the nails are driven into the wood.
Here’s how to adjust the angling of the nail gun:
- Check the angle required for your project and adjust the nail gun’s angle accordingly by pushing the release button and adjusting the nail gun angle up or down.
- Make sure to adjust the angle before attaching a new magazine.
Adjusting the nail gun is an essential part of project preparation, and it determines the quality of the results.
Therefore, ensure that you understand each adjustment and practice it frequently to become an expert and achieve perfection in all your projects.
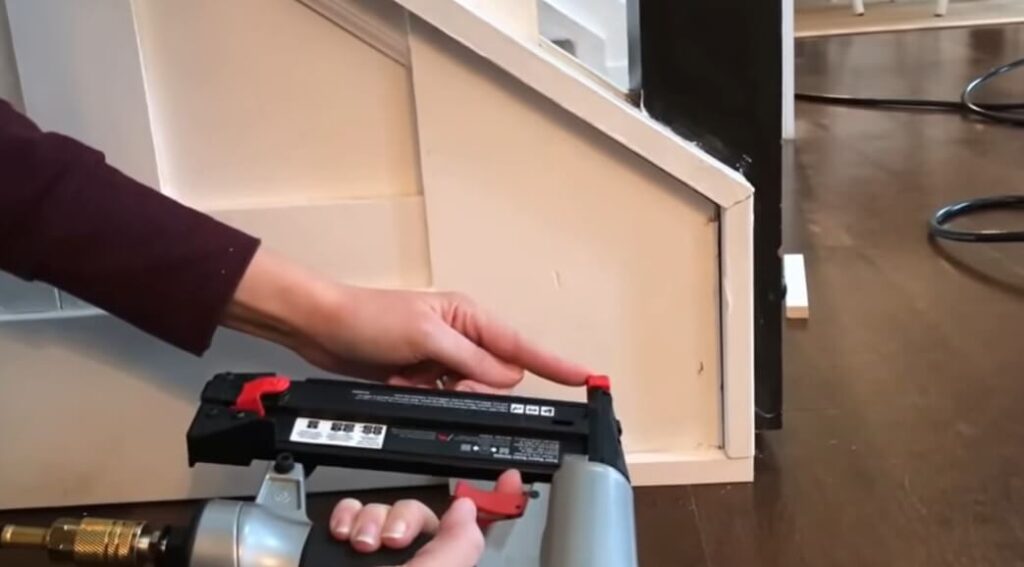
Using Your Nail Gun With Air Compressor
If you’re a DIY enthusiast or professional carpenter, using a nail gun with an air compressor can make your job easier and faster.
Here’s a guide on how to use a nail gun with air compressor, with a focus on proper nail gun grip, consistent nail spacing, posture and position when nailing, how to pull the trigger, and how to troubleshoot common problems.
Proper Nail Gun Grip
Having a proper grip on your nail gun can help prevent accidents and improve your overall nailing accuracy. Here are the key points to remember:
- Grip the handle of the nail gun with your fingers wrapped around it.
- Place your thumb over the nail gun handle’s top.
- Keep your wrist straight while holding the nail gun.
- Do not put your finger on the trigger until the nail gun reaches the correct nailing position.
Consistent Nail Spacing
Consistent nail spacing can make a difference in the appearance and efficiency of your project. Here are the key points to remember:
- Use the proper nail size and type for your project.
- Measure and mark the area where you’ll be nailing to ensure consistent spacing.
- Refer to your nail gun’s manual for recommended spacing.
- Create a nailing pattern and stick to it.
Posture And Position While Nailing
Correct posture and position can reduce fatigue and prevent back and shoulder pain. Here are the key points to remember:
- Stand in a comfortable and stable position.
- Align your body with your nailing surface.
- Hold the nail gun with both hands, supporting it with your non-dominant hand.
- Keep your elbows close to your body while nailing.
How To Hold The Nail Gun
Knowing how to hold your nail gun can improve accuracy and avert accidents. Here are the key points to remember:
- Hold the nail gun’s handle with your dominant hand while supporting it with your non-dominant hand.
- Keep your fingers wrapped around the handle and your thumb over the top.
- Align the nose of the nail gun with the surface you’ll be nailing.
- Hold the nail gun at a 90-degree angle to the surface.
How To Pull The Trigger
Knowing how to pull the nail gun trigger can help you avoid misfires and jams. Here are the key points to remember:
- Put your finger on the trigger only when you’re ready to nail.
- Hold your nail gun firmly in position.
- Squeeze the trigger to release a nail.
- Keep the nail gun in place for a second to allow the nail to fully set.
How To Troubleshoot Common Problems
Like any tool, nail guns can be subject to issues that can be frustrating and unexpected. Here are some common problems and how to address them:
Nail jams: Turn off the air compressor. Open the nose of the gun and remove the jammed nail with pliers. Close the nose and turn the air compressor back on.
Misfires: Check your nail gun’s pressure and adjust as needed. Verify that you are using the right type of nail for your project.
Double firing: Ensure the nail gun is at a 90-degree angle to the surface. Pull your trigger only once.
By following these simple guidelines, you can use a nail gun with air compressor to your advantage. Ensure that you exercise caution when using such tools and take all standard safety precautions.
FAQs: How To Use Nail Gun With Air Compressor?
How Does A Nail Gun Work With An Air Compressor?
A nail gun uses compressed air to drive nails into different surfaces easily and efficiently.
How Do I Adjust The Air Pressure For The Nail Gun?
The recommended air pressure range for a nail gun is typically 70–120 psi. Adjust the regulator to the required pressure.
Can I use any nail gun with my air compressor?
Not all nail guns are compatible with every air compressor. Check the manufacturer’s recommendations for both tools to ensure compatibility and optimal performance.
Can I Use An Air Compressor With Other Tools Apart From A Nail Gun?
Yes, air compressors can be used with a wide range of tools, including paint sprayers, impact wrenches, and staplers.
What safety precautions should I take?
Ensure your safety by wearing protective gear, including safety glasses and ear protection. Always disconnect the air hose when not in use to prevent accidental discharges.
What should I do if my nail gun misfires?
Misfires can result from improper nail loading or low air pressure. Double-check your nail loading process, and if the issue persists, ensure your air compressor is delivering sufficient pressure.
Why is my air compressor not building enough pressure?
This could be due to a leak in the air hose, a malfunctioning pressure switch, or a worn-out piston ring. Inspect and address these issues to restore your air compressor’s efficiency.
How often should I clean my nail gun?
Regularly clean your nail gun after each use to prevent debris buildup. A more thorough cleaning, including lubrication, should be performed every 10,000 nails or as recommended by the manufacturer.
Are there specific lubricants recommended for air compressors?
Yes, specific lubricants recommended for air compressors are synthetic compressor oils or oils labeled as suitable for air compressors.
Conclusion
Therefore, using a nail gun with an air compressor is a very efficient and time-saving choice for your DIY or professional construction projects. However, it is crucial to know the safety procedures, the best practices, and the right type of nailer and air compressor for the job.
Always wear the appropriate safety gear, never point the nail gun at anyone, and never use the tool if you are not familiar with its operation. Moreover, choose the right PSI level for the job, use the appropriate type and size of nails, and keep your tools in top condition through regular cleaning and oiling.
By following these guidelines and practicing caution, you can successfully use a nail gun with an air compressor and achieve accurate and consistent results every time. Happy crafting!
Related Post
Will A 3 Gallon Air Compressor Run A Brad Nailer? Expert Opinion
Yes, a 3-gallon air compressor can run a brad nailer. Brad nailers are pneumatic tools that require relatively low air pressure and volume compared to larger tools like framing nailers or spray...
Did you ever think that the house you're living in how was constructed? Maybe, or maybe not. Whatever, you'll be surprised to learn that wood is used to construct over 90% of American homes...