
Looking to simplify your cedar shingle project? Discover the game-changer – a 15-degree coil siding nailer. These nifty tools are tailor-made for hassle-free cedar shingle installation. They’re your secret weapon for securing shingles without any splits or setbacks, plus they work at lightning speed, saving you precious time.
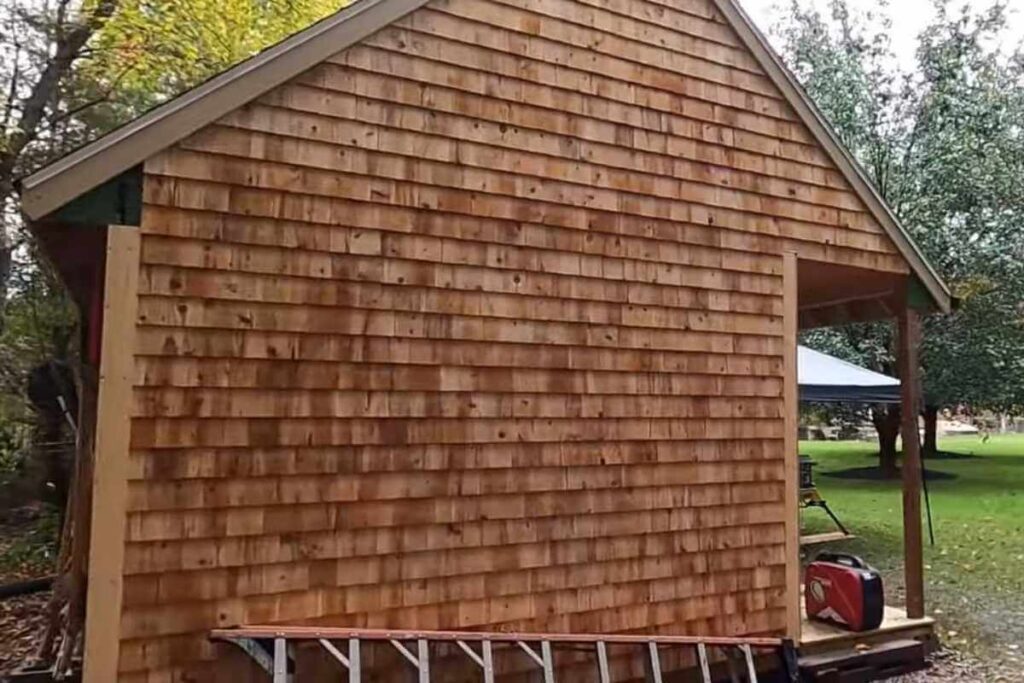
Cedar shingles are an excellent choice for homes and structures, offering unmatched durability and natural resistance to rot and pests. Yet, installing them traditionally can be grueling and time-consuming.
That’s where nail guns come in. They’re a lifesaver for many DIY enthusiasts and pros. But remember, not all nail guns are created equal, and choosing the right one is pivotal when dealing with cedar shingles.
In this guide, we’ll walk you through the nail gun options that are tailor-made for cedar shingles and provide tips for their safe and efficient use.
Importance Of Choosing The Right Nail Gun For Cedar Shingles
It is important to choose the right nail gun for cedar shingles for a number of reasons.
- To ensure proper installation: Cedar shingles are a natural product and can vary in thickness and density. Using a nail gun that is not designed for cedar shingles can increase the risk of splitting or damaging the shingles.
- To avoid overdriving nails: Cedar shingles are relatively soft and can be easily overdriven. Using a nail gun that is too powerful or that does not have adjustable depth control can damage the shingles and reduce their lifespan.
- To use the correct type of nails: Cedar shingles should be installed with galvanized ring shank nails that are 1-1/4 inches to 2-1/2 inches long, depending on the thickness of the shingles. Using the wrong type of nails can increase the risk of the nails rusting or failing over time.
A coil siding nailer is the best type of nail gun for cedar shingles because it is designed to drive nails at a specific angle and depth, and it has a magazine that holds a coil of nails, which allows you to fire nails quickly and efficiently.
Here are some of the benefits of using a coil siding nailer to install cedar shingles:
- Speed and efficiency: Coil siding nailers are much faster and more efficient than hand nailing. This can save you a significant amount of time and effort when installing a large number of shingles.
- Accuracy: Coil siding nailers are designed to drive nails at a specific angle and depth, which helps to ensure that the shingles are properly installed.
- Reduced risk of damage: Coil siding nailers are less likely to damage the shingles than hand nailing. This is because they drive the nails quickly and precisely.
Overall, using a coil siding nailer is the best way to ensure that your cedar shingles are properly installed and that they will last for many years to come.
Types Of Nail Guns For Cedar Shingles
When it comes to installing cedar shingles, using the right nail gun is essential to ensure a perfect finish. The most suitable nail gun type for cedar shingles depends on the task you want to accomplish.
We’ll discuss the different types of nail guns that are best suited for cedar shingles.
Pin Nailers – The Pinner
A pin nailer, also known as a pinner, uses thin gauge nails that are 23 gauge, 1 to 2 inches long, and can hold cedar shingles in place without splitting the wood.
Here are the advantages and disadvantages of using a pin nailer:
Advantages
- Leaves no visible holes or marks on the cedar shingles
- The narrow gauge of the nails prevents the wood from splitting
- Lightweight and easy to use, which makes it a great fit for overhead work
- Affordable compared to other nail guns
Use Cases
- Installing cedar shingles for decorative purposes in a relatively stable environment
Finish Nailers – The Finisher
A finish nailer uses thicker gauge nails that are 15 to 16 gauge, 1.25 to 2.5 inches long. It’s also called a brad nailer. It’s suitable for cedar shingles with no gap between them.
Here are the advantages and disadvantages of using a finish nailer:
Advantages
- Leaves small holes that can quickly be filled up with wood filler for a smooth finish
- Best suited for finishing tasks such as crown moldings, baseboards, and frames
- Able to drive deeper into the wood, which provides a stronger hold
Use Cases
- Installing cedar shingles with a tight fit
Roofing Nailers – The Roofer
Roofing nailers use fasteners with a head that’s large enough to hold the cedar shingle in place and a long enough shaft to pass through the shingle, decking, and the roof’s sheathing.
Here are the advantages and disadvantages of using a roofing nailer:
Advantages
- Fast and efficient, which makes it perfect for large projects
- Designed with safety features and allows for precision in placement
- Capable of fastening cedar shingles onto high-pitched or steep roofs
Use Cases
- Installing cedar shingles on roofs
Siding Nailers – The Sider
Siding nailers are similar to roofing nailers but suitable for exterior cedar shingle projects. They use a steel, ring-shank nail and can withstand harsh weather conditions.
Here are the advantages and disadvantages of using a siding nailer:
Advantages
- Can handle tougher wood that’s resistant to splitting
- Provides a strong hold, allowing for increased resistance to the elements
- Appropriate for exterior use
Use Cases
- Installing cedar shingles on exterior walls
Advantages of a 15-Degree Coil Siding Nailer for Cedar Shingles:
Based on the discussion above, we determined that siding nailers, specifically 15 degree coil siding nailers, are the ideal for installing Cedar Shingles. Because 15-degree coil siding nailers are less likely to fracture thin and brittle Cedar shingles.
Let’s look at some more advantages of employing 15 degree coil siding nailers for Cedar shingles:
- Reduced Risk of Splitting: These nailers are specially designed to drive nails into thin wood without causing splits or cracks in the cedar shingles. This feature is crucial to maintaining the shingles’ integrity and appearance.
- High Rate of Fire: 15-degree coil siding nailers are known for their speed. They can rapidly drive nails one after another, which is a significant time-saver when you’re dealing with a large number of shingles. This efficiency can significantly cut down on your project time.
- Consistent Nailing: These nailers provide consistent depth and angle when driving nails, ensuring uniform and professional results across your cedar shingle surface.
- Ease of Loading: The coil magazine allows you to load a substantial number of nails, reducing the frequency of reloading and increasing productivity.
- Balanced Weight: These nailers are typically lightweight and well-balanced, making them comfortable to use for extended periods, reducing user fatigue.
While there are other types of nail guns available, such as framing nailers and finish nailers, they are not as well-suited for cedar shingle installation due to the risk of splitting and different nail types they use.
For the best results and an efficient, hassle-free cedar shingle project, the 15-degree coil siding nailer is your go-to option. Its combination of speed, precision, and reduced risk of damaging the wood make it an ideal choice for this specific application.
Consider your specific needs and the type of cedar shingle you want to install; this will help you select the right nail gun for the job.
Factors To Consider When Choosing The Right Nail Gun For Cedar Shingles
If you’re considering using cedar shingles as your roofing or siding material, it’s crucial to use the right nail gun to ensure the shingles are installed correctly. With so many options available, it can be overwhelming to decide which nail gun to use.
In this section, we’ll explore the key factors that you need to consider when selecting the right nail gun for cedar shingles.
Type Of Shingles
There are two types of cedar shingles: hand-split and machine-cut. Hand-split cedar shingles are thicker, uneven in size and texture, and require a longer nail to secure them.
On the other hand, machine-cut shingles are thinner, uniform in size and shape, and require a shorter nail.
Make sure to select a nail gun with a nail length appropriate for the type of cedar shingles you plan to use.
Size Of The Nails
The size of nails also depends on the thickness of cedar shingles. For hand-split shingles, nails between 1-¾ to 2 inches long should be used, while for machine-cut shingles, nails between 1-¼ to 1-½ inches long should be used.
The nail gun should be able to accept these nail sizes.
Angle Of The Nails
Nail guns come in two types of angles: straight and angled. A straight nail gun has better access to tight spaces and is suitable for installing cedar shingles on walls. However, an angled nail gun has better maneuverability and is useful for installing shingles on the roof.
Decide what type of nail gun to use based on where you need to install the cedar shingles.
Adjustable Depth
Having adjustable depth adjustment feature in your nail gun will allow you to set the desire depth on the go. Also it will help you to reduce overdriving or under driving nails into your Cedar shingles.
So, check this carefully whether your nail gun have this facilities or not during purchase.
Magazine Capacity
Magazine capacity is the number of nails a nail gun can hold in its magazine. A nail gun that can hold a high number of nails can significantly reduce downtime for reloading, making the job quicker and more efficient.
Ensure the magazine capacity is sufficient for the job.
Power Source
Most nail guns are powered by either air, electricity, or batteries. However, air-powered nail guns are the most popular for cedar shingles as they provide consistent power. Electric or battery-powered nail guns may not be powerful enough to penetrate cedar shingles.
Weight And Ergonomics
Installing cedar shingles can be a time-consuming project, so selecting a lightweight nail gun with an ergonomic grip can make the job less strenuous.
Consider how long you will be working with the tool, and choose a nail gun that won’t add unnecessary strain on your hand and wrist.
Ease Of Use And Maintenance
Choose a nail gun that is easy to use and maintain, allowing you to increase productivity and avoid any unnecessary downtime. It’s crucial to follow the manufacturer’s maintenance instructions to ensure the nail gun performs to its best and lasts for an extended period.
By considering the factors outlined above, you can choose the nail gun that will best suit your project needs.
Remember to select a nail gun with the appropriate nail length, magazine capacity, angle, power source, weight, ergonomics and ease of use and maintenance to ensure a quick and efficient installation of your cedar shingles, with professional-looking results.
Comparison Of Top Nail Guns For Cedar Shingles
If you’re a DIY enthusiast looking to do your roof, deck, or siding using cedar shingles, it’s necessary to have a nail gun for quick and efficient work. Now, we will go through some of the best cedar shingle nail guns available in the market by category.
Here’s a comparison table for the top nail guns used for cedar shingles, including the pin nailer, finish nailer, roofing nailer, and siding nailer:
| Aspects | Pin Nailer | Finish Nailer | Roofing Nailer | Siding Nailer (15-degree Coil) |
|---|---|---|---|---|
| Suitable for Cedar Shingles | Not Recommended | Not Recommended | Not Recommended | Highly Recommended |
| Nail Type | 23-gauge headless pins | 15 to 16-gauge finishing nails | Coil nails or roofing nails | Coil siding nails |
| Nail Length | 1/2″ – 2″ | 1″ – 2-1/2″ | 1-1/4″ – 2″ | 1-1/4″ – 2-1/2″ |
| Angle | Straight | Straight | Straight or angled | 15-degree angle |
| Rate of Fire | Rapid, but individual shots | Moderate | Rapid (for roofing) | Rapid (for siding) |
| Splitting Risk | Minimal (small holes) | Moderate (more significant holes) | High (risk of splitting) | Low (designed for cedar) |
| Use with Compressor | Yes | Yes | Yes (Typically) | Yes (Typically) |
Note:
- Suitability for Cedar Shingles: The “Suitable for Cedar Shingles” column indicates whether the nail gun is a good choice for cedar shingle installation. Pin and finish nailers are not recommended due to the risk of splitting the wood. Roofing nailers may be used, but they carry a higher risk of splitting. The 15-degree coil siding nailer is highly recommended for cedar shingles.
- Nail Type: Specifies the type of nails used by each nail gun. For cedar shingles, coil siding nails or specific shingle nails are most appropriate.
- Nail Length: Indicates the range of nail lengths that each nail gun can accommodate, which is important for securing cedar shingles effectively.
- Angle: Describes the angle at which the nail gun drives nails. Cedar shingles are best secured with a 15-degree coil siding nailer.
- Rate of Fire: Refers to the firing speed of the nail gun, which can affect your work efficiency.
- Splitting Risk: Reflects the likelihood of splitting the cedar shingles when using the nail gun. The 15-degree coil siding nailer has a low risk of splitting.
- Use with Compressor: Specifies whether the nail gun typically requires a compressor for operation.
Keep in mind that the choice of the right nail gun for cedar shingles significantly impacts the quality of your work and the overall ease of your project.
For cedar shingles, the 15-degree coil siding nailer stands out as the most suitable option due to its low splitting risk and efficient operation.
What Size Nails For Cedar Shingles?
The size of nails that you need for cedar shingles will depend on the thickness of the shingles. The general rule of thumb is to use nails that are at least 3/4 inches longer than the thickness of the shingles. For example, if you are using 1/2-inch thick cedar shingles, you would use 1-1/4 inch nails.
Here is a table of recommended nail sizes for cedar shingles:
| Shingle Thickness | Nail Size |
|---|---|
| 1/2 inch | 1-1/4 inch |
| 5/8 inch | 1-3/4 inch |
| 3/4 inch | 2-1/2 inch |
It is important to use nails that are long enough to penetrate the sheathing and shingle by at least 3/4 inches. This will help to ensure that the shingles are properly secured and that they will last for many years to come.
In addition to the length of the nail, it is also important to choose the right type of nail for cedar shingles. Cedar shingles should be installed with galvanized ring shank nails.
Here are some tips for choosing and using nails for cedar shingles:
- Choose galvanized ring shank nails that are the correct size for the thickness of your shingles. Galvanized nails are resistant to rust and corrosion, which is important for outdoor applications. You can find galvanized ring shank nails at most home improvement stores.
- Make sure that the nails are long enough to penetrate through the shingle and into the roof sheathing by at least 3/4 of an inch.
- Select ring shank nails as they are less likely to split the wood than smooth shank nails, and they provide a better grip on the shingles.
- Drive the nails in at a slight angle, so that the head of the nail is flush with the surface of the shingle.
- Avoid overdriving the nails, as this can split the shingles.
If you are unsure about what size nails to use for your cedar shingles, it is always best to consult with a roofing professional.
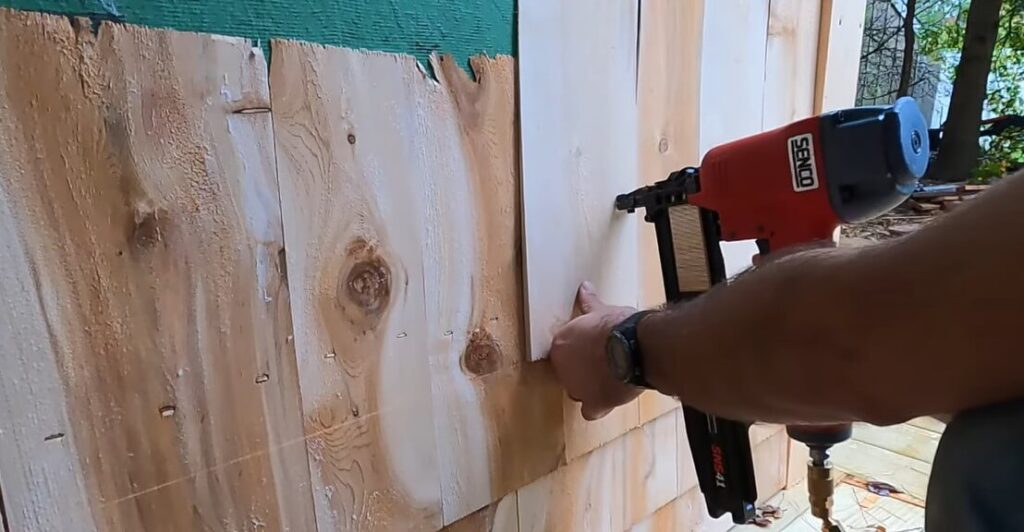
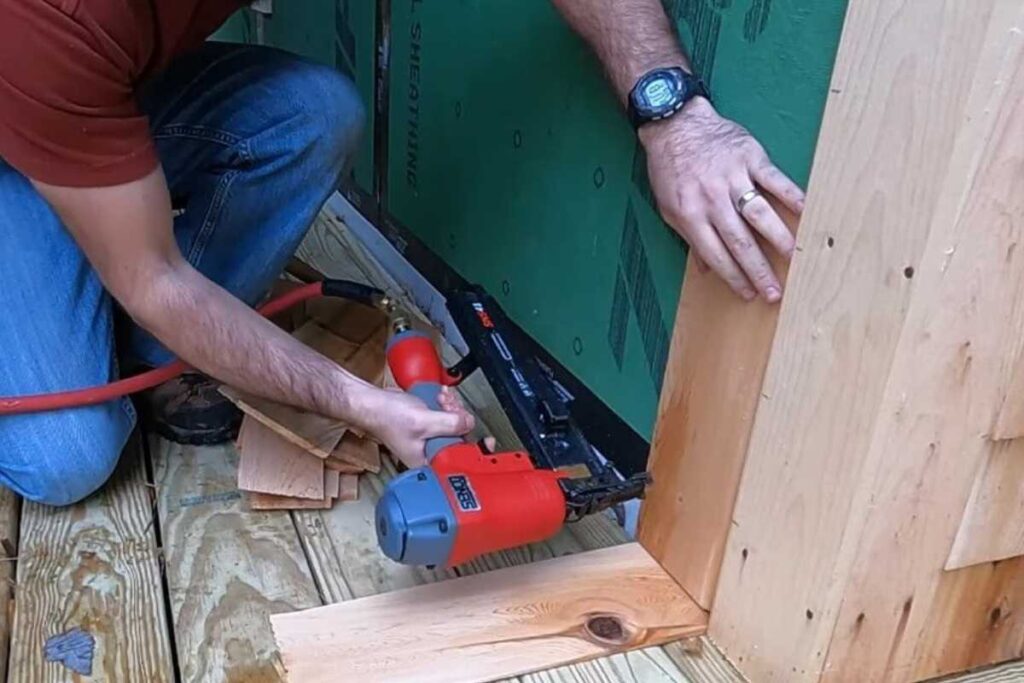
Tips For Using Nail Guns For Cedar Shingles
Safety First: Personal Protective Equipment
When it comes to using nail guns for cedar shingles, safety should always come first. You want to avoid any potential injuries or accidents that could arise from using the tool. Here are some personal protective equipment tips to keep in mind:
- Wear safety glasses to protect your eyes from flying debris.
- Use hearing protection to prevent hearing damage from the loud noise of the nail gun.
- Wear gloves to protect your hands from splinters and other injuries.
- Consider wearing a hard hat to protect your head from falling shingles.
Proper Technique And Handling
Using the right technique when operating the nail gun can make a significant difference in the outcome of the project. Here are some expert tips for properly using and handling a nail gun:
- Adjust the air pressure to suit the shingle type and thickness you’re working with.
- Maintain control of the nail gun at all times and always keep it pointed away from yourself and others.
- Keep your non-dominant hand away from the line of fire.
- Hold the nail gun perpendicular to the shingle, adjusting it as needed.
- Only fire nails when the gun makes contact with the shingle.
- Do not fire a nail into knots or other imperfections in the shingle.
Maintenance And Cleaning
Keeping your nail gun clean is crucial to ensure that it operates safely and correctly. Here are some maintenance and cleaning tips to consider:
- Read the manufacturer’s instructions for maintenance and adhere to them.
- Regularly oil the nail gun, using the oil recommended by the manufacturer.
- Wipe down the nail gun with a clean cloth after each use to remove any dirt or debris.
- Use compressed air to blow out any dust or debris inside the nail gun.
- Clean and inspect the nail gun’s nosepiece before each use.
By following these tips, you can safely and effectively use a nail gun for cedar shingles. Remember to wear proper personal protective equipment, use the right technique, and keep the nail gun clean and well-maintained.
Best Coil Siding Nailers For Cedar Shingles
The best coil siding nailers for cedar shingles are those that are designed to drive nails at a specific angle and depth, and that have adjustable depth control. This helps to ensure that the shingles are properly installed and that the nails are not overdriven.
The best coil siding nailers for cedar shingles are:
- Paslode IM45 Coil Siding Nailer
- Dewalt DCN690B Cordless Coil Siding Nailer
- Freeman PCN65 Pneumatic Coil Siding Nailer
- Bosch FSN40C Coil Siding Nailer
Paslode IM45 Coil Siding Nailer:
The Paslode IM45 is a reliable pneumatic coil siding nailer known for its consistent performance. It’s a popular choice among professionals for its ability to handle a variety of siding materials, including cedar shingles, with ease.
Dewalt DCN690B Cordless Coil Siding Nailer:
The Dewalt DCN690B is a cordless coil siding nailer, offering the convenience of portability without the need for an air compressor. It’s a versatile and powerful tool that excels in both speed and precision, making it a top choice for siding projects, including cedar shingle installations.
Freeman PCN65 Pneumatic Coil Siding Nailer:
The Freeman PCN65 is a cost-effective pneumatic coil siding nailer that’s perfect for contractors on a budget. Despite its affordability, it delivers reliable performance and is suitable for a variety of siding materials, including cedar shingles.
Bosch FSN40C Coil Siding Nailer:
The Bosch FSN40C is a high-quality pneumatic coil siding nailer known for its precision and durability. It’s a professional-grade tool designed to tackle various siding materials, ensuring a secure and long-lasting attachment, making it a top choice for cedar shingles and other siding applications.
These nailers are all well-designed and durable, and they are all capable of driving nails at the correct angle and depth for cedar shingles. They also have a variety of features that make them easy to use, such as comfortable grips, adjustable depth control, and easy-loading magazines.
Here is a more detailed comparison of the four nailers:
| Feature | Paslode IM45 | Dewalt DCN690B | Freeman PCN65 | Bosch FSN40C |
|---|---|---|---|---|
| Nail capacity | 125 Fixing | 100 | 100 | 100 |
| Nail size | 1-1/4″ to 2-1/2″ | 1-1/4″ to 2-1/2″ | 1-1/4″ to 2-1/2″ | 1-1/4″ to 2-1/2″ |
| Firing mode | Single and contact | Single and contact | Single and contact | Single and contact |
| Weight | 7.2 lbs. | 8.3 lbs. | 7.5 lbs. | 7.6 lbs. |
| Price | Check on Amazon | Check on Amazon | Check on Amazon | Check on Amazon |
Ultimately, the best coil siding nailer for you will depend on your individual needs and budget. If you are looking for a top-of-the-line nailer with all the bells and whistles, the Paslode IM45 is a great option.
If you are looking for a cordless nailer, the Dewalt DCN690B is a good choice. If you are on a budget, the Freeman PCN65 is a good value. And if you are looking for a lightweight and easy-to-use nailer, the Bosch FSN40C is a good option.
No matter which nailer you choose, be sure to read the instructions carefully and use it safely.
FAQs: What Nail Gun To Use For Cedar Shingles?
What Size Nail Gun Is Best For Cedar Shingles?
The best size nail gun for cedar shingles is a 15-degree coil siding nailer. This type of nail gun is designed to drive nails at the correct angle and depth for cedar shingles, which helps to prevent splitting and damage. It also has a magazine that holds a coil of nails, which allows you to fire nails quickly and efficiently.
You can also explore the above list of the best coil siding nailer to narrow down your list of choice.
What Type Of Nails Should I Use For Cedar Shingles?
The best type of nails to use for cedar shingles are galvanized ring shank nails. These nails are resistant to rust and corrosion, and they have a better grip on the wood, which helps to prevent the shingles from splitting.
When choosing galvanized ring shank nails for cedar shingles, be sure to select the correct size. The size of the nails you need will depend on the thickness of the shingles.
For standard cedar shingles, which are typically 1/4 inch thick, you should use galvanized ring shank nails that are 1-1/4 inches to 1-1/2 inches long.
For thicker cedar shingles, such as those that are 1/2 inch thick, you should use galvanized ring shank nails that are 1-3/4 inches to 2-1/2 inches long.
Can I Use A Regular Nail Gun For Cedar Shingles?
You should use a nail gun specifically designed for cedar shingles to prevent damage.
What Is The Recommended Air Pressure For Cedar Shingles?
Set the air pressure between 80 and 100 psi for the best results.
Do I Need To Predrill Holes For Cedar Shingles With A Nail Gun?
No, predrilling is not required with a nail gun specifically manufactured for cedar shingles.
Can I Hand-Nail Cedar Shingles Instead Of Using A Nail Gun?
Yes, you can hand-nail cedar shingles but it is a time-consuming process and using a nail gun will save time.
Will A Coil Roofing Nailer Work For Cedar Shingles?
Yes, a coil roofing nailer can be used for cedar shingles but it should have a modified nose piece.
Conclusion
In conclusion, selecting the right nail gun is a critical decision when working with cedar shingles, a material known for its durability and natural beauty. After exploring various types of nail guns, it’s evident that not all are created equal for this specific application.
The 15-degree coil siding nailer emerges as the clear winner for cedar shingle projects. Its ability to drive nails efficiently, minimize the risk of splitting, and offer a consistent and professional finish makes it the go-to choice for woodworkers and construction professionals alike.
By making an informed decision and choosing the right tool for the job, you’ll not only save time but also ensure your cedar shingle project stands the test of time, maintaining its structural integrity and aesthetic appeal.
So, when you’re ready to tackle cedar shingles, remember, the 15-degree coil siding nailer is your trusted companion for success.
Recent Posts
Woodworking is one of the most rewarding hobbies and professions, but it also comes with serious risks if proper precautions are not taken. Whether you're working with a table saw, planer, or simple...
What to Use If You Don't Have a Brad Nailer: Handy Alternatives
You can use a hammer and finishing nails paring with nail set or wood glue if you don't have a Brad Nailer. These tools effectively secure trim and small woodworking projects. So, if you’re in...