
If you’re into DIY woodworking, trim installation, or crafting, a brad nailer is one of the most rewarding tools to own. Whether you’re tackling picture frames, delicate moldings, or light cabinetry, this tool brings speed, precision, and a clean finish. Therefore, it is essential to know how to use a brad nailer for precise and safe operation.
In this guide, you’ll learn everything—from what a brad nailer actually is and when to use it, to safe operation tips, troubleshooting, and even maintenance ideas.
Let’s begin the journey.
What Is a Brad Nailer & When to Use It?
Brad Nailer or Trim Nailer is a small nail gun that is mainly used for the precise finishing of woodworking projects. It is designed to drive 18 gauge 5/8 to 2 inches nails called brad, which are more modest and more delicate than finishing nails.
Brad additionally highlights an exceptionally flimsy head, which brings about a more modest nail opening after the nail is driven underneath the wood’s surface. This implies you’ll have to do less filling up of the hole with wood filler prior to completing the thing, and you will not have to fill the opening at all in certain conditions.
When should you choose a brad nailer?
Brad nailers shine in situations where you need precision without damaging the wood. You can opt for a brad nailer:
- When installing lightweight trim & baseboard, decorative molding, fixing thin plywood, or crafting projects where you want minimal nail visibility.
- When holding pieces temporarily—like during glue sets—or securing thin panels where stronger, larger nails would split the wood.
Can you use a brad nailer for roofing? – lets learn more.
Compared to other nailers:
- Finish nailers (15- or 16-gauge) deliver stronger hold but leave bigger holes.
- Pin nailers (23-gauge) leave near-invisible marks, ideal for ultra-fine detail, but lack holding strength.
Types of Brad Nailers
There aren’t many options to choose from when it comes to brad nailer styles. Because the majority of brad nailers are built to drive 18 gauge brad nails, there are no other sorts of nails that are suitable for it. In brad nailers, you’ll only find straight magazines.
As a result, there is no way to distinguish them based on nail gauge, angle, or other factors. In a nutshell, selecting and using it is a breeze.
Be that as it may, in view of the driving force, there are two types of brad nailers: pneumatic and electric.
1. Pneumatic Brad Nailer:
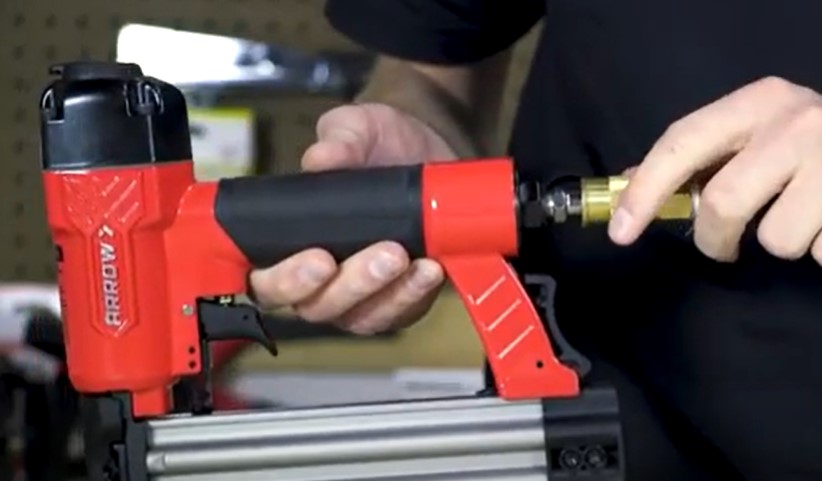
Pneumatic brad nailers are generally popular and broadly utilized in light of their adaptability and simplicity to use. They utilize compressed air to run and drive nails. Hence, it is powerful, and you can drive nails with it without wasting your time. It likewise gives you an exceptionally clear and expert completion each time.
Pneumatic brad nailers are modest in cost, however, you need to put resources into a compressor and hoses. Air compressors might make noise, which is sometimes inconvenient to users and nearby persons. Bearing air hoses additionally restricts portability.
It also needs normal oiling and upkeep, and sometimes, you are required to change the hose, which includes costs over the long haul.
Key Points:
- Runs on an air compressor.
- Powerful and reliable.
- Ideal for professionals or frequent use.
2. Electric Brad Nailer:
Electric brad nailers typically convey an electric engine rather than a compressed air chamber of pneumatic nailers and can create a similar force as pneumatic ones. This engine can be fueled by a direct electric line or by utilizing a battery.
In view of this, we again can separate electric brad nailers into two classifications – corded and cordless.
As the Corded Brad Nailers are associated with the power source of the mainline, you will get a continuous power supply and can drive more nails in a short measure of time. In any case, they again limit portability like pneumatic nailers.
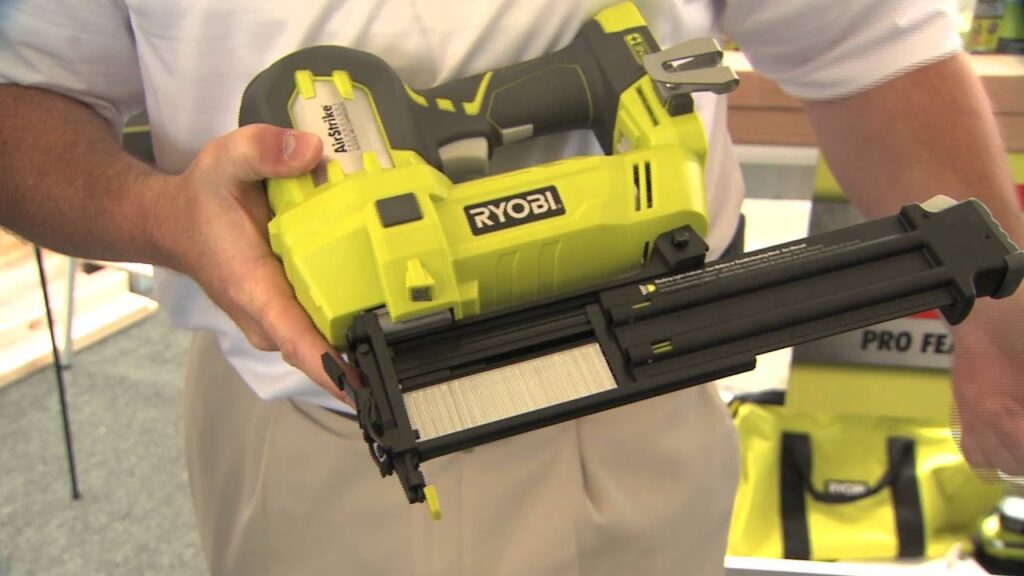
Cordless Brad Nailers, then again, are utilizing battery ability to run the engine. Therefore, they won’t need any hose or air compressor and along these lines can give the most elevated versatility to drive nails at tight corners as well as off-grid regions.
Key Points:
- Corded or cordless (battery-powered).
- More portable and convenient.
- Perfect for home DIY projects.
Components of a Brad Nailer
A brad nailer may look compact, but it’s built with several key parts that work together to deliver smooth, accurate nail shots. Whether you’re using a pneumatic or electric version, most brad nailers share the following components:
1. Nosepiece (or Tip)
- The front part of the nailer where the brad nail exits.
- Must be pressed firmly against the work surface before the trigger activates (a safety feature).
- Some models have a non-marring tip to prevent scratches on delicate wood.
2. Magazine
- Holds the strip of brad nails.
- Typically designed as a slide-in or bottom-load system.
- Keeps nails aligned so they feed smoothly into the firing chamber.
3. Magazine Release Latch
- A small lever or button used to open the magazine for loading or clearing jams.
- Essential for quick reloading during projects.
4. Trigger
- The control that fires the nail.
- Two types:
- Sequential trigger: Requires pressing the nosepiece before the trigger (safer).
- Contact/bump trigger: Fires as soon as both nose and trigger are pressed (faster but less safe).
5. Handle / Grip
- Ergonomically designed for comfort.
- Often padded with rubber for better grip and reduced vibration during use.
6. Depth Adjustment Dial (or Wheel)
- Lets you control how deep the brad nails sink into the wood.
- Very useful for preventing overdriving (nails going too deep) or underdriving.
7. Exhaust Vent (for Pneumatic Models)
- Directs air away from the user after each shot.
- Some models have an adjustable exhaust so you can control where the air blows.
8. Air Inlet (for Pneumatic Models)
- The connection point where the air hose from the compressor attaches.
- Usually has a quick-connect fitting for easy use.
9. Battery Port (for Cordless Models)
- Located at the base of the handle.
- Holds the rechargeable lithium-ion battery that powers the tool.
10. Safety Mechanism
- Prevents accidental firing unless the nosepiece is pressed against a surface.
- This ensures nails only fire when intended.
11. Belt Hook (Optional)
- A handy clip that allows you to hang the brad nailer on your tool belt.
- Useful for professionals moving around job sites.
👉 In short, a brad nailer is a combination of precision engineering and safety design. The nosepiece, magazine, trigger, and depth control all ensure accuracy, while safety mechanisms like the nose lock and exhaust vent keep the user protected.
Preparing for Use A Brad Nailer
A. Safety Precautions:
Though a brad nailer is a small nail gun and less powerful than other heavy-duty nail guns, it has the ability to injure you. So, you have to be cautious while using any power tool.
- For that, you should wear appropriate safety gear including safety glasses and ear protection. You should also avoid wearing any loose clothing during working with any machine.
- Ensure the work area is well-ventilated.
- Disconnect the power source before any maintenance or adjustments.
It would be also helpful if you be careful when driving nails. Do not put your finger in between the brad nailer and the work surface you’re going to fasten in any way.
Please do not keep the nail gun unattended while it is plugged in. Always remember to shut the power off during loading the magazine or upkeep.
B. Familiarize Yourself with the User Manual:
A brad nailer’s specification and other characteristics, such as air pressure, voltage, depth adjustment, jam clearing, troubleshooting technique, and so on, differ from one brand to the next.
If you read the instruction booklet provided by the manufacturer thoroughly before starting to drive nails, you will gain a complete understanding of your instrument and be able to take the required steps to ensure that the nail gun runs properly.
Reading the instruction manual also assists you to identify any specific requirements or limitations for your brad nailer model.
Steps Of How To Use A Brad Nailer
I hope you’re getting a sense of what a brad nailer is, how it’s used, and what styles are available. You also get a glimpse of the safety precautions.
Now, as promised, we’d want to get started on the most efficient way to use it and how to load it, and use it correctly.
A. Choose The Right Power Source
Before moving into the procedure of the use, it is essential to select the right kind of power source for your brad nailer. If your brad nailer is a pneumatic one, you will require an air compressor.
To work with a pneumatic brad nailer, you will require an air compressor that has the ability to create no less than 2 CFM airflow @ 90 PSI and can uphold 70 to 120 PSI gaseous tension.
Note: On the off chance that you purchase a lower limit air compressor than the required, you can’t drive brads effectively. It will either under or over-flush with the stock. You’ll likewise require hoses to associate the air compressor with the nailer.
Once you choose the right kind of air compressor and hose, the next task is to secure the hose and set the right amount of air pressure.
To secure the hose, you can wrap Teflon tape on the hose adapter and then insert it into the compressor and nailer connector. Teflon tape will help you to protect against leaking of air during operation.
Adjusting the air pressure at the compressor device depends on the nailing depth and the density of the wood. If you need more deep driving, you have to increase the air pressure and vice versa. The same adjustment procedure you have to follow in case you’re driving nails into soft or hard lumber.
If you choose a cordless brad nailer, you will need a battery to fire it. It is simple to charge and insert the battery before shooting with a brad nailer. You can do it rapidly.
B. Loading A Brad Nailer
Once you choose the right brad nailer for you, it’s time to fill the brad nail gun with brads. Despite the fact that it is not a difficult task, we recommend that you follow the following guidelines:
Note: For safety, you must first unplug the hose, cord, or battery from your brad nail gun before loading it.
Step 1: Select the Correct Length Of Brad
Brad nailers are typically intended to acknowledge ⅝” to 2” brad. Check your nailer in particular and utilize the right sort of brad nails. On the off chance that you attempt to stack more short or greater nails than suggested, it won’t work.
- Shorter nails: Perfect for delicate trim.
- Longer nails: Better for thicker wood pieces.
Tip: Always match the nail size to the thickness of your wood.
Can you use a brad nailer for fencing? – lets learn more.
Step 2: Select the Correct Gauge For Brad
You should buy the right gauge (thickness) brad as well as the right length. If you’re wondering what the difference is between 16 gauge and 18 gauge nails, I’d say it’s significant.
A brad nailer never can drive 16 gauge nails, you’ll need a finish nailer for that.
Step 3: Release the Magazine Latch and Open the Magazine
After selecting the correct brads, open the magazine latch by pressing a button or pulling it outward.

Step 4: Align the Nails in the Correct Position
Place the nail strip (full unit) on the magazine. When placing the nails, take care that the pointy end points downwards. If you failed to place the nail strip correctly, you may encounter frequent jamming issues during shooting.
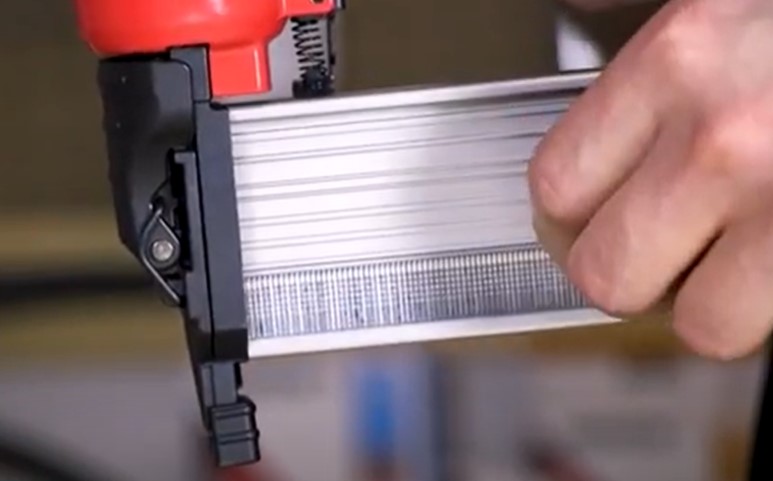
Note: Though it may not be evident that you must always load entire or unbroken strips, continuous strips can help you achieve smoother brad feeding and jam-free nailing. As a result, be cautious when handling the strips and try to avoid feeding broken strips.
Step 5: Push Forward And Slide The Magazine Shut
Insert the brad strip as close to the nail gun’s head (or firing point) as possible. Then gently close the magazine shutter. Some brad nailer magazines are shelf-accelerating, so you may not need to move them.
Keep in mind, if you slam the magazine shut too hard, it may damage the brad strip (particularly if it’s a non-continuous piece) and cause jamming.
C. Positioning And Depth Adjustment
After loading the magazine with the right sort of brad nails, it is time to position the brad nail gun on the workpiece and set the depth of drive.
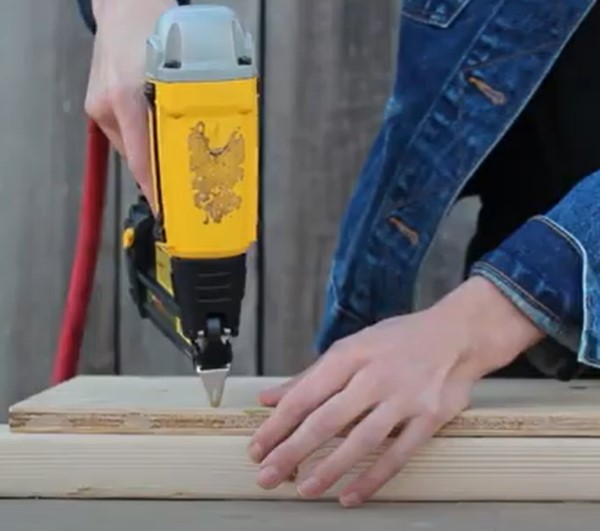
Step 1: Position The Tip On The Workpiece
You will discover both sequential and contact actuation modes in a brad nailer. In case you’re a fledgling to brad nailer, it is smarter to pick the sequential mode as it needs to press the trigger and afterward push the tip onto the surface to fire a nail. Therefore, it is a protected and more precise technique for driving nails.
In this way, select the mode, then, at that point, select the position of nailing on the working surface and pull the trigger and push the nailer to fire brad. You could do some homework prior to going for definite activities.
Moreover, attempt to drive nails at the center of the edge of the board or trim to abstain from parting.
Step 2: Set The Perfect Depth of the Drive
Setting the desired depth of drive is necessary to get the finest work. Under flush or over flush both may cause problems. Under flush or protruding nail head need further hammering. As brads are thin and long wire, pounding by a hammer may bend them and, in worst cases, may ruin your workpiece.
Deep driving a nail, on the other hand, may make it easy to pull off the trim or baseboard and weaken the structure.
Now, how could you adjust the depth of drive?
You can do it in two ways – by adjusting the air pressure in the compressor machine or tuning up the nail gun using a depth adjustment wheel or knob.
D. Test The Brad Nailer
It would be better if you do some practice on scrap wood which is similar to the original. It is necessary to be similar kinds of wood because different wood has different densities and thus needs different depth settings.
Doing some practice on scrap also gives you an idea about the force and efficacy of a brad nailer. In addition, it can save your trim or molding (that you’re going to attach to your kitchen cabinet or wall) from being scrap.
Good to Go
Now all set, and you are good to go for the final operation with your brad nailer.
Tips for Better Accuracy and Control
When it comes to using a brad nailer effectively, proper holding and positioning are crucial for accurate and secure nailing. Follow these techniques to ensure optimal results:
Apply steady pressure on the trigger:
When ready to nail, maintain consistent and steady pressure on the trigger. Squeezing the trigger too quickly or releasing it abruptly can affect the accuracy and depth of the nail.
A controlled and smooth trigger action will result in better control and more accurate nailing.
Space the nails evenly and avoid overcrowding:
Depending on your project requirements, space the nails evenly along the work surface. Overcrowding the nails too close together can lead to splitting or weakening of the material.
Refer to the manufacturer’s guidelines for the recommended spacing between nails for optimal results.
Practice proper timing and rhythm:
Developing a rhythm while nailing can help maintain a consistent pace and improve accuracy. It’s important to time the trigger release and nail placement properly. As the nail is being driven into the material, release the trigger to prevent excessive force or over-penetration.
This will ensure the nail is properly embedded without causing any damage to the surface.
Some quick tips:
- Keep both hands steady.
- Adjust depth settings to avoid nails sticking out.
- Angle slightly if needed to prevent splitting.
- Combine with wood glue for stronger bonds.
By following these nailing techniques, you’ll be able to achieve clean and precise results with your brad nailer. Remember to always prioritize safety, accuracy, and patience while using the tool.
Practice these techniques on scrap materials before starting any project to familiarize yourself with the brad nailer’s operation and enhance your skills.
Common Mistakes to Avoid
- Using nails too short or too long.
- Pressing too hard against the wood.
- Forgetting to test on scrap pieces first.
- Ignoring jams or skipping tool maintenance.
Maintenance and Care of a Brad Nailer
Proper maintenance can enhance the life of a tool. It is also necessary for smooth operation. You may follow the following upkeep techniques to get better output from your brad nail gun.
- Clean regularly: Wipe down after each use.
- In the case of a pneumatic brad nailer, you have to lubricate it every day or at regular intervals to keep it working.
- In addition to oiling the brad nailer, you should also check the O-rings, nail gun barrel, whether the hose has any leakage or not, and whether all other parts are in good condition or not.
- If you use your nail gun in winter, do not forget to keep the nailer in a warm place after everyday use.
Our Favorite Brad Nailers
Our number one choice for brad nailer is from Metabo HPT, an incredibly famous brand of power tools. According to our experience, it is the best pneumatic brad nailer equipped for dealing with a wide scope of applications soundlessly.
Our next most loved brad nailer is a cordless one and from another famous brand Porter-Cable. It is great for people who need infrequent attaching work or inclines toward simple versatility.
Also, our last competitor is from WEN. It’s an inexpensive brad nailer reasonable for DIYers who needs to get a decent pneumatic nailer without spending a lot.
Let’s read the advantages and drawbacks of every one of them beneath.
1. Metabo HPT NT50AE2 – Best Pneumatic Brad Nailer

Benefits Of Metabo Pneumatic Brad Nailer
- It is a lightweight (2.2 pounds only) and durable brad nailer.
- Adequately powerful to pass through hardwoods, including oak and maple.
- Switching between bump to sequential firing is simple.
- It is equipped with dent protection and non-marring tips.
- Its reload indicator allows you to stop blank firing.
- Its compact body design aids it to fire in weird positions.
- Tool-less, easy-to-clear nose permits speedy jam discharge.
Drawbacks
- Can only shoot 18-gauge brad nails
To read the customer reviews and explore the latest price, you may click here.
2. PORTER-CABLE PCC790LA – Best Cordless Brad Nailer

Benefits Of Porter Cable Cordless Brad Nailer
- If you choose it, you can cut the cost of gas cartridges.
- You can likewise move freely as it no longer needs any bulky compressor or hose.
- It is outfitted with a solid engine that can give a pneumatic-like force.
- It is functional for a wide range of wood and climate conditions.
- Jam clearing and stall release are a breeze with it.
- It is furnished with a tool-free depth adjustment wheel.
- Multi-utilitarian LED for light and error signs.
Drawbacks
- Ideal for light-duty work, as it were.
To read the customer reviews and explore the latest price, you may click here.
3. WEN 61721 – Best Bang For The Buck
Benefits Of WEN 61721 Brad Nailer
- Exceptionally reasonable contrasted with its convenience
- Lightweight and compact in design
- Easy-to-utilize and comfortable
- Depth adjustment is a breeze
- Without hassle, jam clearing
- Quick and effortless loading and unloading of nails
- Large magazines help longer run time
- Lowest air utilization, 0.028 CFM @ 88 PSI
Drawbacks
- A little jamming problem.
To read the customer reviews and explore the latest price, you may click here.
Assuming you need to get a total rundown of the best brad nailers, you might visit our page for reviews and guides of top rated brad nailers by clicking here.
How to Properly Use a Brad Nailer?
To use a brad nailer safely and effectively:
- Choose the right brad length—about three times the thickness of the material you’re nailing.
- Load the tool correctly, keeping the strip intact for smooth feeding, and lock the drawbar securely.
- Adjust depth and pressure—start at mid-settings, then fine-tune using test shots on scrap materials.
- Position the tool, press the contact tip firmly, and squeeze the trigger; the tool fires only when both are properly engaged.
- Finalize the depth—look for a flush or slightly recessed nail head, adjusting as needed.
This method ensures precision, prevents damage, and gives a clean finish—perfect for trim, molding, or detail work.
How Long Should Brad Nails Be for Trim?
The optimal length of a brad nail should be roughly three times the thickness of the material you’re fastening.
For example:
- Attaching a ½-inch trim piece? Use a 1½-inch brad.
- For ¾-inch pieces, a 1-1/4-inch brad is common and effective.
As noted by experienced woodworkers:
“You’re okay with the 1 1/4”… it goes through the piece and into about 1/3 the next piece.”
This ensures enough penetration for holding strength without risking breakthrough on the backside.
When Not to Use Brad Nails?
Avoid brad nails when:
- Fastening heavier or load-bearing trim, such as baseboards, door/window casings, or stair treads. These require the strength of larger 15- or 16-gauge finish nails.
- Working with dense hardwoods or thicker materials, where brads may bend or not offer sufficient hold.
- Needing invisible fastening, like for thin veneers or delicate decorative trim—pin nails (23-gauge) are better suited for that purpose.
Why Won’t My Brad Nailer Shoot My Nails?
Common issues and how to troubleshoot them:
1. Incorrect fasteners or jams
Using the wrong length, gauge, or collation type can cause misfeeds. Clear jams, switch to correct brads.
2. Insufficient air or power
If nails aren’t sinking fully, check your air compressor’s pressure, hose, and fittings.
3. Dirty magazine or stuck feeder
Dirt or sawdust can block movement. Clean using compressed air or a brush.
4. Worn seals or internal damage
Leaks from damaged O-rings, seals, or springs can lower pressure or stop firing. Inspect and replace parts as needed.
5. Broken magazine spring or misaligned driver blade
If brads slide freely or don’t feed, check the spring and alignment, especially if the nailer never fed properly.
6. Battery, trigger, or safety contact issues (for electric models)
Ensure battery is charged and properly seated. Also, check if the safety tip and trigger are engaging correctly.
Real-user insight: some Ryobi users report that lubrication or seal replacement alleviates weak firing or jams. Battery capacity can also affect performance.
FAQs on How to Use a Brad Nailer?
Can a brad nailer be used without an air compressor?
Yes, if it’s a cordless or corded electric brad nailer. Pneumatic models, however, require an air compressor.
What size brad nails are best for trim?
Usually, 1 ½” brads work well for baseboards and trim, but it depends on wood thickness.
Can brad nails hold heavy wood pieces?
Not really. Brad nails are for lightweight applications. Use a finish nailer or screws for heavier wood.
How often should I oil a pneumatic brad nailer?
A drop or two of pneumatic oil before each use keeps it running smoothly.
Is a brad nailer good for beginners?
Absolutely! It’s one of the easiest and safest nail guns for beginners to start with.
Takeaways: How To Use A Brad Nailer?
A brad nailer transforms precision woodworking and finishing projects—making them faster, cleaner, and more satisfying. By understanding when to use it, how to set it up, maintaining it properly, and operating it safely, you’re well on your way to craftsmanship that looks professional and feels rewarding.
You now have everything you need: from setup and loading to firing, troubleshooting, and caring for your tool. Now, get out there, fire up that brad nailer, and bring your next DIY or trim project to life with confidence and finesse!
Related Reviews:
- Brad Nailer vs Finish Nailer
- Nail Gun Not Shooting Nails
- How to Use a Framing Nailer?
- 7 Benefits of Using a Nail Gun
- Can You Use A Brad Nailer For Shiplap?
Tools Mirror is reader-supported. When you shop through retailer links on our site, we may earn an affiliate commission at no cost to you.
Recent Posts
Woodworking is one of the most rewarding hobbies and professions, but it also comes with serious risks if proper precautions are not taken. Whether you're working with a table saw, planer, or simple...
What to Use If You Don't Have a Brad Nailer: Handy Alternatives
You can use a hammer and finishing nails paring with nail set or wood glue if you don't have a Brad Nailer. These tools effectively secure trim and small woodworking projects. So, if you’re in...