
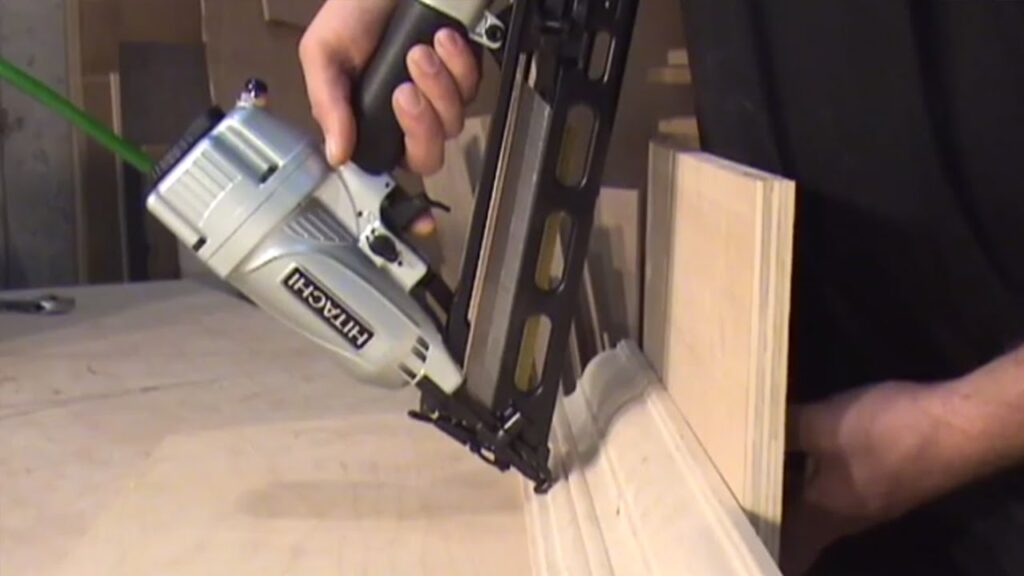
Yes, you can use a finish nailer for exterior trim. Finish nailers are versatile tools designed to securely fasten trim materials such as casings, moldings, and baseboards. They provide precise and professional results, making them ideal for outdoor trim projects that require durability and aesthetic appeal.
Mastering exterior trim work is essential for homeowners and DIY enthusiasts looking to enhance the aesthetic appeal and value of their homes. When it comes to achieving professional-looking results, using the right tools is paramount. Understanding how to effectively use a finish nailer for exterior trim projects can elevate your carpentry skills and ensure a flawless finish.
In this blog, we will explore the benefits, techniques, and best practices of using a finish nailer for exterior trim, empowering you to tackle your outdoor projects with confidence.
“The right tools can turn a simple task into a work of art. When it comes to exterior trim work, a finish nailer is the artist’s brush.”
Tools Mirror
Understanding Exterior Trim
Exterior trim plays a crucial role in enhancing the visual appeal and architectural character of a home. It serves as the finishing touch, adding definition and elegance to windows, doors, eaves, and other exterior elements.
To have a comprehensive understanding of exterior trim, let’s delve into its definition, common materials used, and popular types of trim projects.
Definition and Purpose of Exterior Trim
Exterior trim refers to the decorative and functional elements installed around the exterior of a building. It serves multiple purposes, including:
Aesthetic Enhancement: Trim provides a polished and cohesive look, adding architectural interest and character to the overall design of a home.
Protection: It helps protect vulnerable areas of the building’s exterior, such as the gaps between windows and walls, from moisture, insects, and other environmental factors.
Concealing Joints and Gaps: Trim is used to covering joints, seams, and gaps between various building components, creating a seamless and finished appearance.
Common Materials Used for Exterior Trim
Several materials are commonly used for exterior trim, each offering its own unique characteristics and aesthetic appeal.
Some of the popular options include:
Wood: Traditional and versatile, wood trim provides a classic look and can be easily customized and shaped to fit specific design requirements.
PVC: Polyvinyl chloride (PVC) trim is a low-maintenance and durable alternative to wood. It resists rot, insects, and moisture, making it ideal for exterior applications.
Composite: Composite trim combines wood fibers and synthetic materials, offering the natural beauty of wood with added durability and resistance to decay and warping.
Fiber Cement: Fiber cement trim is composed of cement, sand, and cellulose fibers. It provides excellent durability, and resistance to rot, and can mimic the appearance of wood.
Popular Types of Exterior Trim Projects
Exterior trim can be applied to various parts of a building’s exterior, enhancing both its functionality and aesthetics.
Some common types of exterior trim projects include:
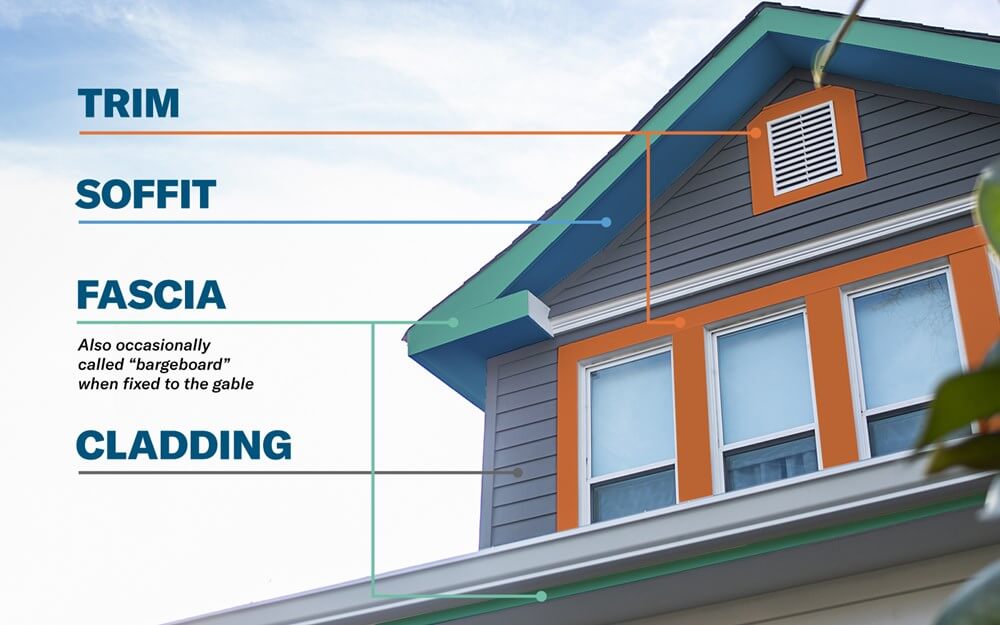
Window and Door Casings: Trim around windows and doors provides a decorative frame, hiding gaps, and providing a transition between the window or door and the surrounding wall.
Soffits and Fascia Boards: Soffits are located under the eaves, while fascia boards are installed vertically along the edge of the roof. Trim in these areas provides a clean and finished look.
Crown Molding and Baseboards: Crown molding adds an elegant touch at the junction of walls and ceilings, while baseboards provide a transition between walls and floors, concealing any gaps.
Siding and Corner Boards: Trim can be used to accentuate the corners of a building and provide a transition between different types of siding materials.
Understanding the fundamentals of exterior trim, including its definition, materials, and various applications, will empower you to make informed decisions when it comes to selecting, installing, and maintaining trim for your home’s exterior.
Benefits of Using a Finish Nailer for Exterior Trim
Using a finish nailer for exterior trim projects offers several advantages, allowing you to achieve professional results efficiently and effectively.
Let’s explore the benefits of utilizing a finish nailer for your outdoor trim work:
1. Precise and Secure Fastening
Finish nailers provide precise and secure fastening of trim materials to various surfaces. The nails used in finish nailers are small and have a smaller head, minimizing the visibility of nail holes. This ensures a clean and seamless finish, enhancing the overall appearance of the trim.
Additionally, the nails are driven deep into the trim and the substrate, preventing movement and potential warping of the trim over time.
2. Time and Labor Saving
Using a finish nailer significantly speeds up the installation process compared to traditional methods such as hammering nails manually. With a finish nailer, you can quickly and efficiently attach trim pieces, saving you valuable time and effort.
This is especially beneficial when working on larger exterior trim projects or multiple installations.
The reduced labor and increased productivity make finish nailers a valuable tool for both professionals and DIY enthusiasts.
3. Versatility for Various Trim Applications
Finish nailers offer versatility, allowing you to tackle a wide range of exterior trim applications.
Whether you’re working on window and door casings, soffits and fascia boards, crown molding, baseboards, or siding and corner boards, a finish nailer can handle the task.
This versatility eliminates the need for multiple tools, simplifying your workflow and ensuring consistent results across different trim projects.
4. Enhanced Durability and Stability
By securely fastening trim materials, a finish nailer helps ensure long-lasting durability and stability. The nails driven by a finish nailer penetrate deep into the trim and the substrate, creating a strong connection that withstands the elements.
This is particularly important for exterior trim exposed to weather conditions, as it helps prevent trim movement, separation, and potential damage.
5. Professional-Looking Finish
One of the key benefits of using a finish nailer for exterior trim is the ability to achieve a professional-looking finish. The precise and controlled fastening provided by a finish nailer results in clean lines, tight joints, and minimal visible fasteners.
This attention to detail enhances the overall aesthetic appeal of your exterior trim, adding value to your home and creating a visually pleasing exterior.
Using a finish nailer for exterior trim work not only saves time and effort but also ensures high-quality, durable, and visually appealing results.
It is a valuable tool that empowers you to tackle your outdoor trim projects with confidence and achieve professional-level craftsmanship.
Drawbacks of Using a Finish Nailer for Exterior Trim
While using a finish nailer for exterior trim projects offers numerous benefits, it is important to be aware of the potential drawbacks associated with its usage.
Consider the following limitations when using a finish nailer for your outdoor trim work:
1. Limited Holding Power
Finish nailers utilize smaller gauge nails with narrower heads compared to other types of nails or screws. While this provides a cleaner finish with minimal visible holes, it also means that the holding power of the nails is relatively lower.
In situations where the trim may be subjected to significant stress or movement, such as with heavy doors or highly exposed areas, additional reinforcement methods may be necessary to ensure long-term durability and stability.
2. Vulnerability to Rust and Corrosion
The exterior trim is exposed to the elements, including moisture and changing weather conditions. The nails used in finish nailers are typically made of steel, which can be susceptible to rust and corrosion over time.
This can compromise the integrity of the trim and affect its overall appearance.
To mitigate this issue, it is crucial to use galvanized or stainless steel nails specifically designed for outdoor applications.
Regular maintenance and inspection of the trim are also recommended to identify and address any signs of rust or corrosion promptly.
3. Limited Fastener Options
Finish nailers are primarily designed for attaching trim and moldings, and they typically accept only nails as fasteners.
While nails are suitable for most exterior trim applications, there may be instances where alternative fasteners like screws or construction adhesives are more appropriate.
For example, when installing exterior trim in areas prone to extreme movement or vibrations, using screws or adhesives can provide added strength and stability.
It is important to assess the specific requirements of your trim project and determine the most suitable fastening method accordingly.
4. Potential Damage to Trim
Using a finish nailer requires careful precision and control to prevent potential damage to the trim materials. If the nail is not properly aligned or if excessive force is applied, it can cause splitting, cracking, or denting of the trim.
This is especially true when working with more delicate or fragile materials.
Proper technique, practice, and familiarity with the specific trim materials being used are crucial to avoid any unintended damage during the fastening process.
5. Noise and Air Compressor Dependency
Finish nailers often require an air compressor to function, which can generate noise and require additional setup and maintenance. The noise generated by the compressor can be disruptive, especially in residential areas or when working in close proximity to others.
Additionally, the need for an air compressor introduces additional equipment requirements and logistical considerations, such as ensuring a proper power source and managing the associated hoses and connections.
While the drawbacks mentioned above should be taken into account, they can be effectively managed and mitigated with proper planning, technique, and choosing the appropriate fastening methods for specific trim applications.
By understanding these limitations, you can make informed decisions and ensure the successful completion of your exterior trim projects using a finish nailer.
Selecting the Right Finish Nailer
Choosing the right finish nailer for your exterior trim projects is crucial to ensure efficient and effective results.
Consider the following factors when selecting a finish nailer specifically designed for outdoor applications:
1. Types of Finish Nailers Suitable for Exterior Trim
There are two main types of finish nailers commonly used for exterior trim work:
Pneumatic Finish Nailer: Pneumatic finish nailers require an air compressor to operate. They are popular for their power, reliability, and consistent performance.
Pneumatic nailers are suitable for heavy-duty trim projects and provide excellent driving force for larger nails.
Cordless Finish Nailer: Cordless finish nailers are powered by rechargeable batteries, offering greater portability and flexibility. They are convenient for projects where access to a power source or mobility is a concern.
Cordless nailers are suitable for lighter trim materials and smaller nails.
Consider your specific project requirements, preferred power source, and mobility needs when choosing between pneumatic and cordless options.
2. Nail Gauge and Length
Selecting the appropriate nail gauge and length is essential to ensure the proper fastening and structural integrity of the trim. The gauge refers to the thickness of the nails, with 15-gauge and 16-gauge being the most common options for finish nailers.
Thicker gauge nails provide greater holding power, while thinner gauge nails leave smaller holes and are less likely to split the trim.
The nail length depends on the thickness of the trim material and the depth of penetration required. Ensure that the nail length is sufficient to securely fasten the trim to the substrate without protruding through the opposite side.
3. Nail Angle and Magazine Capacity
Consider the angle at which the nails are fired from the finish nailer. Most finish nailers are available in either 15-degree or 16-degree angles. The angle selection depends on the accessibility of the trim area and personal preference.
The magazine capacity of the finish nailer determines the number of nails it can hold at a time. A higher magazine capacity reduces the frequency of reloading, saving time and improving productivity.
4. Additional Features and Adjustability
Look for additional features that enhance usability and convenience. Some finish nailers offer adjustable depth settings, allowing you to control the depth of nail penetration. This feature is useful for achieving flush or countersunk nail heads, depending on your project requirements.
Consider the weight and ergonomics of the finish nailer, as you’ll be handling it for extended periods.
A lightweight and well-balanced nailer will reduce fatigue and improve overall comfort during operation.
5. Brand and Quality
Choose a reputable brand known for producing high-quality finish nailers. Research customer reviews and ratings to gauge the performance, durability, and reliability of the nailer.
Investing in a reliable and durable finish nailer will ensure long-term performance and satisfactory results.
Consult with professionals or visit a local hardware store to get hands-on experience and guidance on selecting the right finish nailer for your specific exterior trim needs.
By considering these factors, you can confidently select a finish nailer that meets the requirements of your exterior trim projects, ensuring efficient and precise installation while achieving professional results.
Recommended Finish Nailer Models For Exterior Trim Projects
There are numerous brands and models of finish nailers on the market, making it difficult to select the best one. If you ask me which is the best, I’d say there isn’t a clear winner.
Instead, I recommend the Numax SFN64 and Metabo HPT NT65MA4 finish nailers from the pneumatic category, as well as the Ryobi P325 One+ from the cordless category.
Let’s go over them in more depth.
1. NuMax SFN64 Pneumatic 16-Gauge Finish Nailer

If you’re in the market for a top-of-the-line finishing nailer, the NuMax SFN64 Pneumatic 16-Gauge Finish Nailer is certainly worth considering.
This high-quality tool boasts a number of impressive features, including a lightweight aluminum body, a no-mar tip to prevent damage to surfaces, and an adjustable depth control for precision nail placement.
Additionally, the SFN64 is compatible with a wide range of nail lengths, making it a versatile choice for a variety of applications.
Overall, the NuMax SFN64 is a reliable and efficient tool that will help you get the job done quickly and effectively. If you’re looking for a top-performing finish nailer, this is definitely one to consider.
You will find this amazing tool in the Amazon store or your nearby hardware market. To buy from Amazon you can just click here.
2. Metabo HPT NT65MA4 15-Gauge Finish Nailer

If you’re looking for a 15-gauge reliable and efficient finish nailer, the Metabo HPT NT65MA4 is definitely worth considering. With its lightweight design and comfortable grip, this tool makes it easy to achieve precise and professional results on a variety of woodworking projects.
Like the Numax, it also features a depth adjustment dial, which allows you to customize the nail depth to your specific needs without the need for any tools.
Additionally, the tool’s quick-clear nose makes it easy to remove jams and get back to work quickly.
Overall, the Metabo HPT NT65MA4 15-Gauge Finish Nailer is a solid investment for any professional or DIY enthusiast in need of a high-quality finish nailer.
You will find this amazing tool in the Amazon store or your nearby hardware market. To buy from Amazon you can just click here. You can also buy it from Acme Tools by clicking here.
3. Ryobi P325 One+ 18V Cordless Finish Nailer

If you want to avoid using an air compressor, then you can consider buying this Ryobi P325 One+ 18V Cordless Finish Nailer. It could be an ideal choice for a wide range of finish woodworking projects because of its lightweight design, easy maneuverability, and efficient performance.
It also offers a powerful drive that can handle even the toughest materials, and its depth adjustment feature ensures precise nail placement every time.
Additionally, its compatibility with Ryobi’s One+ 18V battery system makes it a versatile tool that can be used with other Ryobi power tools.
Overall, the Ryobi P325 One+ 18V Cordless Finish Nailer is a reliable and efficient solution that can make your woodworking projects easier and more enjoyable.
You will find this amazing tool in the Amazon store or your nearby hardware market. To buy from Amazon you can just click here.
Preparing for Exterior Trim Work
Proper preparation is key to achieving successful and long-lasting exterior trim work. Before diving into your project, consider the following essential steps to ensure a smooth and efficient installation:
1. Assess the Project Scope
Begin by assessing the scope of your exterior trim project. Take a comprehensive look at the areas that require trim installation or replacement.
Identify the specific trim components, such as window casings, door frames, fascia boards, or corner boards, that need attention.
Evaluate the condition of the existing trim and determine if any repairs or replacements are necessary.
2. Gather Materials and Tools
Compile all the necessary materials and tools needed for the exterior trim work.
This may include-
- Trim boards,
- Nails,
- Caulk,
- Adhesive,
- Primer,
- Paint or stain,
- Sandpaper,
- A measuring tape,
- A miter saw,
- A finish nailer,
- Safety equipment (goggles, gloves, dust mask), and
- Any other specific tools based on your project requirements.
3. Measure and Plan
Accurate measurements are vital for a precise and professional-looking trim installation. Measure the lengths and dimensions of the areas where the trim will be installed.
Double-check the measurements to ensure accuracy and account for any irregularities or adjustments needed due to the nature of the building or architectural details.
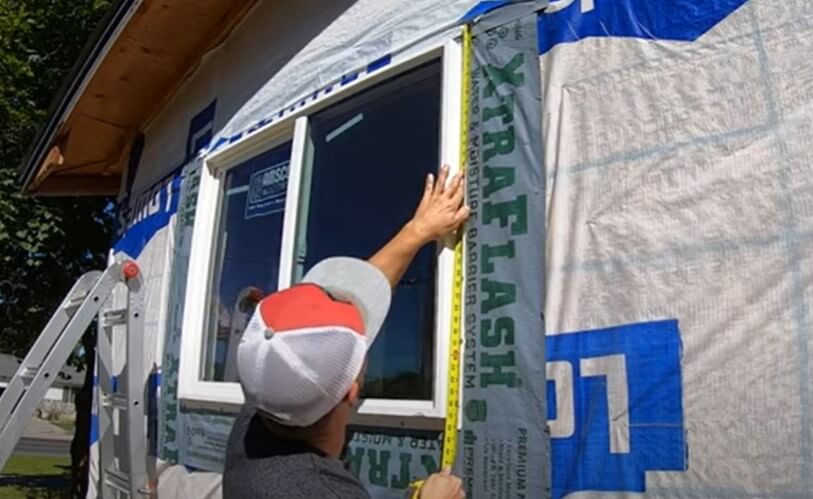
Plan the layout and placement of the trim, considering aesthetics and functionality. Determine the placement of joints, miters, and any additional decorative elements.
This planning stage will help you visualize the final result and ensure a cohesive and harmonious trim installation.
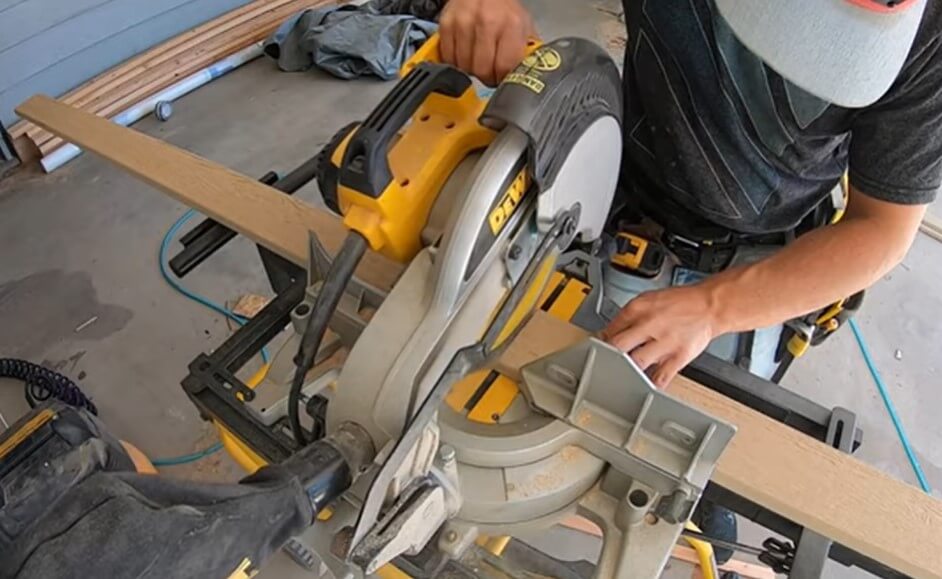
Cut the trim according to the measurement taken using a circular or miter saw available in your hand.
4. Surface Preparation
Prepare the surfaces where the trim will be installed. Remove any existing trim or materials that are damaged, decayed, or no longer serving their purpose.
Clean the surfaces by removing dirt, debris, loose paint, or other contaminants. If needed, sand the surfaces to create a smooth and even base for the new trim.
5. Priming and Painting
To protect the trim and enhance its longevity, consider applying a primer before installation. Primer helps seal the wood and creates a strong bond with the paint or stain, ensuring better adhesion and durability.
Choose a primer that is specifically formulated for exterior use.
After priming, apply a suitable paint or stain to the trim. Select a high-quality exterior-grade paint or stain that is resistant to weather conditions, UV rays, and moisture.
Apply multiple coats as needed, following the manufacturer’s instructions, to achieve the desired finish and protection.

6. Trim Installation
With all the necessary preparations complete, it’s time to install the exterior trim. Use appropriate fastening methods, such as a finish nailer or screws, to securely attach the trim to the substrate.
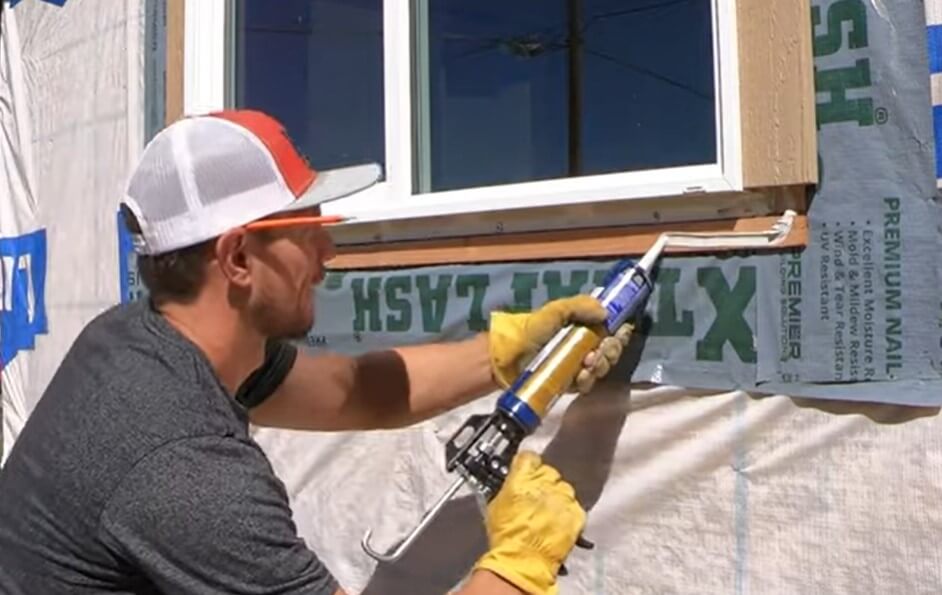
Apply liquid nails using a caulk gun for more secure fastening.
Follow the planned layout, ensuring proper alignment, spacing, and joint connections.
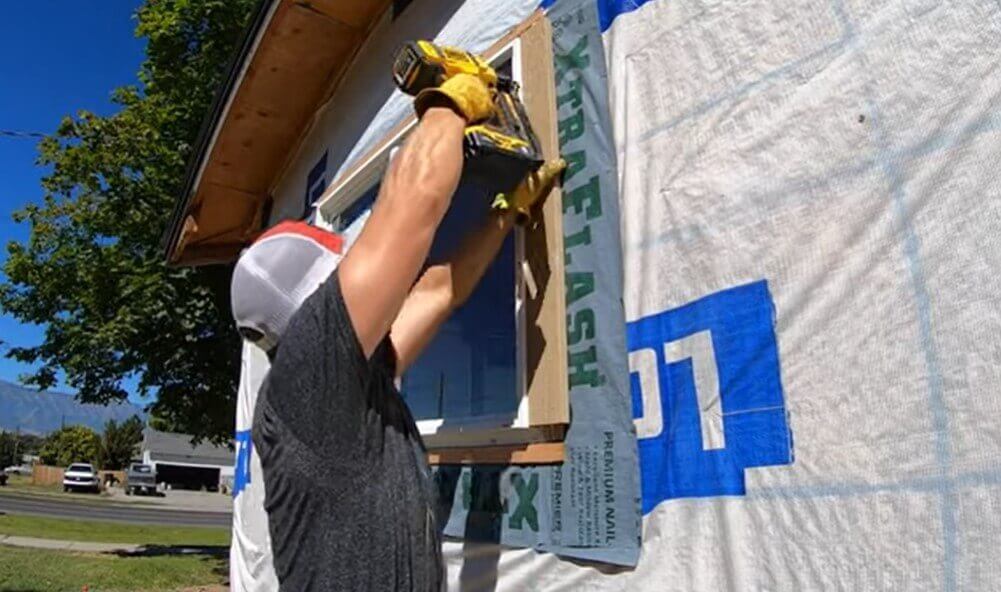
Take care to avoid overdriving nails or damaging the trim during installation.
7. Finishing Touches and Maintenance
Once the trim is installed, inspect the work for any imperfections or gaps. Fill gaps or seams with caulk or wood filler, ensuring a seamless and weather-resistant finish.
Touch up the paint or stain as needed to achieve a uniform and polished appearance.
Regular maintenance is essential to preserve the integrity and beauty of the exterior trim. Monitor for any signs of damage, rot, or deterioration over time. Perform routine inspections, cleanings, and touch-ups as necessary to keep the trim in optimal condition.
By following these preparation steps, you can ensure a well-executed and durable exterior trim installation.
Taking the time to plan, gather the right materials, and properly prepare the surfaces will contribute to the overall success and longevity of your exterior trim work.
Techniques for Using a Finish Nailer for Exterior Trim
Using a finish nailer for exterior trim requires proper technique and attention to detail to achieve precise and secure results.
Here are some essential techniques to follow when using a finish nailer for your exterior trim projects:
1. Choose the Right Nail Size and Type
Select the appropriate nail size and type based on the thickness of the trim material and the substrate it will be attached to.
The length of the nail should be sufficient to penetrate both the trim and the substrate without protruding through the opposite side.
Additionally, opt for corrosion-resistant nails, such as galvanized or stainless steel, to ensure durability and resistance to outdoor elements.
2. Set the Air Pressure
Adjust the air pressure on your pneumatic finish nailer to ensure proper nail penetration without damaging the trim or substrate.
Too much pressure can cause the nail to sink too deeply, while too little pressure can result in nails that don’t penetrate fully.
Refer to the manufacturer’s instructions for recommended air pressure settings based on the specific nailer model and nail size.
3. Practice Proper Nailer Placement
Position the finish nailer at the appropriate angle and distance from the edge of the trim to achieve secure fastening without splitting or damaging the material.
Aim to place the nail at the thickest part of the trim to ensure a solid connection.
Avoid placing nails too close to the edge, as this can lead to splitting.
4. Use a Nail Set
After driving the nail into the trim, use a nail set to recess the nail slightly below the surface. This technique allows you to create a clean and seamless finish by eliminating any visible nail heads.
Take care not to sink the nail too deep, as it may weaken the hold or cause damage to the trim.
5. Fill Nail Holes
Once all the nails are set, inspect the trim for any visible nail holes. Fill the holes with an appropriate wood filler or putty that matches the trim material.
Smooth the filler with a putty knife, ensuring a flush and seamless surface.
Allow the filler to dry completely before sanding and finishing the trim.
6. Practice Consistent Nail Spacing
Maintain consistent nail spacing throughout the trim installation to achieve an aesthetically pleasing and balanced look.
Evenly spaced nails contribute to the overall structural integrity of the trim and reduce the risk of warping or movement over time.
Use a measuring tape or a nail spacing guide to ensure consistent spacing between nails.
7. Consider Pre-Drilling
In some cases, especially when working with hardwood or delicate trim materials, pre-drilling pilot holes may be necessary. Pre-drilling helps prevent splitting and damage to the trim during nail insertion.
Use a drill bit that matches the size of the nail shank to create pilot holes at appropriate intervals along the trim.
This technique is particularly useful when working near the trim edges or in areas prone to splitting.
8. Practice Safety Precautions
Always prioritize safety when using a finish nailer for exterior trim work. Wear safety goggles to protect your eyes from flying debris and gloves to safeguard your hands.
Additionally, ensure that the work area is well-lit and clear of any potential hazards.
Familiarize yourself with the specific safety guidelines outlined in the manufacturer’s instructions for your particular finish nailer model.
By implementing these techniques, you can effectively and safely use a finish nailer for your exterior trim projects. Proper nail selection, precise placement, and attention to detail will help you achieve professional-quality results and ensure the durability and longevity of your exterior trim installation.
How To Install Exterior Trim With A Finish Nailer [Video]
Troubleshooting Common Issues
While using a finish nailer for exterior trim can yield excellent results, you may encounter some common issues during the process. Understanding how to troubleshoot these issues will help you overcome them and achieve a successful trim installation.
Here are some common problems and their troubleshooting solutions:
1. Nail Head Protrusion
Issue: The nail heads are protruding above the surface of the trim, causing an uneven finish.
Solution: Adjust the air pressure on your pneumatic nailer to ensure proper nail depth. If the nail heads are protruding, decrease the air pressure.
Conversely, if the nails are not sinking deep enough, increase the pressure gradually until achieving the desired result.
It may be necessary to test the pressure on a scrap piece of trim before proceeding with the actual installation.
2. Nail Splitting the Trim
Issue: The trim is splitting or cracking when the nails are driven in.
Solution: Pre-drilling pilot holes can help prevent splitting, especially when working with hardwood or delicate trim materials.
Use a drill bit that matches the size of the nail shank to create pilot holes before driving in the nails.
Ensure that the pilot holes are slightly smaller in diameter than the nails to provide a secure grip.
3. Nails Not Holding
Issue: The nails do not provide sufficient holding power, causing the trim to become loose or detach.
Solution: Ensure that you are using nails of an appropriate size and type for the trim material and substrate. Thicker and longer nails generally offer stronger holding power.
Consider using adhesive in conjunction with the nails to enhance the bond and stability of the trim. Apply a suitable construction adhesive to the back of the trim before attaching it to the substrate.
This will provide added strength and reduce the reliance solely on nails.
4. Trim Splitting Near Nail
Issue: The trim material is splitting or cracking near the nail, compromising its integrity.
Solution: Ensure that you are placing the nails at the thickest part of the trim to avoid splitting. Avoid placing nails too close to the trim edges, as these areas are more prone to splitting.
If splitting occurs despite proper nail placement, consider using a slightly thicker gauge nail or pre-drilling pilot holes to reduce the risk of splitting.
5. Difficulty Sinking Nails
Issue: The nails are not sinking fully into the trim, leaving the nail heads protruding.
Solution: Check the air pressure of your pneumatic nailer and adjust it accordingly. Insufficient air pressure can result in nails that do not penetrate deep enough. Increase the pressure gradually while testing on a scrap piece of trim until achieving the desired nail depth.
Additionally, ensure that the nailer’s tip is making proper contact with the trim surface, as improper contact can hinder the nail’s penetration.
6. Jammed Nailer
Issue: The finish nailer becomes jammed, preventing the nails from feeding or firing correctly.
Solution: Clear any debris or obstructions from the nailer’s magazine or firing mechanism. Disconnect the nailer from the air supply and follow the manufacturer’s instructions to safely clear the jam.
Regularly clean and lubricate the nailer as recommended by the manufacturer to prevent jamming and ensure smooth operation.
7. Uneven Nail Spacing
Issue: The spacing between nails is inconsistent, resulting in an unbalanced and unprofessional appearance.
Solution: Use a measuring tape or a nail spacing guide to maintain consistent spacing between nails. Mark the desired nail locations on the trim before driving them in.
Taking the time to measure and mark the spacing will help ensure an even and aesthetically pleasing result.
By troubleshooting these common issues and applying the appropriate solutions, you can overcome challenges and achieve a successful finish nailer experience.
FAQs For Can You Use A Finish Nailer For Exterior Trim
Can you use a finish nailer for exterior trim?
Yes, a finish nailer can be used for exterior trim, but it is important to ensure that the nailer and nails are designed for outdoor use and will not rust or corrode over time.
What gauge finish nails for exterior trim?
When it comes to choosing the right gauge finish nails for exterior trim, it is important to consider the thickness of the trim and the type of material being used.
Generally, 15 or 16 gauge finish nails are recommended for most types of exterior trim, including wood and PVC. These gauges provide enough strength and stability to hold the trim in place without causing damage or splitting.
It is also important to use stainless steel or galvanized finish nails to prevent rust and corrosion, which can weaken the nails over time.
What finish nails to use on exterior trim?
When working on exterior projects, it is important to use the correct type of finish nails to ensure durability and longevity.
Stainless steel or galvanized finish nails are recommended for use on exterior projects, as they are resistant to rust and other weather-related damage.
It is also important to choose the appropriate length and gauge of the nail for the specific project at hand.
Can I use brad nails for exterior trim?
Brad nails should not be used for exterior trim. The thin gauge of brad nails (18 gauge) can easily bend or break, causing the trim to come loose over time.
Moreover, brad nails do not have the holding power necessary for the exterior trim, which is subject to harsh weather conditions and constant exposure to the elements.
It is recommended to use corrosion-resistant screws or nails specifically designed for exterior use, such as galvanized or stainless steel, to ensure a long-lasting and secure installation.
What is the difference between a finish nailer and a brad nailer for door trim?
A finish nailer and a brad nailer are both used for installing door trim, but they differ in several ways.
A finish nailer uses thicker and longer nails, typically between 15 and 16 gauge, making it suitable for larger, heavier trim pieces. In contrast, a brad nailer uses thinner and shorter nails, usually 18 gauge or smaller, making it ideal for smaller and more delicate trim pieces.
Additionally, finish nailers have a larger magazine capacity and greater driving power, enabling them to handle more demanding tasks like attaching baseboards, crown molding, and casings. On the other hand, brad nailers are more suited for precision work that requires a lighter touch like door casing and shoe molding.
Ultimately, the choice between a finish nailer and a brad nailer depends on the specific requirements of the job at hand.
Conclusion
In conclusion, utilizing a finish nailer for exterior trim can be a highly efficient and effective method for achieving professional-quality results. By following the techniques outlined, such as selecting the right nail size, practicing proper nailer placement, and employing consistent spacing, you can ensure a secure and visually appealing trim installation.
While it is essential to troubleshoot common issues that may arise, such as nail protrusion or splitting, the solutions provided can help overcome these challenges and achieve a successful outcome.
With proper preparation, attention to detail, and adherence to safety guidelines, using a finish nailer for exterior trim can streamline the installation process and contribute to the durability and aesthetic appeal of your exterior trim work.
Related Posts:
- Finish Nailer Vs Framing Nailer: Which Is Good For What?
- How To Install Quarter Round Molding?
- How To Install Chair Rail Without A Nail Gun?
- Can You Use A Brad Nailer For Shiplap?
- Can You Use A Brad Nailer For Roofing?
Recent Posts
Woodworking is one of the most rewarding hobbies and professions, but it also comes with serious risks if proper precautions are not taken. Whether you're working with a table saw, planer, or simple...
What to Use If You Don't Have a Brad Nailer: Handy Alternatives
You can use a hammer and finishing nails paring with nail set or wood glue if you don't have a Brad Nailer. These tools effectively secure trim and small woodworking projects. So, if you’re in...